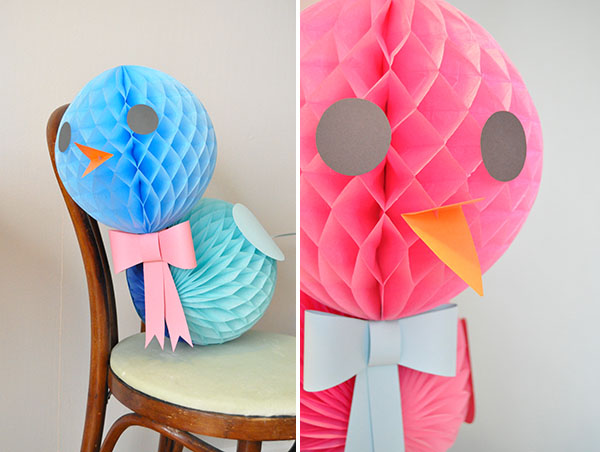
Do you love honeycombs as much as I do? With Easter right around the corner, I spotted egg-shaped honeycombs at Target and thought they would be perfect for making these springy bird decorations! Make a few and hang them around a dessert table this Easter – and once Easter is over, wouldn’t they be fun for a baby shower too?
Supplies: Scrap cardboard, one 14″ honeycomb egg, one 10″ honeycomb ball, assorted card stock, masking tape, hot glue gun
, pencil, scissors, craft knife
, string
, ruler
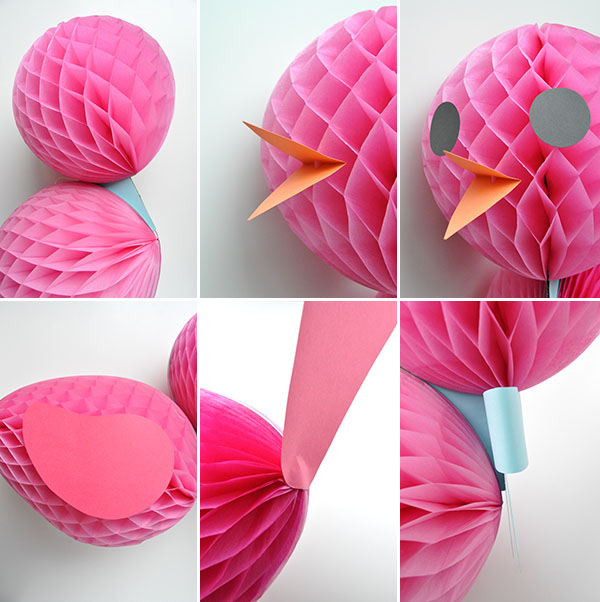
Step 1: Using card stock that matches the head and body of your honeycombs, cut two wings about 8″ long and one tail about 8″ from base to each tip. Cut two black circles about 2″ in diameter and finally one orange diamond about 5″ long. Fold the diamond in half and cut a small 1/2″ slit perpendicular to the fold.
Step 2: Cut off any string loops on the honeycombs. On a flat surface open them halfway and arrange where you’d like the bird’s head in relation to the body.
Step 3: Keeping the honeycombs as you just arranged them, fold them back closed as pictured. Cut a piece of cardboard in an L shape – the corner of it will extend past the curves of the honeycombs, but the ends should not.
Step 4: Cut and glue down two pieces of card stock for both sides of the exposed cardboard corner – use the color you want the bird’s neck bow to be.
Step 5: In the same color of card stock, cut the pieces for your bow. Cut two 1″ by 5″ strips with triangle cut-outs for the tails, one 11″ long strip that is 1 1/4″ on the ends & middle and then curves out to 2″, and one 1″ by 5″ strip for the center knot.
Step 6: Hot glue the both ends of the 11″ long piece to the center. Wrap the plain 1″ by 5″ strip around the center to hide the seam – trim any extra length. Hot glue the two 5″ long tails on the back of the knot, as pictured.
Step 7: Attach the cardboard L back in place on the two honeycombs using masking tape – tape is best for this because it allows you to adjust the head/body placement.
Step 8: Use masking tape to attach a piece of string onto the cardboard L – when the string it pulled taught upwards, it should touch the outer curve of the honeycomb head.
Step 9: Fully open up the honeycomb balls and use masking tape and/or hot glue to keep open. Make sure the string isn’t caught on the inside of the body.
Step 10: Attach the beak to the face by gently wedging the cut slit onto a tissue paper joint. You can adjust this until you are happy with the placement.
Step 11: One at a time, apply hot glue in a squiggle over the backs of the card stock eyes and gently attach onto the honeycomb, holding in place for a few moments.
Step 12: Do the same for both wings, holding both ends of the wings down to be sure they adhere.
Step 13: Curl 1″ of the base of the card stock tail slightly, apply hot glue to the curl, and attach to the end of the honeycomb egg – to be sure the tail is well-supported, attach where the two thin cardboard layers of the honeycomb egg touch.
Step 14: Apply a line of hot glue to the edge of the card stock-covered cardboard and attach the bow. Hang from the ceiling using several pieces of heavy-duty masking tape or tie a loop in the string and hang from a hook.


Heather
April 10, 2014
So cute! These would be perfect for a baby shower!!
Jen
April 10, 2014
I love the color of the blue one! Going to make these this weekend!
Emily
April 10, 2014
these are so adorable!
Heidi
April 10, 2014
I love these, Kathleen!!
Lindsey
April 14, 2014
Oh my goodness, these are just the sweetest! What an adorable idea! Just love them!
April
April 14, 2014
Absolutely charming!