It’s baby shower season again! I thought it would be fun to put together some baby shower favors. I love hosting baby showers because it’s usually not a large party and you can put thought and care into the details and everyone notices! For these projects I used supplies I keep on hand from Paper Mart. They are my favorite source of supplies and ribbon for this kind of thing.
Baby Block Boxes
I love the idea of spelling out something in baby blocks and making it part of the party decor. Then guests can pick up a box of treats as they leave.
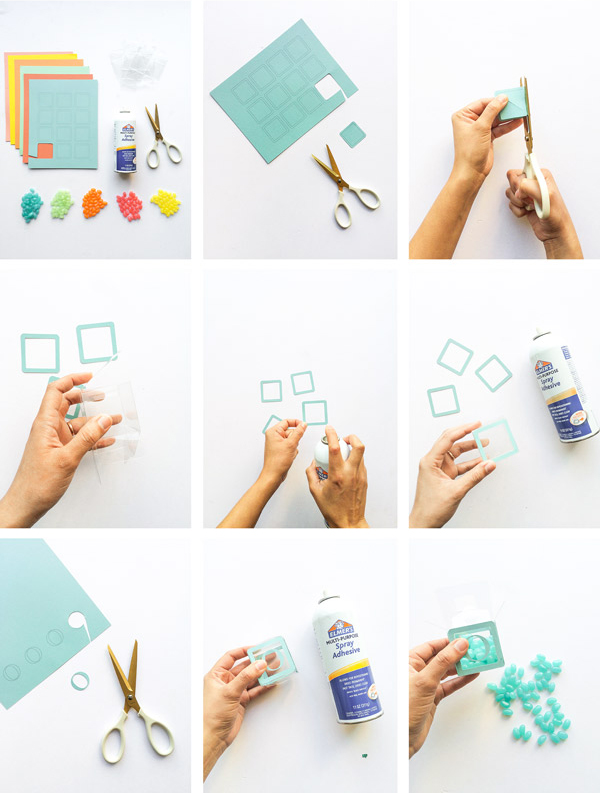
Materials: Colored Paper, Baby Block Template, Clear Plastic Boxes, Scissors or X-acto Knife, Spray Glue, Jelly Beans
Step 1: Print out the Baby Block Template. Trace out and cut the small squares.
Step 2: Assemble your plastic boxes.
Step 3: Use spray glue to attach the squares to the plastic boxes.
Step 4: In the same color as the squares, cut out letters to spell “Oh Baby!”
Step 5: Attach the letters to the boxes with spray glue.
Step 6: Fill with candy.
Rainbow Treat Bags
These treats also work as pretty decorations. We just used a large sheet of homasote from the hardware store and wrapped it in fabric. I love that you can make it any color theme you want.
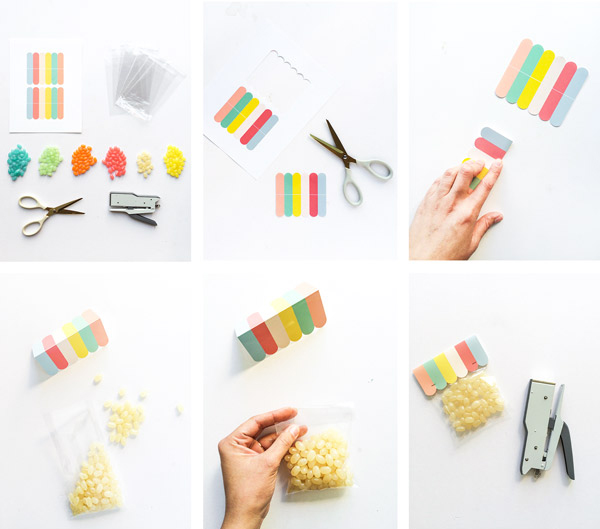
Materials: Rainbow Awning Template, Cellophane Bags, Rainbow Jelly Beans, Scissors, Stapler, Pins
Step 1: Print and cut out the Awning Template.
Step 2: Fold in half.
Step 3: Fill your cellophane bags with candy.
Step 4: Fold over the top portion of the bag and attach the Awning tag.
Step 5: Staple in place.
Step 6: Use push pins to display on a board.
French Flag Treat Bags
I did a version of these French Flag favors for my friend’s baby shower. They’re so easy to make and really sweet.
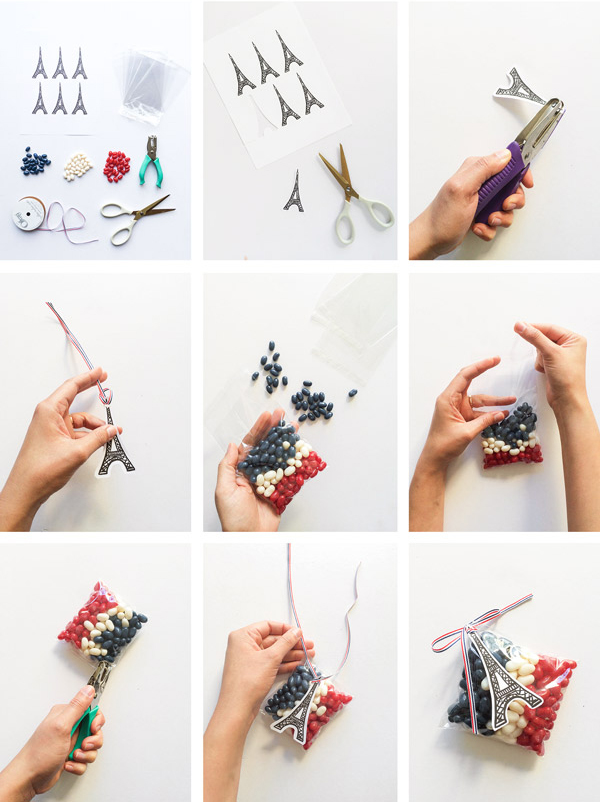
Materials: Eiffel Tower Tag Template, Cellophane Bags, Red, White & Blue Jelly Beans, Hole Punch, Red, White & Blue Ribbon, Scissors
Step 1: Cut out the Eiffel Tower tags.
Step 2: Punch a hole in the top of the Eiffel Tower.
Step 3: Attach a piece of ribbon to hole in the tower.
Step 4: Fill the bag with a layer of red jelly beans. Repeat with a layer of white and a layer of blue.
Step 5: Fold over the bag and use the adhesive to attach the top of the bag to the bottom.
Step 6: Punch a hole in the top corner of the bag.
Step 7: Thread the ribbon (with the tag) through the hole in the bag.
This post is sponsored by Paper Mart. My favorite resource for packaging and craft supplies.
Crafting, Styling and Photos by Andrea Ramirez
Art Direction by Amy Moss


carla
October 5, 2015
It’s great a idea for any themed party!
http://www.motownsavvy.com
Michelle
October 5, 2015
I like the idea with the boxes best, but the Paris themed favor can be used on so many occasions! Thanks for this DIY!
http://www.makeandmess.com/
Three Cheers + Co.
October 5, 2015
Love the alphabet block favor boxes! Such a cute idea!