


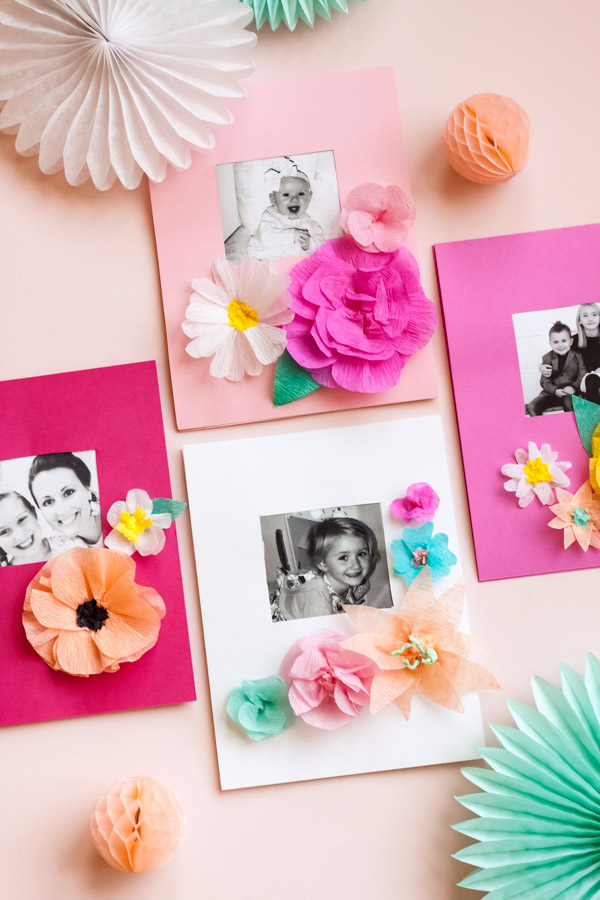
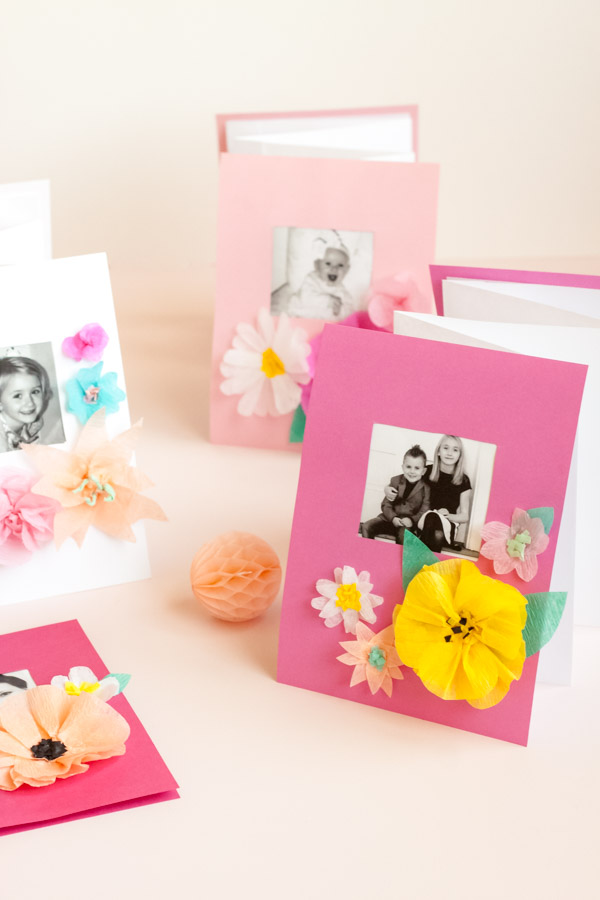
Moms deserve something extra thoughtful this Mother’s Day, as they have been “momming” in overdrive for the last couple months! Grandmas are probably longing for time with the kids, and would love to receive something to remind them of their favorite people. Why not make some beautiful, flower-adorned accordion cards for Mother’s Day, to use as a keepsake with the kids’ latest pieces of art! Drawings really accumulate, and it is nice to have a place to display all the favorites. It would also make the perfect mini photo album, journal, or scrapbook. There is plenty of time to make this thoughtful, handmade card, so read on for the details…


Materials Needed: cardstock, copy paper, glue stick, glue, pencil, straight edge, craft knife, scissors, streamers, photos, kids’ artwork (or copies of art), tape

Step 1: Cut two pieces of cardstock to 5.5” x 7.25”.
Step 2: Use your straight edge to pencil in a 2.5” x 2.25” rectangle 1.75” from the top of one piece of cardstock, and 1 ½” from the sides. Use your craft knife and straight edge to cut out the rectangle.
Step 3: Cut four pieces of copy paper down from 8.5” to 6.625” wide. Make a fold in a sheet of the copy paper 5” from the end. You may use your cardstock to help measure and make the fold. Make another fold 5” from the first fold, but in the opposite direction. Repeat this step on your second, third and fourth sheet of copy paper, and then cut off the short flap on only ONE of your sheets. (It will be about 7/8” cut off). Glue one of your sheets with the 7/8” flap remaining, to the sheet that you cut down using the flap to hold the two together. Make sure each fold is going the opposite direction of the one next to it. Glue the final two sheets with the flaps, to the ends of the other sheets, making sure the folds are alternating.
Step 4: You may either tape a photo to the back of your cardstock frame, or slide in a 4×6 photo at the end. Next, glue two sides and the bottom of your cardstock frame to the first page of your “accordion” sheets, leaving the top opened for sliding in a photo. Keep your accordion folded, and glue the plain piece of cardstock to the back of the book.
Step 5: Fold small pieces of streamers into an accordion, and cut out different flower petal shapes as seen in photo 5 of the tutorial. Many of the petals will be folded in half slightly at the ends, and then glue the ends together, or ruffle the pieces together with glue depending on the flower style. You may cut some yellow and black streamers into very tiny squares, and glue a pile of them into the centers of some of the flowers. You can also roll up longer pieces of a light green or yellow shade to place in the center, or cut a streamer into tiny strips, and fold the strips in half.
Step 6: Arrange some of your streamer flowers on the cover of your accordion book, and glue them down. If you haven’t already, slide a photo behind the cover. Now you are ready to add kids’ artwork, photos, notes, or leave it blank for Mom or Grandma to journal or scrapbook.

Flower Tutorials (L to R, and Top to Bottom)
Flower 1: Cut out longer, yellow petals with a little wave in the top. Pull each petal together at the bottom, almost creating an accordion fold. Glue the petals together at the bottom, arranging them in a circle and adding glue as you go around. Create a second layer on top of the first one, and add a small circle of glue to the top and middle of the flower. Sprinkle a pile of tiny black and yellow streamer pieces, and shake off any excess.
Flower 2: Cut a petal that resembles a heart with a flat bottom. Pinch each petal together at the bottom, and glue the ends together in a circle. Create a second layer behind a couple of petals. Add pink streamer pieces to the center.
Flower 3: Cut your streamer into long triangles with curved sides. Pinch each petal together at the bottom, and arrange the petals in a circle, gluing them together at the ends. Really pinch this one together in the center. Either add tiny streamer “sprinkles” in the middle, or roll streamers up a bit, cut them in half, and glue them to the center so that they are sticking up.
Flower 4: Cut out boxy petals with a slightly narrow bottom, and curved corners. Only bunch the petals together slightly on the bottom, and then glue them in a circle. Create a second, and possibly third layer. Glue tiny black streamer sprinkles in the center.
Flower 5: Create some wide, boxy petals for the bottom layer, and smaller, curvy petals for the top layers. You may want three different sizes. Pinch the largest petals together at the bottom and glue them in a circle. Add the medium sized petals for the middle layer, and glue the smallest petals to the top. Layering is key for this look.
Flower 6: The daisy has long, skinny petals. Glue a couple of layers in a circle, and pinch them all together in the middle, and then add yellow streamer sprinkles in the center.
Flower 7: Create a basic, short and round petal with a slightly flatter end, and gather your petals at the bottom, gluing them together. For the larger version in pink, continue to add layers of petals, pinching them together more in the middle, and leaving them loose on the outer layers.
Flower 8: The white flower uses a small, rounded petal, and the pink petals are slightly longer and skinnier. Glue two layers of each white petal together at the bottom in a circle. Cut tiny strips of yellow streamers, and then fold each strip in half, gluing them to the center of the white flower. You may add a leaf to the bottom as well. Glue the pink petals together at the bottom, creating two layers. Use tiny strips of mint green streamers folded in half for the center. This one also looks good with a leaf.
Flower 9: These petals are more rectangular with a narrow end. Make the wider end wavy at the top. Pinch each petal together at the bottom, and glue the pinched ends together in a layered circle. Add a mix of orange and peach streamer sprinkles to the center.


Crafting and photography by Abby Hunter.


Rakesh Kumar
May 6, 2020
Great to see this such a nice DIY article. Thank you so much for sharing this.
Moms deserve a nicely handcrafted card! Thanks for the great inspiration.
JADUI KAHANIYA
May 10, 2020
Very nice post
Sad images in LOVE
May 12, 2020
Very nice post, I liked it.
Khushi Rahman
May 13, 2020
Nice Pictures. Great to see this such a nice DIY article. Thank you so much for sharing this.
liyana anam
May 13, 2020
Happy Mother’s Day Everyone.
Reza Hossain
May 13, 2020
I love you so much mom
Faisal
May 14, 2020
I love the images too in this so motherly article. great job.