


I’m excited to have a column here where I’ll share one-of-a-kind projects I create for friends & family. My favorite kinds of craft projects are the ones custom-made for someone specific in mind. I hope my ideas will inspire you to make something special for the ones you love.
Since my nephews were little, I’ve been making the party favors for all their birthdays. As a designer, it’s a challenge I relish: coming up with something cool but inexpensive, kid-approved but not gross-looking, and all within whatever theme the boys pick. Over the years, they’ve had some fun parties — like a Batman party (I turned my nephew’s favorite snack at the time — boxes of raisins — into the masked superhero), a Minecraft party (I created these DIY Lego zombie kits), and my favorite, a president-themed party (the kids got a card of coins and fig bars that looked like Obama).
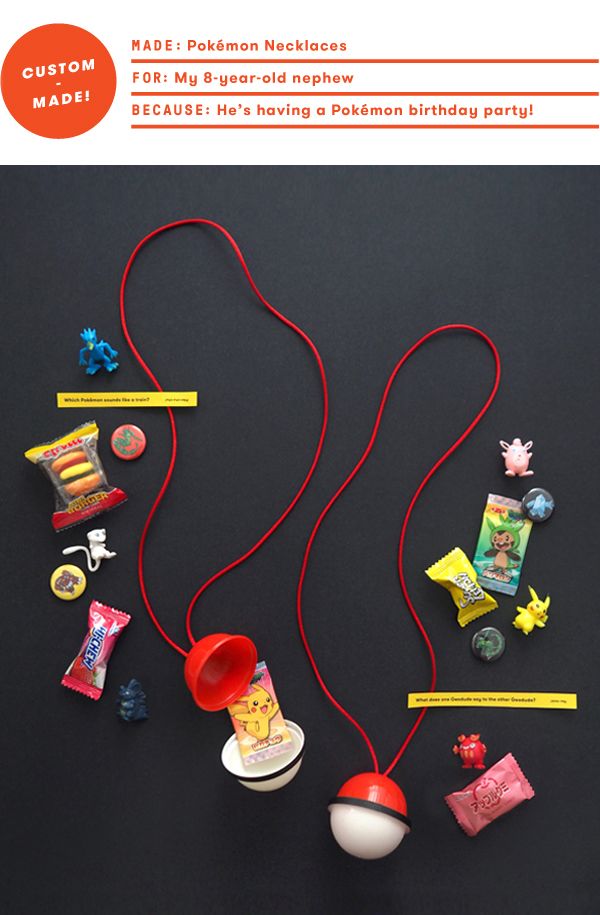
This year, my nephew is obsessed with Pokémon (as most 8-year olds seem to be these days). For his birthday party, I made these necklaces that look like Pokéballs. (They are a play on one of the projects in my craft book, Make & Give). These are fun to make because you can fill them with whatever small surprises you’d like (I filled these with candies, mini Pokémon toys, jokes and buttons). And after all the treats are eaten, the kids will keep playing with the necklaces.
(Continue to find out how to make them!)

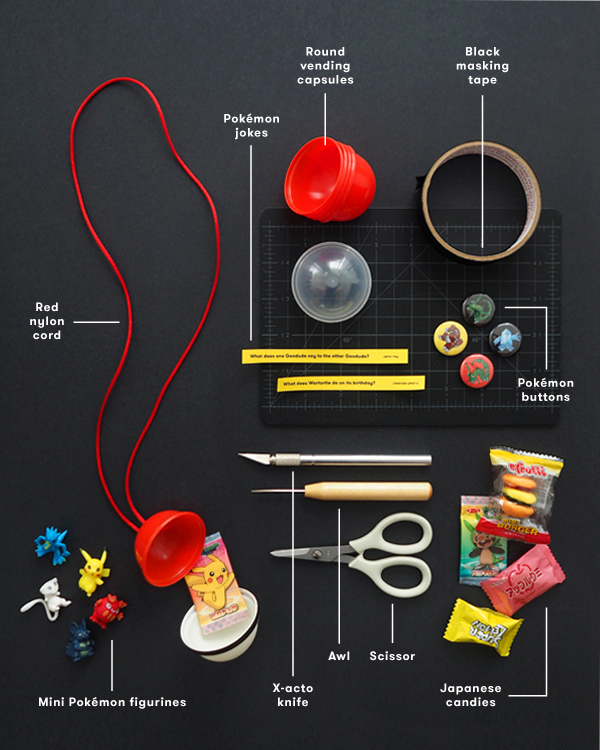
Materials needed: 2” round vending capsules (I requested red caps from the eBay seller), nylon cord (I use 2mm red rattail cord), black masking tape, awl, self-healing cutting mat, ruler, x-acto knife, scissors, white spray paint, small surprises (candies, toys, jokes, buttons)
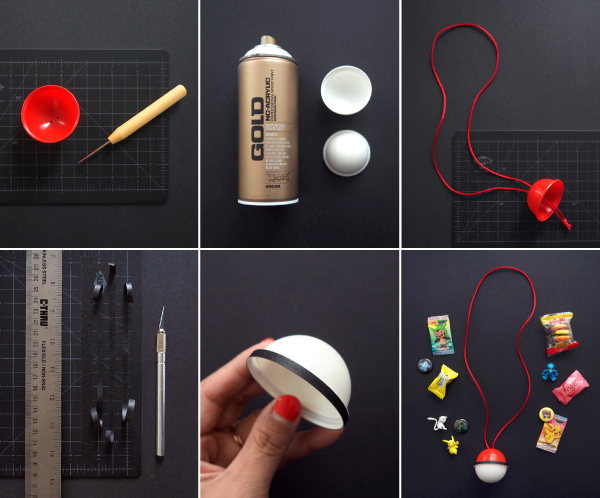
Step 1: Place the colored capsule lid on the self-healing mat, and carefully puncture the lid with your awl to make two small holes, 1/4” apart on the top center of the lid. Push the awl all the way in to make sure the holes are wide enough for the cord to go through.
Step 2: Spray paint the insides of the clear capsule bottoms white, and let them completely dry. (Tip: use a little bit of tape to stick the bottom of the capsule to the surface you’re spray painting on, so the capsule stays put while you spray it.) Painting the capsule bottoms white will definitely make the necklaces look more like Pokéballs; but you can totally to skip this step to keep things more simple! The necklaces will look great with clear bottoms too.
Step 3: Cut a 30” piece of nylon cord for the necklace. Thread the ends through the holes of the lid and make a knot on the inside.
Step 4: Cut a 7 1/2” piece of black masking tape and stick it to your self-healing mat (putting it on the mat makes it easily removable). Use a ruler and x-acto knife to cut 1/2 cm wide strips from the piece of tape.
Step 5: Adhere the black tape strip to the bottom lip of the white painted capsule.
Step 6: Fill the capsule with little surprises. Here are some ideas of treats to include:
- Candy from the Asian grocery store (like this, this or this, to go with the Japanese Pokemon theme, but any small, individually wrapped candies would work)
- Pokemon chewing gum (these are harder to get online, but I’ve found them in the candy aisle of Japanese grocery stores)
- Mini Pokemon figures (the quality of these are never that great, but kids find them fun to play with)
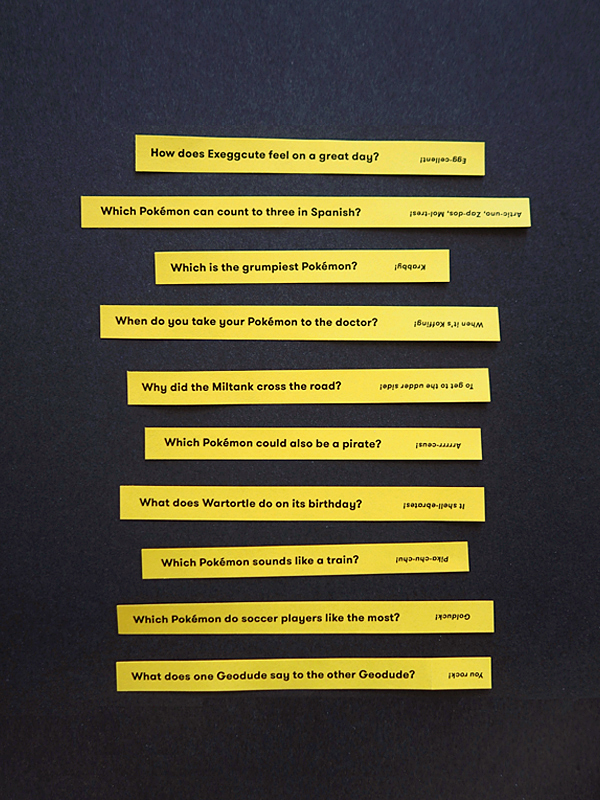
- Pokemon jokes (I designed a sheet you can download and print here. I folded back the answer part, then rolled the strip to fit into the capsule.)
- 1” buttons (I made my own with my nephew’s favorite characters, but these are similar)
- Pokemon stickers, temporary tattoos or erasers (just make sure they’re small enough to fit in your capsules)

Enjoy!


Heather
April 10, 2017
This is adorable! Love this idea!
Megan Hemphill
April 10, 2017
Why am I not this creative? I totally could have used this a couple of years ago when my son was in his Pokémon stage!!
Indya | TheSmallAdventurer
April 11, 2017
I love this so much! I’m 21 this year and still love Pokemon as much as I did when I was younger. In fact, I own way more Pokemon stuff now than when I was a kid!
I can’t imagine how fun it must be to have someone as creative as you in the family. Your nephew is going to have some great memories to look back on thanks to you! ☺️
http://www.thesmalladventurer.blogspot.com.au/
Kate Lately
April 11, 2017
I love this idea! My nephew turns 6 in June and I’m sure he’d love a Pokemon theme..I’ll have to share this with my sister!
http://www.katelately.co
super mario world
April 12, 2017
I totally could have used this a couple of years ago when my son was in his Pokémon stage!!