


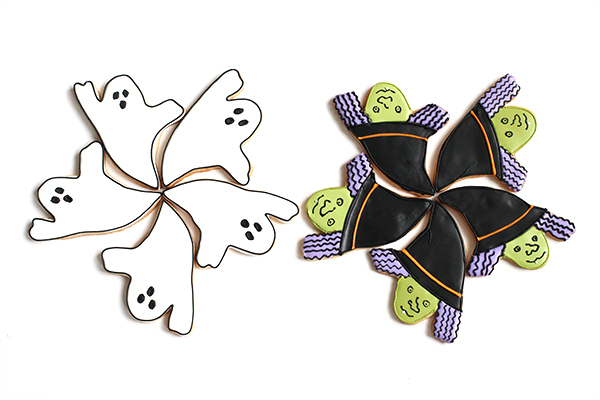
Here is a trick AND a treat in one cookie! The trick is that you can make a ghost and a witch using only one cookie cutter. The treat that you end up with is a fun and delicious Halloween cookie to share with your family and friends. Put your imagination to the test and see if you can find any other ways to use this shape! (Hint: Indian corn or sleeping cat from my book, You Can’t Judge a Cookie by Its Cutter).


Materials needed: ghost shaped cookie cutter, sugar cookie dough (my recipe here) prepared, chilled and rolled out, royal icing in black, white, orange, green, and grayish purple, pasteurized egg whites, plastic or parchment paper piping bags (I use parchment paper), pastry tips #1.5 or #1, small and medium paintbrushes, several small bowls.

Step 1: Make the cookies:
Use the ghost cookie cutter to cut out shapes from the rolled out dough. Place on a parchment lined cookie sheet and bake at 350°F until the edges are slightly brown, about 8-10 minutes. Let cool completely.
Step 2: Prepare the icing:
Prepare small bowls of icing in the colors you wish to use, which should include creepy green for the witch’s face, black for the witch’s hat and ghost outline and features, grayish purple for the witch’s hair, white for the ghost and witch’s snaggletooth, and a small amount of orange for the witch’s hat band. Make the colors the consistency of toothpaste and put a little of each into individual piping bags fitted with #1 0r #1.5 pastry tips, which will be used to outline the cookies. You can add all the orange to the decorating bag since you will not need any for filling in. Add a few more drops of egg whites to the remaining bowls, so that the icing is thinned to the approximate consistency of thick maple syrup. This “flooding” icing will be used to paint within the piped outlines. Be sure to cover each bowl of icing with plastic wrap when not in use, so that a crust does not form.
Step 3: Decorate the GHOSTS
Outline the ghost cookie with white icing. In a couple of minutes, when the icing lines have set slightly, use a medium brush to paint in the ghost with the prepared white flooding icing. Let cookies sit for several hours or overnight until the icing is completely hard. When the icing is firm outline the cookie in black. With the same icing outline the eyes and mouth. Let the lines set for a couple of minutes. With a very small brush fill in the eyes and mouth with thinned out black icing.
Step 4: Decorate the WITCHES
Turn the ghost cookie upside down. Using the black piping bag, outline the hat on the witch using the photo as your guide. With the purple piping bag, outline the two areas of frizzy hair. Leaving a very tiny space between the adjacent colors will help insure that they will not bleed into each other. (You can cover the space when you add lines of icing to the cookies.) Next, line the face with green. Using a medium brush, paint in the witches hat with the black flooding icing. With a small brush, paint in the hair with grayish purple flooding icing. With the green flooding icing, paint in the face. Let the cookie sit for several hours or overnight until the icing is completely hard. When the icing is firm, line the hat in black, make black wavy lines on the hair, make the facial features in black, and line the lower part of the face with green. Finally, use the orange to make the band on the hat and the white to make the witch’s snaggletooth. Let the cookie sit for a few minutes until the lines set.
NOTE: If you would like to complete the cookies in one sitting you can eliminate the overnight drying time and just wait an hour or so to add the final lines. You risk having the black bleed into the other colors, but hey, it’s Halloween and that would be kind of spooky!!


Michelle
October 18, 2016
This is such a great idea, and the cookie decoration is perfect!
https://www.makeandmess.com/
Malia
October 19, 2016
So clever! I always lament that I don’t have the right cookie cutter, but it’s probably not true.
Sarah
October 19, 2016
Does anyone have a good Royal Icing recipe?
Aleksandra
October 19, 2016
These are really cute, will probably use em 🙂
Tori
October 21, 2016
Awww, how cute and spooky! Love them!!!!
Caitlin
October 24, 2016
These cookies are the absolute cutest! That’s so clever that you can use the same cookie cutter for both! I love how you designed the witch – that hair and little tooth is beyond adorable!