


Did you see Kathleen’s adorable Matchbox birthday card? Here’s another way to wish someone a Happy Birthday with a bit of a surprise. It’s also an fun greeting to send in the mail!


Materials: Printable Birthday Pull-Card Template, 8.5 x 11 white card stock (I used Epson Ultra Premium Matte Presentation Paper), sheet of plastic (I used the bag from the Epson packaging but a plastic treat bag works well too), craft knife
or scissors, bone folder
, ruler
, permanent glue stick
or glue applicator
, optional 1″ circle punch
Step 1: Print page both pages of the downloadable template on 8.5 x 11 white cover stock or other presentation paper.
Step 2: Using the bone folder, score the the center of the striped card, cut around the edges, and fold the card in half. Using a 1” circle punch or scissors cut or punch out a half circle at the bottom of the card. Cut out the rest of the pieces from page 2 of the printable template.
Step 3: Cut a 1.75” strip of plastic. Make sure it is long enough to wrap around the center track piece with a bit of overlap.
Step 4: Using a glue stick or dispenser, adhere the plastic strip around the track. Make sure it’s a bit loose so it easily moves around the center piece without catching. Cut off any excess plastic.
Step 5: Glue the flame (top piece) to the plastic track so that the printed side faces up. Make sure to glue this piece to the seam of the plastic track. The top of the flame should be flush to the top of the center piece.
Step 6: Turn the center piece over and glue the bottom piece (faced down) onto the plastic flush with the bottom of the center track. Now test it out to see if it works!
Step 7: Glue the moving unit into the card. Maker sure the glue is as close to the outer edge of the center piece as you can get it so the moving parts don’t get stuck.
Step 8: Once the bottom is in place glue down the the top of the card down. Once again make you glue as close to the outer edges of the center track as you can get it.
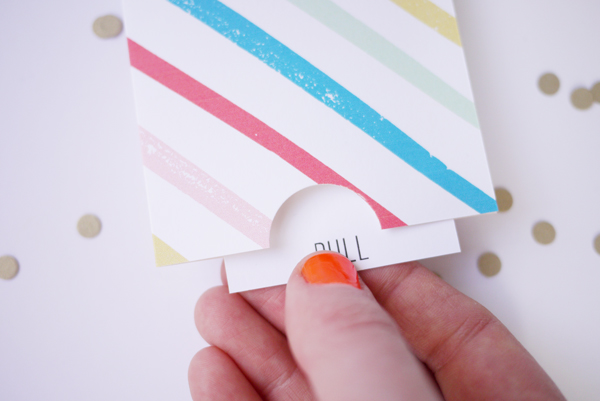
Step 9: Pull the bottom of the card and see the flame pop up. Make a wish!


Kelby
April 2, 2014
This is an ADORABLE DIY…for both kids and adults! I can’t wait to try this!
NewEnglandOutlook.com
Jordan
April 2, 2014
How FUN! Love the pull down!
Cuero&Mør
April 2, 2014
Sweet!! Is a really original diy for make it soon!! 🙂
In our blog we have today and special post about the designer “Alex Proba” with her project “A poster a day”…You´ll love it!! 😉
http://cueroandmorinspiration.com/hemlock-a-poster-a-day/
fathima
April 2, 2014
The printables you come up with blow my mind every time! So fantastically original and just plain awesome, you’re so madly talented. Thanks for sharing!
diana
April 2, 2014
this is so cute! i love making y own birthday cards, its more personalized and people love handmade gifts 🙂
Lisa
April 2, 2014
Love making my own cards!! This looks quite easy!!
L x
http://workingmumy.blogspot.com
Krystal
April 2, 2014
AHH I LOVE THIS! It is so cute!
♥
Krystal | http://www.moorekrystal.wordpress.com
maria
April 2, 2014
una forma diferente de sorprender a tus amigos en sus cumpleaños. gracias por compartir.
besitos
Katie
April 3, 2014
My son’s first birthday is coming up, and our theme is strips (and kazoos because he’s a kazoo maniac). This card would be perfect!… and if I had the time to make more than one, they would be great invites with the details written on the pull flap. Thanks for the idea!
toutsecrée
April 3, 2014
Très bonne idée, comme d’habitude! félicitation aux créatrices
caroline
April 3, 2014
this is an awesome design and idea! thank you for sharing with us your printables. really great work!
https://www.etsy.com/shop/celebratecolours
Renee
April 4, 2014
Very nice idea! Could you explain how you got the textured stripes? Was it done with the computer or by hand?
Hanna
April 11, 2014
WoW!!!
so beautiful and cute….!!!!
I LoVe It