This post is sponsored by Nestlé® Toll House® Morsels, the perfect special ingredient for all of your family’s favorite treats!
Frosting cakes is one of those things that I would love to get better at. My mom would always decorate amazing cakes for our birthdays when I was a little girl and I loved them but I didn’t really inherit that cake-frosting-gene. When I am frosting a cake I usually choose a simple idea in my head how I want it to look but it it never quite seems right. I decided this year I wanted to try to get better at frosting cakes so I asked the talented pastry chef Hope Waggoner to give some easy tips on how to make cakes look perfectly frosted (ps: check out Hope’s awesome tattoo, so perfect-right?) Today’s post is on how to get that perfectly frosted and delicious messy look. Have you ever tried to frost a cake like this? It is harder than you think if you don’t know how. Today Hope is unveiling all the tricks on how to get it perfect.
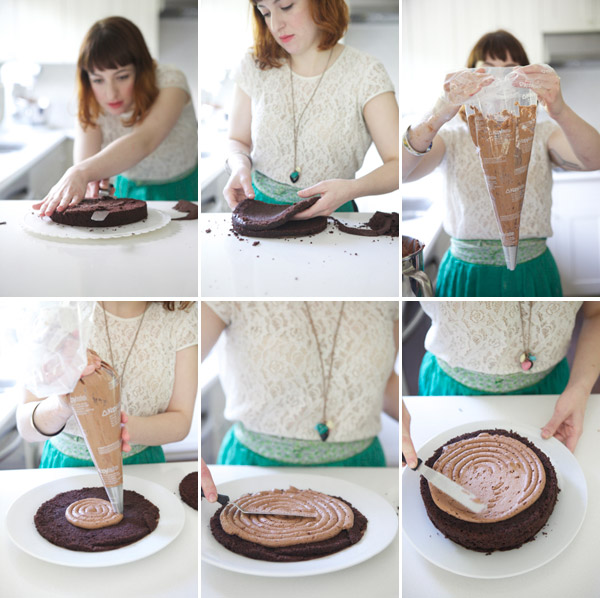
Materials Needed: You can stock up on lots of cake decorating supplies but if you are going to put together a simple cake decorating kit all you really need to frost this cake is: A large Offset Spatula and a heavy duty pastry bag
with large tip
.
Step 1: Bake your cakes using your favorite recipe. (This is my favorite chocolate cake recipe.)
Step 2: After the cakes are baked and have cooled down, put them in saran wrap and put them in the freezer for a few hours. Cooling the cake will make the crumbs way more manageable. (As long as the cakes are wrapped, freezing it will not make a difference in the taste.)
Step 2: Remove the cakes from the freezer and trim off the top with a serrated bread knife (if needed) to create a perfectly flat layer. I prefer tall cakes which means I usually make 3-4 layers and sometimes I cut those in half to create even more layers.
Step 3: Put down the first layer of cake and taking a pastry bag of frosting create a nice even layer of frosting. Take an offset spatula and spread out the frosting about 1″ before the edge. Repeat until all the layers are in place.
Step 4: Create a crumb layer. This layer will seal in all the crumbs before you are ready to decorate your cake. Using the large offset spatula tarting at the top of the cake and then working down the sides, create a thin and smooth layer of frosting over the entire cake. Put it in the refrigerator until the frosting sets. (About 30-60 minutes.)
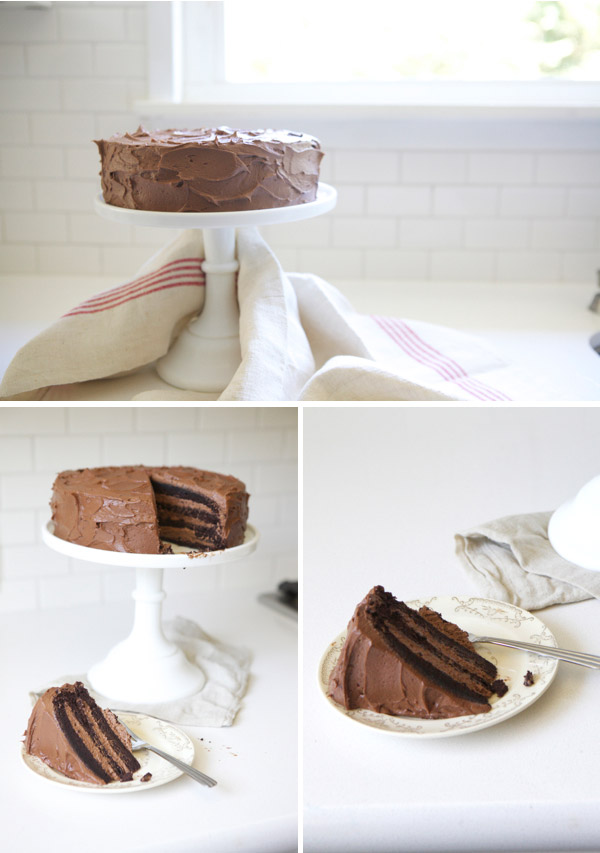
Step 5: Now it’s time to frost! For best results it’s important to work with cold cake and room temperature frosting. To create that perfectly messy frosting look pile on a very very thick layer of frosting with your offset spatula. The secret to get it right is there must be a deep layer of frosting to create the texture and swirls that make it look so good. Once your thick layer of frosting is on, take the back of a spoon and begin making swirls and crests in the thick layer of frosting. Continue until the whole cake looks swoop-y and delicious.


LARY@ Inspiration Nook
August 30, 2012
This loos incredible! I might have to attempt to make this on the weekend. Yum!
Giulia
August 30, 2012
Thanks for the pointers on freezing the cake layers for a bit and the crumb icing – did not know that and I’m sure that will improve my frosting.
Allie
August 30, 2012
But wait! How did you get it from the plate onto the nice clean cake stand?
Good question! It is probably easier to just frost it on the cake stand. But we moved ours with the offset spatula and then touched up the frosting once it was on the cake stand.
rhea
August 30, 2012
i always wind up getting frosting on the cake plate, so i use berries to hide the mess 🙂 a nice garnish and tasty.
katy
August 30, 2012
WAIT! you missed the most important part! how did you get it on to the cake stand without ruining it?!
Lauren | Seventeenth & Irving
August 30, 2012
One of my goals before I’m 30 is to bake a layer cake – I can’t wait to try out these frosting tips…that cake looks perfect!
Kate
August 30, 2012
OH, the crumb layer is what I’ve been lacking this whole time! Perfect tutorial. Definitely using next time I need to make a beautiful cake!
wifemothereventplanner
August 30, 2012
oh lord. Now I need to eat cake.
The New Diplomats Wife
August 30, 2012
YUM. now all i will think about for the remainder of the day is chocolate cake. hungry already.
erin godbey
August 30, 2012
I always lay strips of wax paper or parchment paper around the bottom of my cake while frosting, just under the bottom layer of cake. This keep the mess of frosting off your cake stand, and when you’re done, just pull the strips out. Clean cake stand, clean edges, and you don’t have to transfer the cake!
eHow details this technique here: http://www.ehow.com/how_10021968_frost-cake-rotating-stand.html
jacquelyn |lark&linen
August 30, 2012
I remember the first time I discovered the “crumb layer”. Revolutionary, I tell you!
Martha
August 30, 2012
i didn’t even know i needed this! pinning now.
caroline
August 30, 2012
this is such an awesome tutorial. i seriously ALWAYS wonder how this happens. beautiful!!!
sweatshirt-weather.blogspot.com
Jenna at Homeslice
August 30, 2012
Looks beautiful! I love that it doesn’t have to be too perfect, you know?
Lily
August 30, 2012
Might that be the kitchen of Heidi from 101 Cookbooks? Looks very familiar!
Lindsey
August 30, 2012
This was such a helpful post! Thanks for sharing! Plus, awesome tattoo. 😉
-Lindsey
Samira
August 30, 2012
it looks so good!!!!
amruta
August 30, 2012
This Messy Cake looks gorgeous. Mouth watering. You explained it very well with photographs. Thanks a lot for sharing.
Nati Veneziani
August 31, 2012
It looks SO yummy!
Elena @ Randomly Happy
August 31, 2012
A crumb layer! That makes so much sense to me. I was wondering why crumbs always sneeked their way into the frosting – like some sort of frosting ninjas. I may just have to make a cake to frost so I can try this.
Thanks for the great tips!
x Elena @ Randomly Happy
ps and great tatoo Hope 🙂
Hannah
August 31, 2012
Wow thanks for this…I’ve yet to perfect frosting cakes so this is really helpful!
Audrey - This Little Street
August 31, 2012
Yum yum – this is making me SO hungry! 🙂
Jane
August 31, 2012
My mom taught me an awesome trick for when you want perfectly smooth frosting on top: put some apricot preserves on the top layer of the cake, chill, and then frost. The preserves seal in the crumbs and make everything super smooth.
Sarah
August 31, 2012
well thank you for this – this is a How-To i KNOW i will use – i never knew about the crumb layer! now i get it.
Ginger
August 31, 2012
Looks delicious! I am concerned about using eggs in the frosting, though… Could you recommend any other chocolate frosting recipes?
Melissa
August 31, 2012
This is my third attempt to leave a comment on this post; the two previous attempts were interrupted by a Nestle Toll House survey pop up. I have to say… up to this point yours is one of my favorite blogs and I’m a little disappointed by this “sponsorship.” I would not have minded a little line of text stating the post was sponsored by…, but to have it plastered all over the blogpost is a little much. I read certain blogs, namely yours, because I get great information, creative inspiration, etc., without being bombarded by advertisements. Ads are usually neatly tucked away in a column all their own where I can choose to either read or ignore them.
Is this something we can expect to see often going forward? I sincerely hope you will maintain control of your fabulous blog and not let a few dollars dictate how you speak to your audience.
All that said, I think the content of this post was great and many of us amateur bakers struggle with properly frosting a cake… even an intentionally messy cake. Thanks for listening.
Hi Melissa!
Thanks for letting me know. I didn’t know there was a survey –those should all be deactivated. I just sent an email to my ad network. Thanks! xo J
Katyanne
September 1, 2012
Okay, I seriously have to know this – what size piping bag is that & where did you get it from? I swear it’s the largest one I’ve ever seen, and I’ve just decided that I now need one XD
Julie
September 1, 2012
For those wondering about how to get it from the plate to a cake stand, I always saw on cooking shows that you can put down two pieces of wax paper, side by side (not on top of each other) so it’s kind of half and half on the cake stand but making sure to cover the whole cake stand, put the cake on top, frost it, then pull out the wax paper from underneath. It keeps it from getting frosting on the cake stand! I’ve never tried it, but I don’t know why it wouldn’t work.
Virginie
September 2, 2012
Thank you for this great tutorial. I have featured it on my blog today, I hope it will inspired my readers to try it !
http://www.thatcutelittlecake.com/2012/09/pin-of-week-how-to-frost-messy-cake.html
Virginie
Anne
September 2, 2012
Oh wow thank you so much for the tip! My cakes look weird whenever I just try to use to icing tool but I wouldn’t really get the messy cake look :p
s.K
September 2, 2012
Wonderful post! The pictures are very helpful…I was wondering what kind of pastry bag you used? I was looking to purchase some larger pastry bags and wondered what brand you would recommend. I have had some trouble with the reusable ones in the past, sometimes the seam gets a small hole in it from the pressure I apply and I end up getting frosting everywhere. Thanks!
Annie
September 2, 2012
I agree! This is the only chocolate cake I make. THanks for your tips on frosting, can’t wait to use them.
tara
September 4, 2012
My grandma taught me a trick when I was younger, on how to frost your cake while it’s on your stand with out frosting, well, your stand. Waxed paper. A small piece of waxed paper underneath all 4 sides of your cake will catch any frosting that your stand would normally get smeared with. once you are done frosting your cake, all you have to do is remove the waxed paper strips and your stand is perfectly clean. cake looks great, thanks for the tips 🙂
Marie
September 4, 2012
Yum…this looks really good. I love that simple cake stand too! 🙂
http://www.happypaperplace.com/
how2home
September 10, 2012
this looks incredible, thx for sharing your method/tips with us 🙂
Jessica
September 11, 2012
Even more incredible when done in a white blouse! The cake looks amazing.
Kari
September 13, 2012
It worked! Thanks for the recipe and the tips. I feel quite pleased with myself.
http://withraisins.blogspot.com/2012/09/sweet.html