


by Hank + Hunt
Happy Holidays! Here is a little retro garland for your holiday fete. I’m head over heels for anything vintage at Christmas, and recently swooned over some very kitchy, very vintage, mini present garlands on Etsy, in not so awesome metallic wrap. Then, I saw some dangling from fishing line, swathed in very not-my-kind-of-Christmas-y fabric at a local shop. Our holiday decor at home is more candy shop than tannenbaum, and I really wanted something with brighter colors. I’ve been looking for more ways to use crepe paper ever since Jordan opened my eyes to the availability of entire sheets of the lovely stuff and decided to use it to wrap the mini boxes for the garland. I did manage to wrangle up some of that silver thread that the vintage ones seemed to be wrapped with.

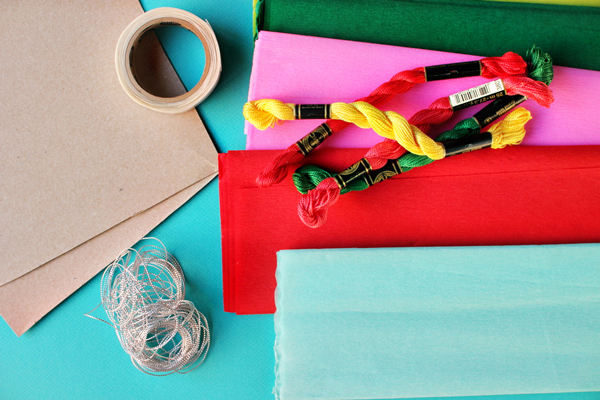


You will need: crepe paper folds, cereal box or raisin boxes (empty), scissors, Glue Dots, embroidery thread or thin metallic ribbon (here’s a Seattle based source), and scissors. Optional: scoring board, paper cutter.
Step 1: Cut down each side of the empty cereal box. Cut into strips about 1 – 1.5″ wide. This is most easily done with a paper cutter.
Step 2: Cut each strip into one 4″ length and one 5.5″ length. Either folding carefully, or using a scoring board to help, fold each strip as follows: for the 4″ strip: fold at 1″, 1.5″, 2.5″, & 3″/for the 5 ” strip: fold at 1.5″, 2″, 3 .5″, & 4″ Fold the strip so the printed side is on the inside of the mock box. Once you have folded the strips, attach a glue dot to the top side (cardboard side) of one end and over lap the panels, forming a box. Alternatively, you could just use small empty match or raisin boxes.
Step 3. Take your crepe paper, still folded from the package, and using your box as a guide, cut a strip wider than the box. Next, use a Glue Dot to adhere the crepe paper strip to the box and wrap around a few times, until the color is solid. If you are using a printed box, like the raisin box, it will take a few more wraps to cover the print. Wrap your box like a present, using Glue Dots to secure each end. It doesn’t have to be perfect, think kitchy.


Lay out your packages as you would like to hang them. Cut a strip of thread or ribbon the length of garland you will need. I cut a five foot length for my 14 packages, since it was for my mini tree. Tie a hoop on one end and thread the long end through the back of the package, under the string it is wrapped with. Tie a knot. Continue down the line, working with the long end of the garland string, tying knots as you go and spacing them about 3-4 inches apart. You could also just attach an ornament hook to the back and hang willy-nilly for an even simpler treat. I might have to makea bunch for a wreath!
We are having our first real Christmas party this weekend and I have two mini trees that I will be using on my buffet that were in need of some love. These little packages all tied up with string, might be one of my favorite things. Perfect for my mini trees.


Andrea
December 13, 2011
Those are the perfect decorations for the retro silver trees. Love those trees…love the garland!
tute-bot
December 13, 2011
This is such a cute idea! I’m glad I found your blog because I’ve been really enjoying your tutorials and your bright yellow logo makes me smile every time I see it.
Lexy @ The Proper Pinwheel
December 13, 2011
I have a silver tree right now and I am doing this! So great. Thanks for sharing!
maggie mae
December 13, 2011
I remember one year, when my sister and I where kids, my mother did our Christmas tree like this! But inside each box was a M&M or chocolate ornament!!
Now that I think of it, it would be a fun DIY Advent Calendar for kids!
Rebecca
December 13, 2011
What a fun DIY! I definitely want to try this one. So cute!
Rebecca (hearts)…
we love citrus
December 13, 2011
so colorful, i want to try to make it 🙂
chandra ~ oh lovely day
December 13, 2011
Jenny- your creativity continues to blow me away! These are so fun!
Lisette
December 13, 2011
Those mini trees look so festive with the mini packages. What fun colors!!
debbie
December 13, 2011
wow this is so cute!
Allyson
December 13, 2011
This is such a great idea!
Rebecca - A Daily Something
December 13, 2011
Wow Jenny, this is just great!!!
Mod Human Vintage
December 13, 2011
By far this is the best post ever! I love this idea so much that I am heading over to my local craft department to find these supplies! This is going to be perfect 🙂
Thanks so much!
Kelly
Mod Human Vintage
Jessica
December 13, 2011
Sweet and simple garland…thanks for sharing!
rhiannon
December 13, 2011
this is SO SO adorable!!
http://www.modernsuburbanites.blogspot.com
Tara
December 13, 2011
Love this! Would be cute for a birthday party, too.
shannon
December 13, 2011
This is so cute!!! I love it. My daughter would especially love this because they look like little American Girl sized presents. 🙂
http://shannonhearts.blogspot.com
Marie
December 13, 2011
How fun…I’ve always loved mini presents! 🙂 You might like these DIY cinnamon-scented ornaments…
http://www.happypaperplace.com/2011/12/diy-cinnamon-spice-and-everything-nice.html
Kristina Gulino
December 13, 2011
Oooooh too much darlingness. They are easy too!
Kristina
Leconcept
December 13, 2011
Cute idea!
Sarah @http://agirlintransit.blogspot.com/
December 13, 2011
I love that it’s made out of re-used raisin boxes. This is my kind of crafting.
– Sarah
http://agirlintransit.blogspot.com
jonahliza
December 13, 2011
i love oh happy day diys! they are always colorful, modern.. and awesome! they just keep getting better! thank you. you rock jordan + friends <3 happy holidays.
bevy
December 13, 2011
so so so cute! and they look great on the mini silver tree!
beth
December 13, 2011
just adorable!
shutterbug
December 13, 2011
aww… so cute! i will have to find some little boxes to make this. i don’t like raisins.
Maria
December 13, 2011
So cute…we recently made some little brown paper packages..tied up with string. We used mini nerds candy boxes and mini milk duds boxes (leftover from our Halloween stash). Love the crepe paper idea. We also used twine to tie them up.
Katie Hackworth
December 14, 2011
If i only had the time… these are adorable!!
Molly @thewaffler
December 14, 2011
These bring back good memories of my grandfather’s house. He always had a few present garlands up on his big tree. Yours are lovely.
Jenna {Jenna Sais Quois}
December 14, 2011
This is amazing! I love the tiny packages against the silvery Christmas tree. What a great idea! This would be really fun to make with kids, too.
Nichole {Sweet Carolina}
December 14, 2011
Perfect! I live for Oh Happy Day’s DIYs! Love how you used raisin boxes 🙂
Inge
December 14, 2011
I wish I had enough time to do this cute DIY-project, but there will be more time soon (in a week I’m at home for the holidays – yaaaayyy!), so I’ll definitely try to make these… 🙂 It looks absolutely amazing!
Love, Inge x
Erma
December 14, 2011
This is so cute! I think I can set aside enough time to make my own. I don’t usually eat raisins so I think I’ll cut up a Coke 12-pack box to make my packages. Thanks for the tutorial!
zhing
December 14, 2011
too cute! 🙂 shame my tree is too tiny and stuffed with store-bought tinsels!!! next year! 🙂
thanks for the daily inspiration!
xx
B (MakeDo and Spend)
December 15, 2011
These are great!
Really remind me of decorations we used to have on the tree when I was little
Might have to try them for my crafty tree!
April
December 19, 2011
I can’t believe I’d never thought of this before because these packages are so cute and easy to make. Today I finally sat down with a chopped up cereal box and made some. Instead of doing the garland thing for now I just made a pile of tiny gifts to sit with the christmas cards on a table. Looks fabulous!
Thanks so much for this post ♥