This is a series of posts I’m doing on affordable art. Find my other posts in this series here: Potato Print Art Work, Modern Art DIY, Painted Words as Art.
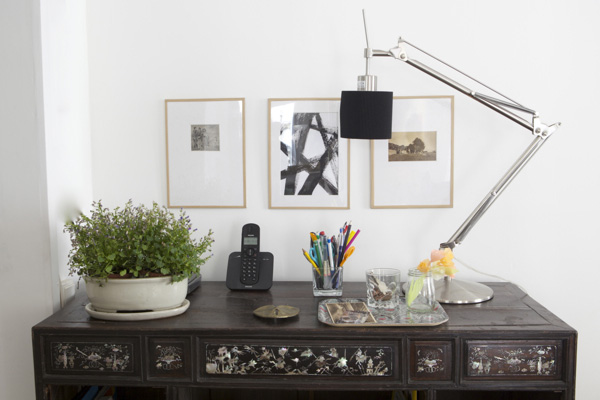
I was at a friend’s home a few months ago and I asked her where she got her pretty thin wood frames. She laughed and told me to pick it up off the wall and look at the back. I was shocked to see that the “frame” was actually kraft paper tape. I’ve seen it a few other times here in France since but I think its ingenius. Framing gets expensive when you buy the frames then have the custom mat cut. With these tools you pay a tiny more up front but you’ll be able to frame a lot of artwork. There are two main limitations to this kind of framing. First, you can’t frame extra large pieces because the tape isn’t strong enough to hold a large piece of glass or plexiglass. Two, You can’t change out art easily. If you want to remove the artwork you have to remove the tape and take it apart. The bonuses are it is really cheap and you can make the thickness of each frame different. I even experimented and painted the tape black and it worked great, you can change the color very easily. This project is perfect when you just want a simple thin frame.
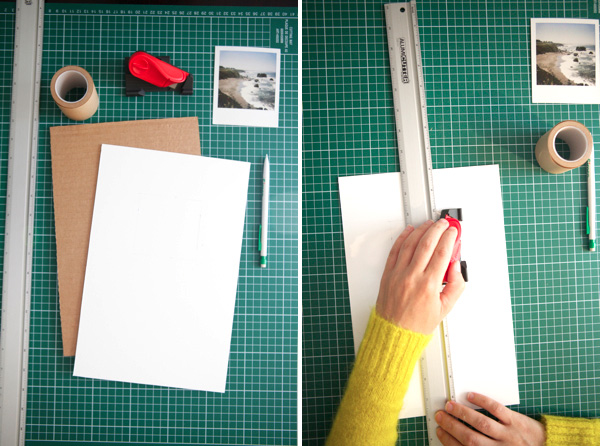
Materials Needed: Glass or plexiglass, mat board cut to the size of the plexiglass (from an art store), mat board cutter, a piece of cardboard cut to the size of the plexiglass, ruler, paper tape (from an art store), exacto knife, hardware to hang your artwork, superglue
First, I started with some leftover plexiglass we had from this project. Then I made all the dimensions based on the size of the plexiglass. Glass stores sell glass very inexpensively or if you have a lot to frame go to Home Depot and have them cut down a $20 sheet of plexiglass to the sizes you want.
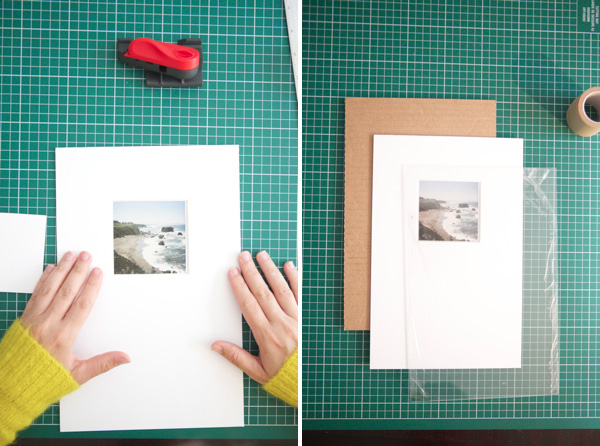
Next, cut your own matboard. It is usually around $8 to have a piece of matboard cut to your specific size of art. If you are planning on framing more that a few pieces its definitely easier to invest in a matboard cutter for $15. It cuts the matboard with a beveled edge and is really easy to use. Measure where you want the opening and follow the instructions on the package of the mat board cutter. Tape the artwork on the back of the mat board so it is secure in place.
Now you are ready to put it all together. If you are using plexiglass remove the film on it. Then stack the plexiglass, mat and artwork, and cardboard on the back. Get the paper tape and wet the back of it. I used a sponge and it worked well. Once you get it wet you have about 30-45 seconds to get it placed right before it starts to dry. Place the tape gently starting in the middle and working toward the edges. Pull the tape tightly over the edge and around the back smoothing it nice and tight. Then repeat with the opposite edge and then finish with the last two edges. I usually eyeball the thickness of tape that I want and then try to match the last three sides to the first.
Once it is done let it dry for at least an hour before handling and wait several hours before hanging. Attach a piece of hanging hardware with superglue on the back and then mount an extra piece of tape onto it for support.
Here are some general costs of everything in this project: Glass or plexiglass $20, mat board $7, mat board cutter $15, paper tape $4, hardware to hang your artwork $5. It will cost about $50 to collect all these supplies but you’ll be able to frame around 10 different pieces.


tara
September 6, 2011
what kind of plant is that??
Jessica
September 6, 2011
What a great idea! Thanks for the tutorial – I will have to try this!
Katie I KCANDCOBLOG
September 6, 2011
A must try DIY! Not many people know that matting a picture frame is a true artform!
Juliann
September 6, 2011
Pretty with kraft paper. We used to do this at a store I worked for and called it “French Framing”. I guess they really use this technique in France.
Angela
September 6, 2011
I love this. Super smart and stylish.
Erin
September 6, 2011
Super cute but how do you hang it?
jordan
September 6, 2011
@Erin look at the last step. You glue on hanging hardware.
Sarah
September 6, 2011
Love how simple it is, I bet that it would be real fun to switch out the different colored tapes as well!
Hilary Inspired
September 6, 2011
This is such a clever idea! And I love the simple aesthetic of it. I’ve been doing a lot of DIY art projects so this is right up my alley right now. Thanks for sharing as always, Jordan!
Danielle
September 6, 2011
That’s such a great idea! I have loads of silly doodles that are just waiting to be framed and looked after properly, I know what I’m doing this weekend now! 🙂
Great blog by the by! If you have the time and inclination you’re more than welcome to check out mine… it’s here – http://fandabbydozie.blogspot.com/
x
Victoria@Victory Paper
September 6, 2011
These are perfect! I was looking for some thin wood frames the other day at Michaels for some of my projects but couldn’t find any 🙁 great to see this as an alternative!
Marta
September 6, 2011
Mmmm I think i’ll try this tutorial!! I have so many photos to be framed…
Thanks!
Marti
September 6, 2011
Wow, I like it, I like it
Kacie
September 6, 2011
THAT is so coooool! I love it. You can’t even tell it’s tape in the first photo. Love these DIY’s. Especially the potato prints! Thanks!
Do you mind if I grab a screenshot to add to a link post on my blog? Would love for my readers to come check this out!
Kacie
http://www.acollectionofpassions.com/
Rosie
September 6, 2011
Those are brilliant! I bet it would be really neat to draw on the tape too, I’m going to have to try this!
Jenn
September 6, 2011
So neat, I also like Rosie’s idea about drawing on the tape.
kathy c
September 6, 2011
Oh my stars, as a pre-k teacher my students create lots of lovely art that I would love to give to parents for gifts. You have just shared a wonderful way to make their work a framed piece of art! I already have a matboard cutter as well as lots of scrapes of matboard that I can use. I have lots of pieces of glass from cheap frames I have “collected”, wil the tape cover up the sharpe edges? Sounds like all I need is paper tape, is there different widths? Also what kind of paint did you use to paint the tape? DId you paint after you applied it to the glass? Sorry for all the questions but I am a detail-kinda girl!
Mandy
September 6, 2011
Love this- thanks! One question- Can you cut the plexi glass? Or did you have to get it cut the exact sizes of your mats?
Kate
September 6, 2011
This is a wonderful idea! Thank you for sharing!
rebekkah
September 6, 2011
so creative all the time! thank you! xx
http://lifeishappymostofthetime.blogspot.com/
Hannah @ Smith+Scout
September 7, 2011
Brilliant idea, very affordable!
Misha
September 7, 2011
Oh! I love hanging art in our house…my husband is the one who does it, thankfully, otherwise we probably wouldn’t have anything up. We’re always picking up random pieces that aren’t framed.
Ashley
September 7, 2011
You never cease to amaze, Jordan. I am really enjoying the budget artwork series you have been sharing lately…so much inspiration and ingenuity.
Amanda Young - SWOON OVER IT PHOTOGRAPHY
September 7, 2011
Brilliant, as always. I will most certainly be trying this out… even with my non-crafty self. 😉
Michelle
September 7, 2011
I love your DIY art tutorials. Thanks!
Danna Harvey
September 7, 2011
Great post. It’s so nice to see someone in the blogosphere actually delivering useful information. Nice job.
mackenzie
September 8, 2011
Love this idea, You can totally use other colors of tape, and even make colored “matting” with it!
This girl loves to Talk
September 8, 2011
i wonder if you even need the plexi glass. Sure its nicer, but from a distance the tape just on white board would still look like a ‘frame’. Making it even cheaper!
Kendra
September 12, 2011
This is super timely for me! I’ve been trying to come up with some light, versatile, DIY frames to decorate my bedroom walls. Last week’s attempt at using foam-core turned out miserably… this seems much more promising!
nati
September 14, 2011
i used your idea but instead of paper tape i used washi tape and for the cardboard i recicled a cereal box. this is me holding the pretty result http://twitpic.com/6l0p8o. the picture is a drawing i bought in México (i’m from Chile)