


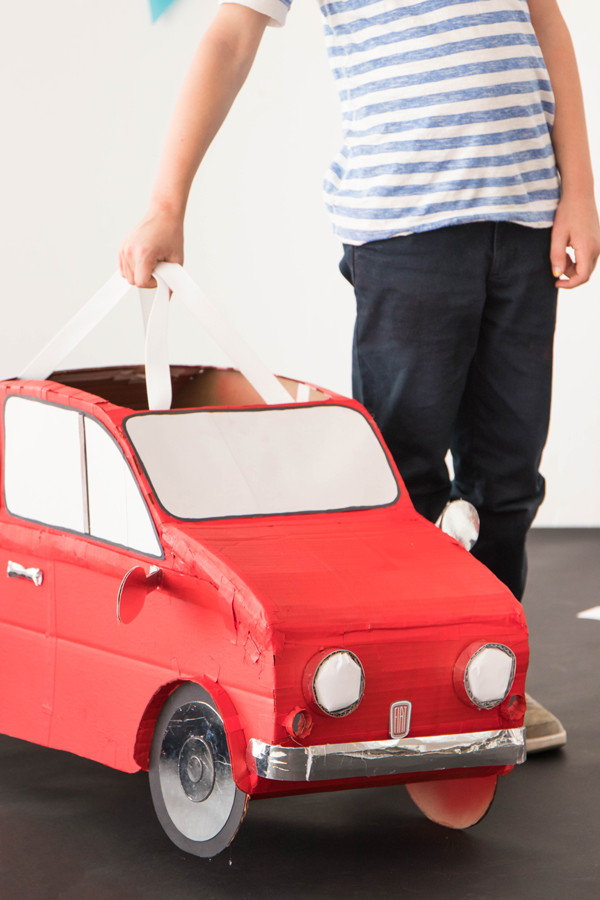
Halloween is upon us, and that means COSTUMES! We always love crafting funny, homemade costumes and this year we are excited to partner with Amazon Prime to create a special costume (or boxtume) using their boxes! We use Prime for all of our craft projects, as we’re guaranteed to get our supplies within 1-2 days (plus, we get the added bonus of using the boxes!). For this DIY, we were inspired by our signature vintage Fiat and decided to recreate a smaller version that could be worn as a costume. The whole thing is made from just cardboard and paper (and a bit of packaging tape). Read on for the full instructions!


One reason we love using cardboard boxes for Halloween costumes is that everyone has a few Amazon Smile boxes lying around (we may or may not have an addiction!) This is the perfect way to recycle them. Here, we made this costume for a child, but it could easily work for an adult as well – just make each piece a little bigger! And don’t forget to add details like the muffler, fender, or bumper (and add shiny mirror board for your accents!). You’re ready to cruise.


Materials: Leftover Amazon Smile boxes, Box cutter, ruler, scissors, gaffers tape, spray paint (in red and silver), mirrorboard, cardstock (in black, white, light gray, yellow, and red), black marker, hot glue gun, 1″ nylon webbing
Step 1: Draw a large outline of a Fiat, wheels included, onto a large amazon box and cut out with a box cutter. Trace the cutout onto another piece of box and cut out.
Step 2: Using the wearer for reference, cut a long strip of the box that is as wide as you want the Fiat to be. Cut out a rectangle with rounded edges toward the middle of the strip. This opening will be for the wearer’s head/body.
Step 3: Tape the connecting piece along the outer edge of one of the cutouts. Then tape the mirror image to the other side. Making sure the head/body opening is toward the center of the Fiat base.
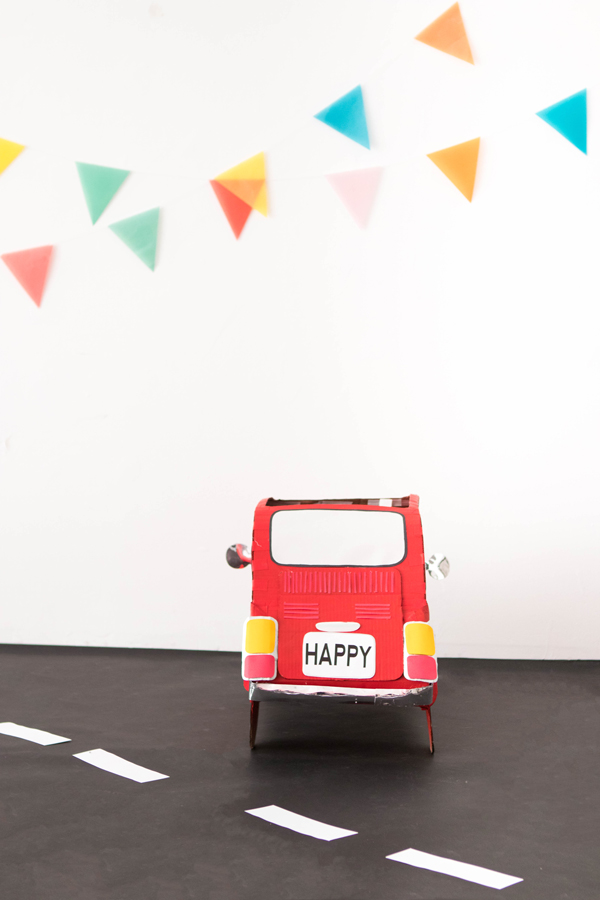
Step 4: Make other Fiat details using cardboard and an x-acto. We added accents above the wheels, side and trunk panels, and small front lights. Secure to the Fiat with gaffers tape.
Step 5: Spray paint the Fiat red, until you achieve an even color. Let the paint dry between coats.
Step 6: Draw front, back, and side window shapes on light gray cardstock and cut out. Outline the windows with a black marker.
Step 7: Cut a circle out of black cardstock that is the size of the wheel. Make a total of six concentric circles, alternating between black cardstock and mirrorboard, allowing more mirrorboard to show than cardstock for the inner circles. Repeat for the other three wheels.
Step 8: Create a front and back bumper from long pieces of your Amazon box. Crease the cardboard so it bends easily to create curves. Make two circular headlight rims out of thin strips of cardstock. Cut two rectangular pieces of cardboard and round the edges for rear light panels. Spray paint all the pieces silver then glue mirrorboard along the flat faces of the pieces for extra shine.
Step 9: To make a side view mirrors, cut out two 2” rounds and two 2” strips of mirrorboard. Hot glue the strips together, shiny facing out. Sandwich the strip between the two circles and hot glue to secure. Fold the end of the mirrorboard strip at ½” to create a tab and hot glue it to the side panel of the Fiat. Repeat for the other side.
Step 10: Cut rectangles out of yellow and red cardstock and round the edges. Hot glue the shapes to the rearview light silver panels. Hot glue the completed panels to the back of the Fiat.
Step 11: For headlights, cut out rounds from white cardstock that are larger than the circumference of the headlight cardboard rims. Push the round into the rim to achieve a puffy shape and hot glue to secure. Hot glue the headlights to the front of the car.


Thanks to Amazon for sponsoring this post and for inviting me to contribute to the Prime Newsletter.
Photos and Video by Paul Ferney for Oh Happy Day!
Styling by Sarah Kate Price
Crafting by Justine Pon


Jamie
October 10, 2017
Such a fun idea! I would love it if you stopped by my blog next Monday and link up your fiat costume and any other projects you’ve been working on to my More the Merrier Monday link party! diyhshp.blogspot.com
lenny face
October 11, 2017
awesome post thank you –Voter ID
Lisa
October 13, 2017
This so beautiful! Awesome DIY! Thank you!