


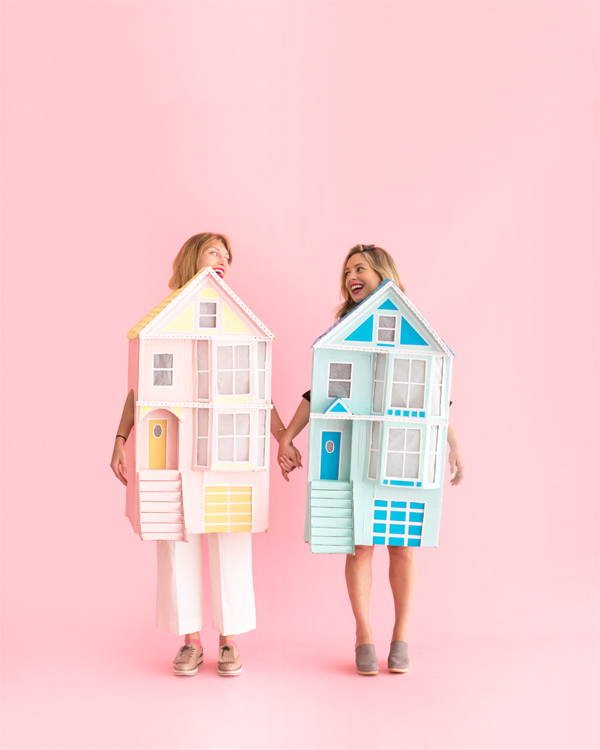
At any given moment you will find dozens of tourists packed onto the grassy slopes of Alamo Square Park, furiously snapping photos of the Painted Ladies- the most beautiful and quaint row of pastel terrace houses in San Francisco. As they are a classic icon of our home town, we thought it would make the perfect couples costume for Halloween! Continue to see how we made them…


Materials Needed: Large cardboard boxes, pencil, ruler, x-acto knife,
packaging tape, spray paint (in mint and pink), white paint, paint brush, cardstock (in yellow, teal, and white), scissors, hot glue gun, tracing paper, LED tea lights
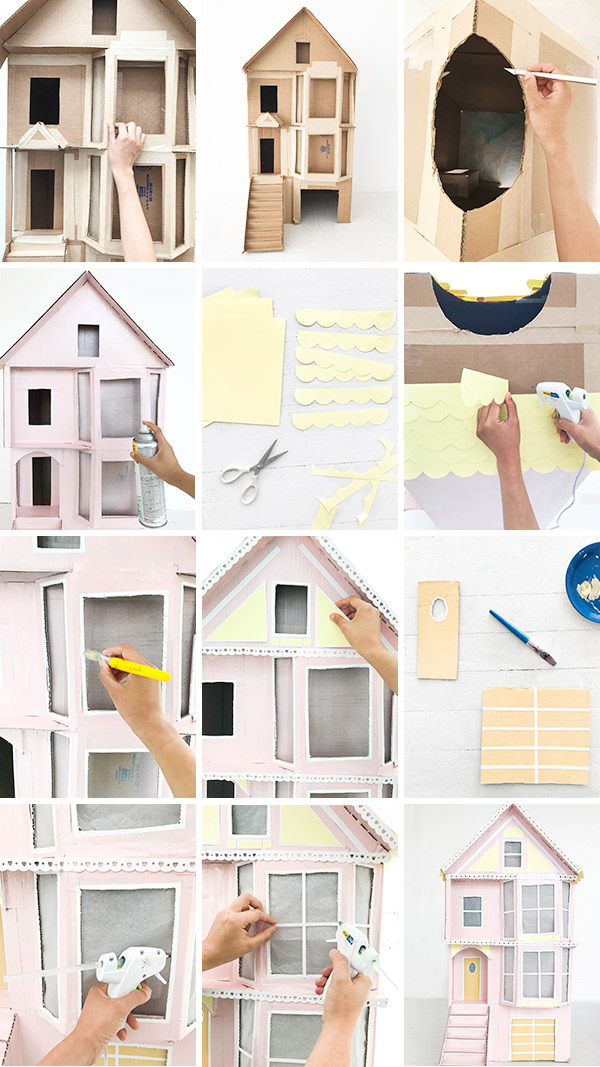
Step 1: Start with a large cardboard box that is big enough to fit vertically over the wearer’s head and body. Open up the flaps of the box so the top and bottom of the box are open while the sides remain intact. Cut the front and back flaps of the top of the box at an angle so they look like triangles.
Step 2: Using a photo of the Painted Ladies for inspiration, start adding house features. Add strips of cardboard under the roof and at the halfway point of the height of the house to indicate different floors. Use an x-acto knife to cut out a window and door on the left side of the house and a square at the bottom for a garage.
Step 3: To make a roof, cut two cardboard squares, lay them side by side then tape together the sides that touch. Bend the cardboard along the taped area to form a peak. Tape the angled piece to the two triangles of the house base. For an attic, cut a triangle that is the width of the house base and cut a rectangular window out of the triangle. Tape the bottom of this triangle to the cardboard strip under the roof.
Step 4: For stairs, cut two 90 degree triangles that are ⅓ of the height of the house base. Bridge the gap between the two triangles by cutting pieces of cardboard into strips and taping them together to create a flight of stairs. Tape the stairs to front of the house.
Step 5: To make windows, cut a rectangular piece of cardboard with a width of half of the house. Fold the cardboard piece into three sections, with the center section larger than the two sides. Use an x-acto knife to cut out windows from each of the three panels, leaving a ½” border. Repeat for a second set of windows. Lay that piece of cardboard onto cardboard and trace the outline. Cut out the resulting trapezoid and tape together. Tape the two completed window segments above and below the center level of the house.
Step 6: Cut head and arm holes using the wearer for reference.
Step 7: Spray paint the cardboard base until you have achieved an even color and let it dry.
Step 8: Paint a thin white border around the windows, doors, and garage.
Step 9: For roof shingles, draw scallop patterns down the length of a piece of cardstock and cut out. Stack a few sheets of paper and cut to save time. Layer and glue scallop pieces starting from the bottom of the roof and working your way up to the top. Trim off the excess.
Step 10: Time to decorate the house! For modern trim, cut ¾” strips of white cardstock and scallop the bottom. Use hole punches of various sizes and shapes to make a pattern. Cut geometric shapes out of colored cardstock and add a white cardstock border. Hot glue the pieces below the roof and windows, and anywhere else you like.
Step 11: Cut a front door and garage door out of cardboard and paint the same color as the roof shingles. Add front door and garage details before taping to the inside of the house.
Step 12: Cut and hot glue a piece of tracing paper along the top and sides of the inside of the window frames. Leave the bottom ⅓ of a piece of tracing paper unglued for the center windows of each of the two 3-panel windows so you can insert an LED tea candle inside the windows.
Step 13: Cut ¼” strips of white cardstock. Hot glue the strips to the cardboard around the windows to create window panes. Put on the costume before having a friend help you turn on and put the tea lights in the windows. You’re all set!

Crafting by Alison Piepmeyer and Justine Pon


Michelle
September 22, 2017
What an awesome costume!
https://www.makeandmess.com/
Holly
September 22, 2017
This looks AH-MAZ-ING. I love it so much and I also love that you are getting right stuck into Halloween over here on Oh Happy Day! It makes me so excited for October and all the autumny vibes. Yass!
Holly from The Art of Being Holly xo
Leslie
September 22, 2017
These are too cute! The little houses turned out perfect. These ladies did a creative job. I can barely manage a stick person and they have constructed houses, hah.
Belle
September 22, 2017
OMG this is hilarious! I was wondering when you guys were going to start publishing some of your Halloween content. Yay!
Any ideas for toddler costumes? I need to come up with something comfy that my daughter won’t try to escape out of…!
http://www.thislifeisbelle.com/
Jacqueline Elliott
September 23, 2017
These are amazing! I think I totally want one just to display in my room. I still haven’t grown out of my doll phase 😛
There’s no way you can wear this and not have the most unique costume at the party,
-Jacqueline
Jackieomy.blogspot.ca