


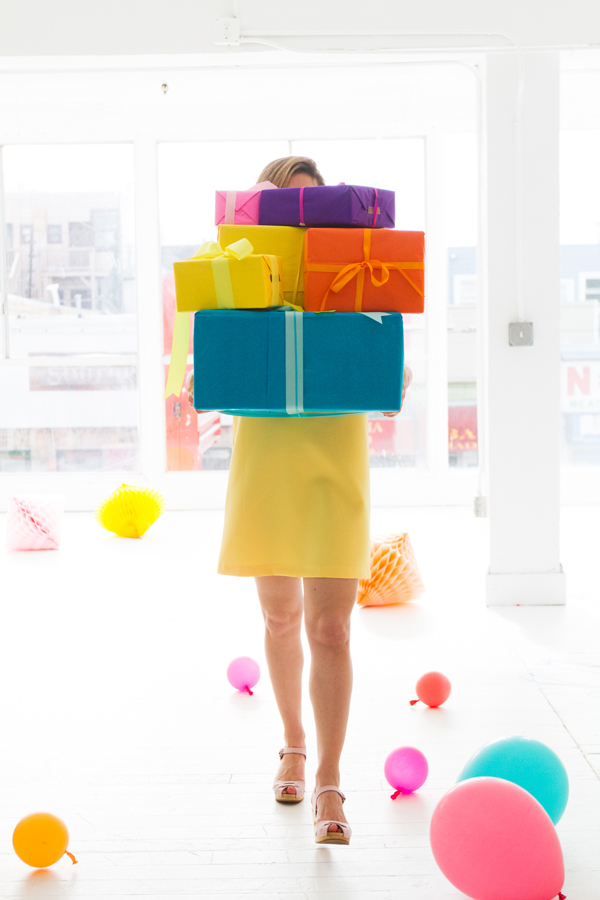
I don’t think I’ve mentioned it here but I’m having a baby soon (ah!) and we collaborated with Balloon Time to come up with an Epic Rainbow Baby Shower. My team put together the most beautiful shower with lots of inspiration and DIY’s! We even made a video!

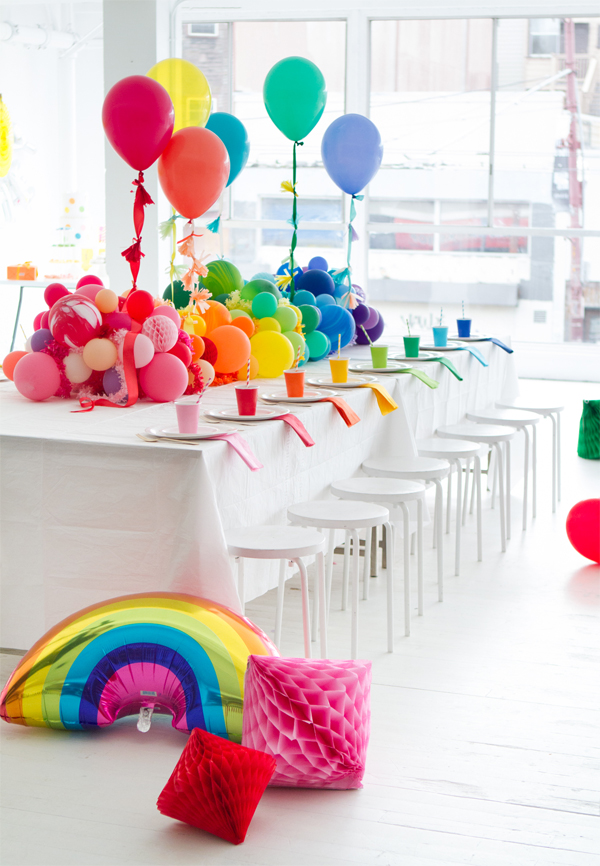
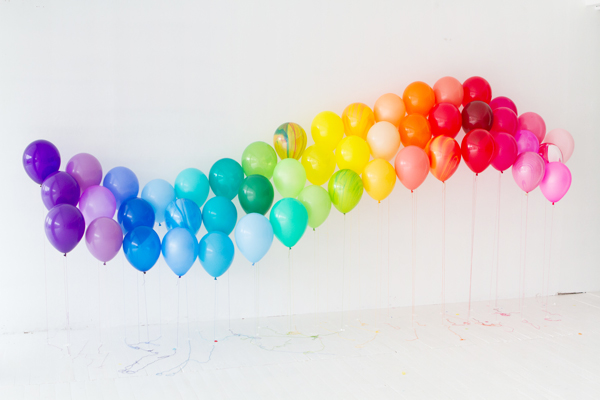
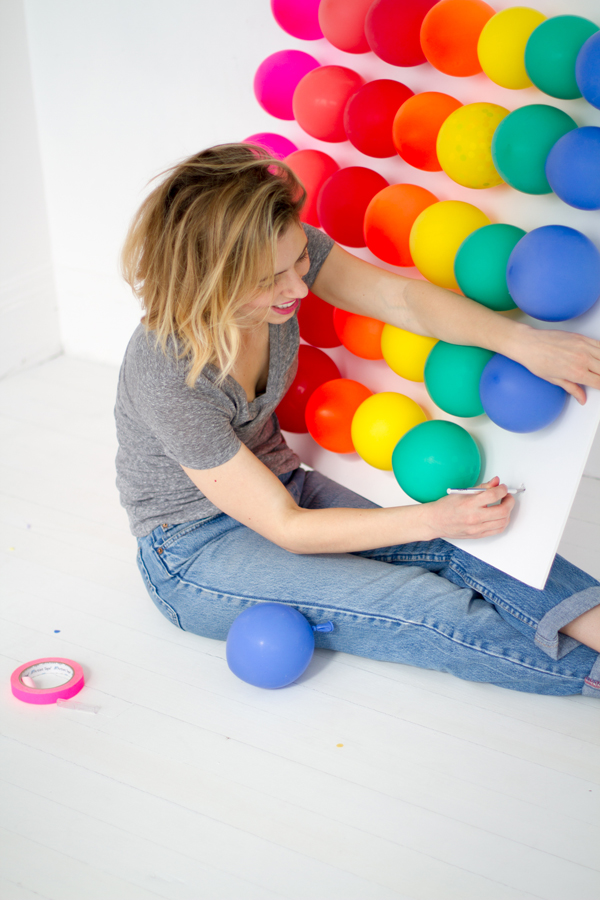
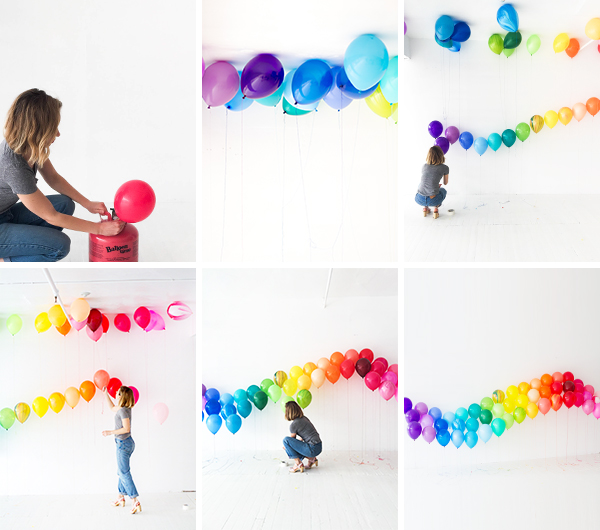
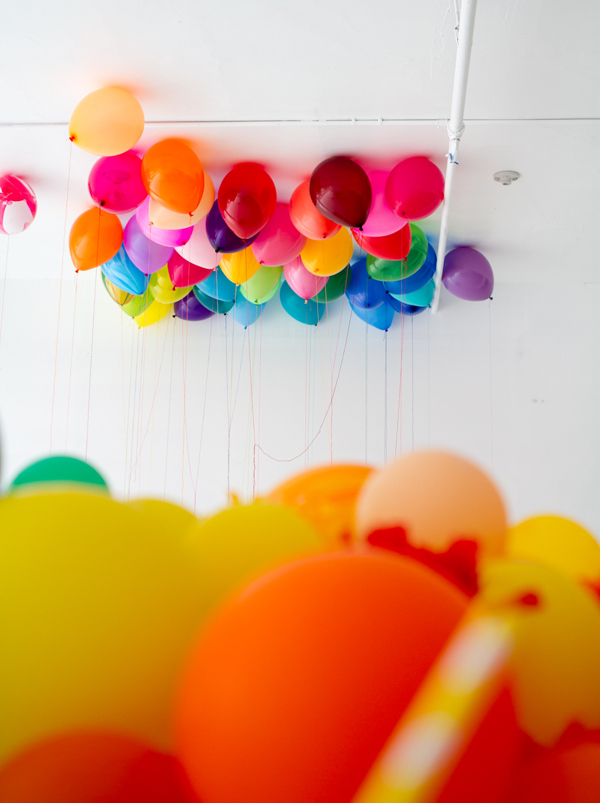
The star of the party (besides my giant belly!) was this Rainbow Balloon Wall (click through for full DIY). It was simple enough to put together. We just started out with about 50 balloons and taped each one in place on the floor. I love decor like this that isn’t too complicated but makes a huge impact. You can use it for decor or as a photobooth backdrop.
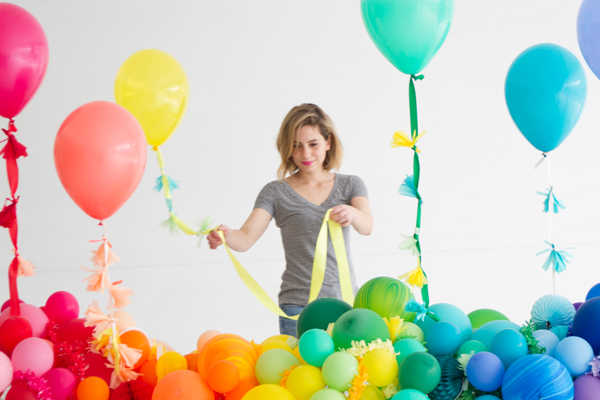
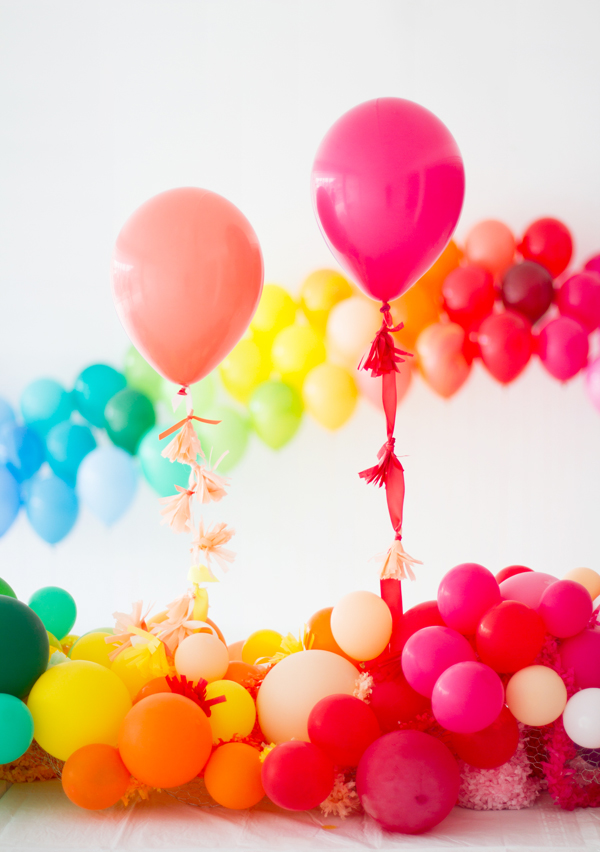
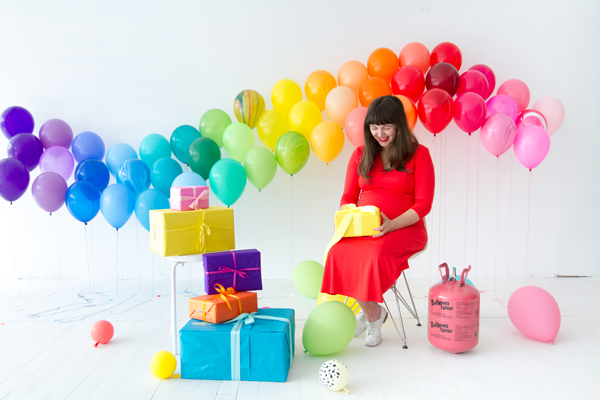
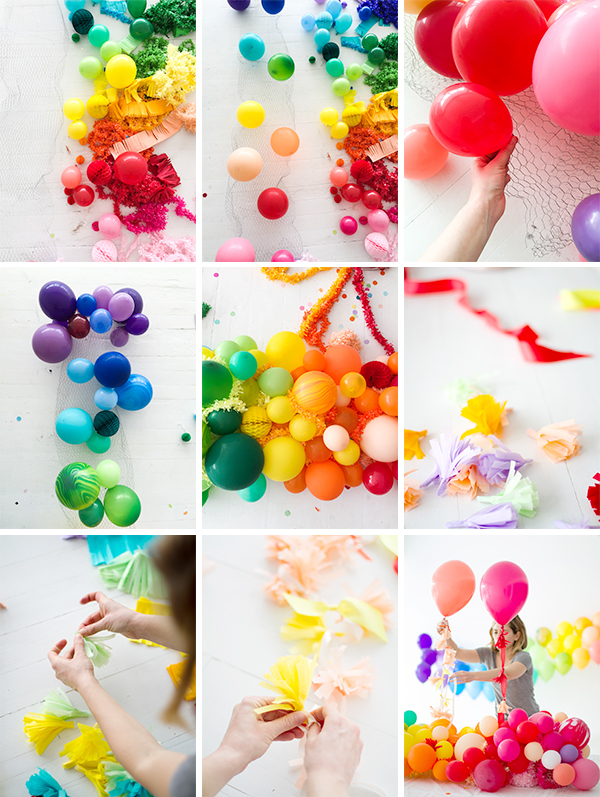
The Balloon Centerpiece was a labor of love (see the instructions here!) Alison spent all morning making this thing! It was a mixture of different balloons and festooning from the party shop. She also added some frilly balloons to give it a little height. It was so beautiful.
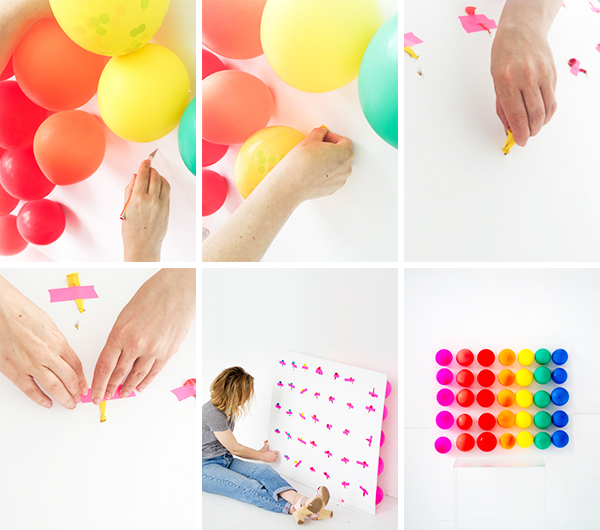
This Balloon Game was inspired buy those classic carnival balloon dart games (without the flying darts!) Each balloon had a prize or fortune or little toy and some had confetti! I only like to play games at showers where you win prizes!

Balloon Game DIY
Supplies: Large Foam Core Board, 35 11” balloons (in 7 rainbow colors), balloon pump, x-acto knife, ruler, pencil, tape, pin
Step 1: Use a pencil and ruler to measure and mark 7 equidistant holes horizontally across the foam core and 5 holes vertically down the foam core. Use these markings as a base to continue creating a grid of equidistant dots on the board.
Step 2: Wherever there is a mark, cut a small triangle hole with an x-acto knife.
Step 3: Fill your balloons with prizes (confetti, candy, small treats, poems, fun facts about a new mom, etc.)
Step 4: Blow up all your balloons half way (or until they are a perfect round sphere.) Tie the balloon tight so it remains a sphere (it will have a long tail.)
Step 5: Pull the tails through the small holes in the foam core until the knot pops all the way through.
Step 6: Attach with tape on the back side.
Step 7: Give everyone a chance to try and pop the balloons with the pin. Share the prizes inside with everyone!
Balloon Centerpiece
Supplies: Chicken wire, wire cutters, gloves, balloon pump, 11” and 5” rainbow balloons, hot glue gun, 5” honeycomb balls, festooning, tissue paper, x-acto knife, tape, ribbon, Balloon Time Helium Tank
Step 1: Measure out the length of your table and cut a piece of chicken wire that fits down the middle of the table (be careful to use gloves so you don’t cut your fingers!)
Step 2: Bend the chicken wire into a wave-like pattern, with varying heights, down the center.
Step 3: Fold the sharp edges of the chicken wire under, so they don’t poke out.
Step 4: Blow up a ton of 11” balloons and 5” balloons (in all different sizes and rainbow colors). Starting with the larger, 11” balloons, begin attaching them to the chicken wire in an ombre rainbow pattern. We tied them to the chicken wire to make them more sturdy.
Step 5: Fill in the gaps with smaller, 5” balloons. Once the chicken wire is covered, you can hot glue additional balloons on top to fill in any gaps. We also added in a few honeycomb balls into the mix.
Step 6: Weave colorful festooning or fringe in between the balloons to add in another layer of texture. (At this point, if you haven’t already, move the centerpiece on top of the table.)
Step 7: Use an x-acto knife to cut fringe from colorful tissue paper strips. Roll the strips up so they create small tassels, and secure with tape.
Step 8: Tie the tassels onto strands of ribbon and attach to an 11” balloon filled with helium. Make sure you don’t tie too many onto one strand or it will be too heavy and weigh the balloon down.
Step 9: Place about 6 balloons at varying heights down the center of the table.
Balloon Backdrop
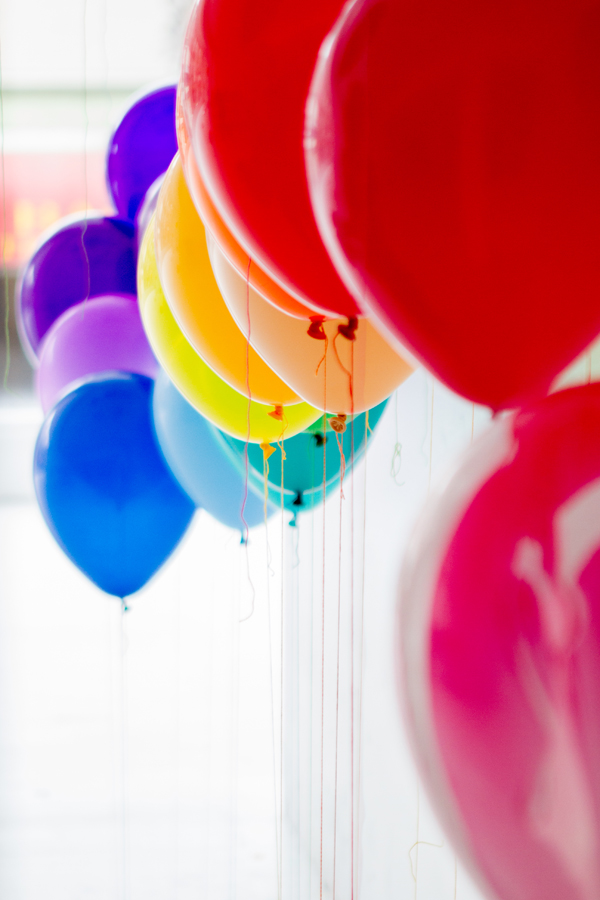
Supplies: Balloon Time Helium Tank, 50+ balloons in rainbow colors, string (we used rainbow colored embroidery thread so the string matched the balloons), tape
Step 1: Blow up all your balloons using your Balloon Time Helium Tank and tie with string.
Step 2: Sort your balloons into rainbow colors, and begin taping the back layer of balloons down in a wave pattern. We started by taping a yellow balloon in the center, a pink balloon on the right side and purple balloon on the left side, then filling in the remainder of balloons in between. (We had approximately 17 balloons per tier.)
Step 3: Once you’re happy with the wave pattern, begin on the second tier, following the same pattern.
Step 4: Finish with a third tier.
Step 5: Use as a Photo Booth backdrop!
This post is sponsored by Balloon Time.
Video by Ralph Blair
Photos by Paul Ferney
Art Direction by Amy Moss
Crafting by Alison Piepmeyer


Pixelhazard
May 2, 2016
oh what a lovely fun idea & congrats!!! I’m onto my second so no baby shower this time around but I will be throwing one. Should keep this in mind.
india
May 2, 2016
this makes me want to throw a rainbow party so bad!! and you are seriously the cutest pregnant lady ever!!! good luck with the rest of the pregnancy 🙂
Daphne @ Be Frenchie
May 2, 2016
Congratulations Jordan,
looks like the most wonderful baby shower. I can’t believe how Ralph Blair, ( he’s your nephew isn’t it ?), is gifted. I saw his movies on designmom and his work is amazing.
Wishing you a serene end of pregnancy to welcome your sweet little one !
chiara
May 2, 2016
seriously amazing!!! love everything about it! xo
Cintia
May 2, 2016
I love every detail
http://soldenochedecocrochet.blogspot.com.ar/
CandiceMcC
May 2, 2016
Aww, I don’t think you have mentioned it. You’re adorable. Congrats! And my 5-year-old daughter would ADORE this party. I think it’s pretty snazzy myself.
Terrell
May 2, 2016
That centerpiece though…..LOVE!!!!
Ujjaini
May 2, 2016
I love how it looks!
http://www.myhappynook.com
mom in mendon
May 2, 2016
So happy.
Rebekah Desloge
May 2, 2016
the rainbow balloons are so great, and love the fringe tutorial… feeling inspired for sure. congrats on baby on the way!
Kari
May 2, 2016
What a fun, colorful party! I’d love to walk into a room filled with that many balloons!!
Kari
http://www.sweetteasweetie.com
Anna
May 3, 2016
Congratulations!!!
Brilliant and incredible party post!!
Annie Abbey
May 3, 2016
Oh my goodness! Congratulations! I love this video! It is perfect for a non gender-specific party! (I hate the “pink theme” “blue theme” that normally occurs at baby showers! Great video and post 🙂
xx Annie
http://www.somethingswellblog.com/
Bridget
May 3, 2016
All the colour! All the amazing! I’m so stealing these ideas for non baby parties! And what a talent Ralph Blair is. I have loved watching his skills develop via Design Mom. Creative blood runs deep in your family!!
bri
May 3, 2016
ok, you gals outdid yourselves! SO cute! xx bri