This post is sponsored by Bing our Craft Night Sponsor. Take the Bing Challenge and find out why People Chose Bing Search Results nearly 2 to 1!
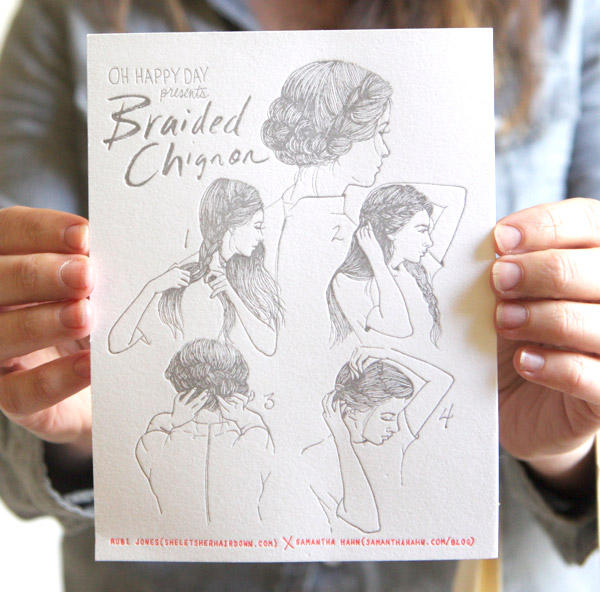
Rubi Jones (hair stylist extraordinaire) was in town so I asked her to host a braid bar and teach us how to braid our hair. I met Rubi when I was living in Paris and she was always off in exotic locations doing hair for fashion week. She is really talented so I was excited to collaborate with her. We made these letterpress instructions for the night of the event. The talented Samantha Hahn did the illustrations and then we printed them on my letterpress (with a tiny bit of red neon ink at the bottom.) For those that couldn’t make it here is a step by step from Rubi on how to do a braided chignon. This is a great everyday hairstyle or for something a little fancier.
Step 1: Start with a deep side part and continue it all the way down to your neck. That will divide your hair into two sections.
Step 2: French braid one section, starting as close to your side part as you can and when you cant add more hair just finish off the braid like a normal braid. French braid the other side.
Step 3: Now you’re going to pin both braids together to create a low chignon. Cross them once and pin one braid and then pin the other.
Step 4: Once your hair feels secure, you’re going to pull your braid apart a little bit to add some texture. Starting at the beginning of your braids lightly tug on either side of the braid as you work your way to the end.
Here are some photos I pulled from instagram of the finished results.
images from: @ohhappyday /@maryinsf /@margaretgstewart /@rubijones


Cerise
January 16, 2013
It looks really beautiful. I’m awful at following directions, but I adore the letterpress how to.
ami@naivecookcooks
January 16, 2013
Will love ti try it soon! I am still in my pajamas stuck to this computer screen lol.
Jenn D
January 16, 2013
Love this! Such a beautiful, classic look. The instructions were great, so I’m hopeful about being able to do it myself! PS, the invitations are beautiful too.
Trish
January 16, 2013
What a cool hairstyle! Seems so easy, I’ll have to give this a go.
Trish
http://www.jellybonesblog.blogspot.com
sarah
January 16, 2013
cute!
Sar
http://www.etsy.com/shop/owleyevintage
Laura Trevey
January 17, 2013
Everyone looks gorgeous, and thanks for linking to their Instagram! Great way to see more 🙂
Megan
January 17, 2013
Oh thank you for this! I love the illustrated letterpress card. Makes it look easier to do than I originally thought.
tere
January 17, 2013
Happy B-day!! ;^)
Katie
January 17, 2013
I looooooove the look of braids but somehow never learnt how to braid. It’s ridiculous really! I really must watch some youtube tutorials and learn how. All the hairstyles from your braid bar look fantastic!
sue
January 18, 2013
I love the totes! what a great event!!
Brigette
January 18, 2013
love this look and i love that it’s easy to do with long hair!
Kelsey
January 18, 2013
So wish I lived in your area! This would have been a highlight of my year. Love those bags too (great ones to sell maybe?)!
xo Kelsey
http://kelseydesign.com/
Hilary Rushford
January 18, 2013
A lovely evening!
with grace & gumption, Hilary
Sweet Harvest Moon
January 19, 2013
So pretty!
Cortney W.
January 21, 2013
I wish I had hair long enough to do this!!!!
Lexi @ Glitter, Inc.
January 24, 2013
The letterpress chignon print is absolutely lovely — I kind of want to frame it!
fern choonet
January 26, 2013
I love the illustration!!!! So beautiful! I wish I could join your Braid bar 🙂
Liondrancustomgo
January 27, 2013
So beautiful!Love!