


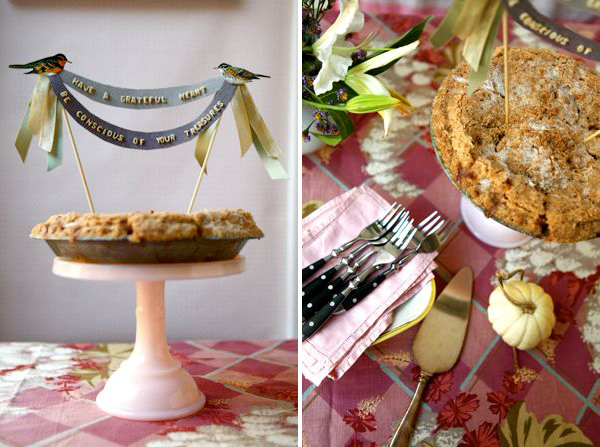
Don’t get me wrong, I love cake. It’s just that sometimes I wonder why they get all the love. Frosting, toppers, edible flowers, candles, rainbow insides…….it’s all so pretty! With the holidays fast approaching, I thought I’d see if I could ‘celebrate’ the humble pie, and dress it up a little. Here are instructions to make a heartfelt Thanksgiving pie topper.

Materials: 4 x 8 inch piece of heavyweight dark gray paper, 2 x 8 inch piece of heavyweight light gray paper, sage green and gray ribbon, 2 wooden skewers, pencil, ruler, white glue, scissors, Alphabet Pasta, print-outs or color copies of bird illustrations (with 1 x 2 inch birds), mini-clamps.

Step 1. Begin with your gray paper – draw an upside-down rainbow shape, starting from the top lefthand corner, to the center of the bottom side (marked with a ruler), back up to the top righthand side of the rectangle. Do this on both the dark gray and the light gray paper. You will have one deep rainbow and one shallow rainbow. Cut out a 1 inch strip following your pencil line, with both colored papers.
Step 2. Spill out a pile of alphabet pasta into a saucer or tray. Search for your letters and set them aside to glue. I chose to write “Have a Grateful Heart” based on a quote by Seneca who said, “Nothing is more honorable than a grateful heart,” and “Be conscious of your treasures” derived from Thortnon Wilder who said, “We can only be said to be alive in those moments when our hearts are conscious of our treasures.” Really, you could write whatever moves you. Place little dots of white glue on the paper and carefully put your letters into place. You may have to use a pencil tip to nudge them into the right position. Let dry.
Step 3. Cut out two bird illustrations. Make sure they are facing each other. I used an old bird guide book I had, but Vintage Printable has a great selection of birds. You may have to resize your images to get the right sized birds.
Step 4. Cut two 8-inch lengths of each ribbon, so you have four pieces of ribbon total. Cut your skewers to be roughly 8 inches also.
Step 5. Layer your bird, letter swags, folded ribbons and skewer, in that order. Place glue in between every layer, and clip them together to dry. Be sure to angle your skewers slightly inwards. I left mine to dry overnight, although I don’t think they actually need that much time.
Step 6. Bake, or buy, a pie! Insert your topper into your pie and enjoy!

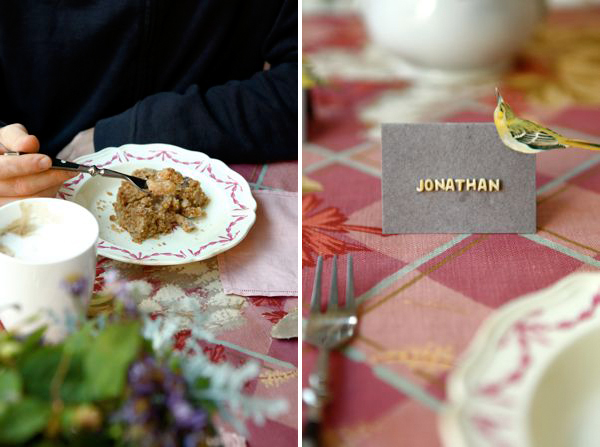
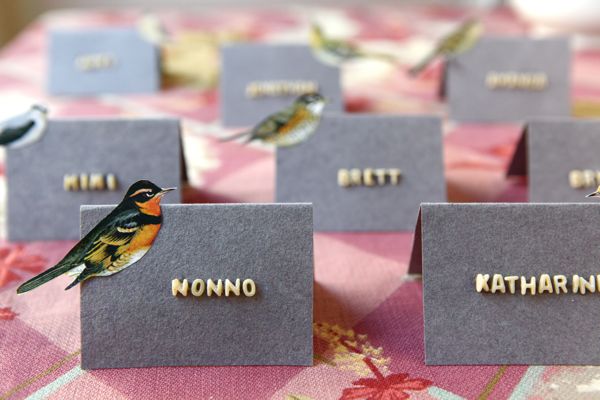
P.S. With some leftover alphabet pasta, I made some quick place cards for the table. I see lots of potential with these pasta letters, and there are a about a million in each little box. I’m thinking about gift tags, cards, on top of presents – – what do you think they would be good for?


Pilar
November 15, 2011
This is a great idea, I’m running to the kitchen to check if there is some alphabet pastsa! Thanks for sharing!
http://secondopilar.blogspot.com/
Zoë {Conversation Pieces}
November 15, 2011
So pretty! And such a great use of alphabet pasta!!
jonahliza
November 15, 2011
every diy, here, just keeps getting better and better. this is so simple, clever… and awesome! thanks for such a fun and inspirational blog <3
lyndsay
November 16, 2011
this is the bestest thing i’ve seen in like, forever. I LOVE IT! thank you for sharing this wonderful tutorial! can’t wait to try it! xox
Hilary
November 16, 2011
Well this is just a stunner! What a beautiful and dramatic way to announce the serving of the best part of a meal – dessert!
– Hilary
theresa
November 17, 2011
I love this! Thanks for sharing! t.xoxo
Linda
November 17, 2011
This is really charming~ thanks so much for sharing it! So happy to have found your wonderful blog!
Kayleigh
November 17, 2011
This is rad!!! 🙂
Maria
November 18, 2011
Thank you for tis tutorial – this banner is adorable! I’m gong to give this a try. I love the table cloth in the pictures. Wondering if you want to share where you found it.
Debbie@Mountain Breaths
November 19, 2011
Love this so much that I just blogged about it! I included a link to your blog.
claire
November 19, 2011
I super love this project! Perfect because I’m planning to bake a pie for Thanksgiving. The message says everything! 🙂
Andrea
November 24, 2011
Ooo, this is so pretty! Pinning it.