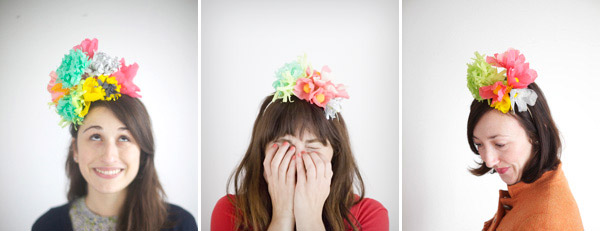
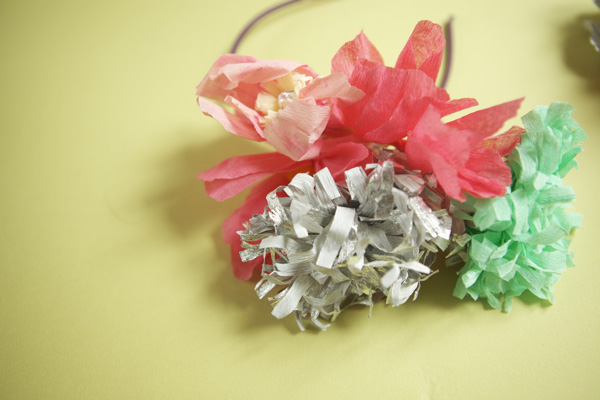
Here are the instructions to make the floral party hats from the party last weekend. When I set out to make them I was envisioning a very tall pile of flowers on someone’s head, I wanted something festive and sort of over the top. There are a million ways to make paper flowers but here are two basic styles that I used. You can change the look completely of either style just by switching color, changing the shape of the petals, or adjusting the fullness. I took a paper flower class a few years ago but I couldn’t remember the instructions so I just made this one up and was pretty happy with how sturdy they were. I think they are more fun if they all look different so its good to get creative with colors and textures. I even tried to hand paint some of the crepe paper before I cut out the petal shapes to them look more interesting. It took me a few hours to make about 10 party hats so if you had a lot to make you could have a few friends over and do an assembly line.
Materials Needed: Crepe Paper in Folds (I like to get the plain colors from here and the metallic stuff from here.), Scissors, Thin Gauge Wire, Wire Cutters, Glue (I don’t use the glue in these two examples but I found it helpful depending on the style of flower), Plastic Headbands (We got cheap ones from H&M.)
Basic Rose Instructions
Step 1: For the petals, take the fold of crepe paper and cut off a 4 inch section.
Step 2: Take that section and cut it in half the same direction as the grain. (Crepe paper has a grain and this will matter later on.)
Step 3: Cut out a petal shape so that the grain of the crepe paper goes from the top to the bottom. It should look like there are lines running from the top of the petal to the base. (Choose the shape of the petal depending on the type of flower you want to make.)
Step 4: Cut long sections of wire about 10″ long and short sections of wire 3″ long. If you are making a lot of flowers then cut all the wire at one time for the process to go a lot faster.
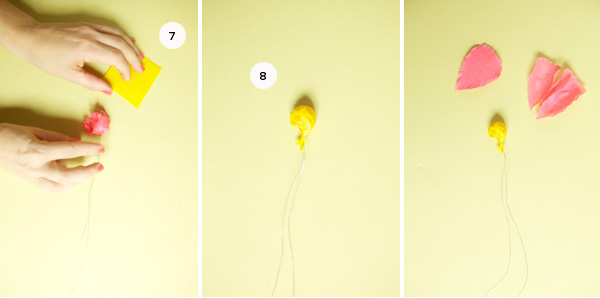
Step 5: Take a scrap piece of crepe paper and wrap the wire around the middle twisting it very tight so the paper can’t slip out.
Step 6: Scrunch it in a ball.
Step 7: Then take a square of crepe paper (in whatever color you want the center of the flower to be) and wrap it around the scrunched up ball twisting it at the bottom.
Step 8: Now you’re ready to add the petals.
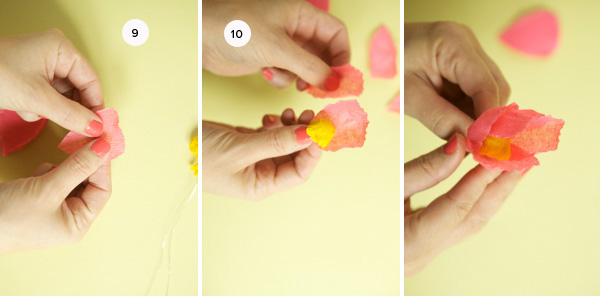
Step 9: Take the petals and with both thumbs stretch the crepe paper so it makes a nice curved petal. This is where it will matter what grain the paper is going in so that it stretches right. To go quicker you can even do this to a small stack of petals at the same time.
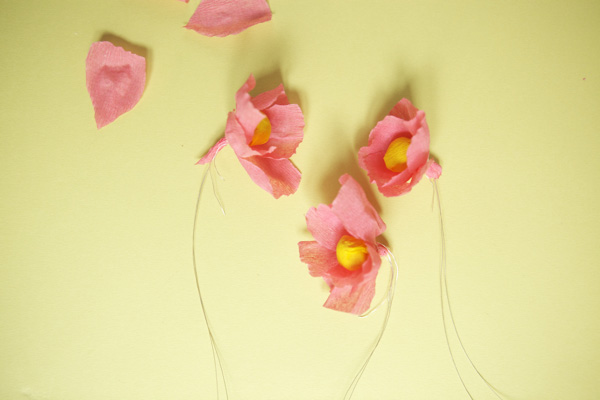
Step 10: Taking the center of the flower begin placing the petals around and then pinching it and holding it at the base. When you are happy with the fullness of the petals take a small piece of wire and tightly wrap it and twist it to secure it in place. When you are done you should have a nice simple flower.
Basic Chrysanthemum Instruction
Step 10: Take a fold of crepe paper and cut off a 4″ section. (If you want the flower big and puffy do a 6″ section.)
Step 11: Take the fold and cut along one side about 3/4 of the way through making thin strips of fringe.
Step 12: Repeat steps 5 through 7 to create the center of the flower. Begin wrapping the petals around the center and pinching it tight at the base.
Step 13: Continue wrapping it around until you are happy with the fullness.
Step 14: Wrap some small wire tightly around the base. Wrinkle and fluff the petals with your fingers.
Attaching the Flowers to Your Headband
Step 15: Gather the flowers you want to use together in one hand until they look pretty.
Step 16: Hold the flowers tightly together at the base and pull the wire taught.
Step 17: Take the headband and wrap the wire tightly around it until secure, trimming the extra wire if needed. Once it is assembled you can adjust the composition to your liking.
Thank you to my pretty friends Caroline, Meg, Lindsey, and Anne for letting me take their picture.







Meg
November 16, 2011
LOVE THIS!
Misha
November 16, 2011
how are you soo genius?? these are fabulous!
emily
November 16, 2011
love the animation (and the hats!)
marie anne
November 16, 2011
hi Jordan,
I am curious on what feature you use to create the animated hands on the still photograph.
It is really cool.
Marie-Anne
Hi Marie Anne, I made it on photoshop. It’s called an animated GIF (I learned how at blogshop!)
Becky
November 16, 2011
Adorable, as usual! Thanks Jordan!
Caroline
November 16, 2011
Love the GIF you made at the end!
Jenzie
November 16, 2011
these are so fun and cute! I definitely want to plan this for one of the bridal showers I’ll be hosting next year!
Jasmine
November 16, 2011
oh how cute! So fun and happy and perfect for almost any occasion!!
Marcela | Wholesale Flowers Co
November 16, 2011
A fun idea! They look so cute for any occasion!
teresa
November 16, 2011
So much fun….and adorable- thanks for sharing your talents.
Happy Day =)
Christine
November 16, 2011
Fabulous as always! I might make one to wear at home just for fun.
rachel!
November 16, 2011
TOO DARLING. i love it!
lily
November 16, 2011
i want to make these for a christmas party in red, green and gold!!
Oh – Fancy That.
Cathy
November 16, 2011
LOVE these! HOW fun!!!!!
Ridgely's Radar
November 16, 2011
Fabulous idea! Thanks for sharing!
Zsa Zsa
November 17, 2011
Oooh these are too pretty! Great for upcoming christmas parties with little girls (and not so young and little anymore ladies too!) 🙂
jaclyn @ thelateafternoon
November 17, 2011
cutest party hats ever!
brittany
November 17, 2011
so that’s where you find those amazing shades of crepe paper! good to note!
I actually get them here in Paris from BHV the best crepe paper comes from Europe ;).
Hannah @ Sparrow + Spark!
November 17, 2011
These are so fun! Lovely.
Sugar Daze/Cat
November 17, 2011
Those are too cute! Love your models too! 🙂
Alessandra
November 17, 2011
so cute!
Mary
November 17, 2011
So so SO cute!
YUMiChA
November 17, 2011
Oh its so cute! I love that!
Cecilia
November 17, 2011
These are just charming. great tutorial!
Jenny @ Hank + Hunt
November 17, 2011
OMG! I love those little hats, but the metallic crepe paper???I’ve died and gone to heaven!
Supal {chevrons and eclairs}
November 17, 2011
WHOA?! This is amazing!!
http://www.chevronsandeclairs.com
Hello Sandwich
November 17, 2011
This. Is. Just. So. Cute!
Love Sandwich
xoxo
Laure
November 17, 2011
These are lovely !
Donna
November 17, 2011
I’m going to use this to make myself a headpiece to wear to my husband’s company holiday party! The theme is “Havana Nights” and I think a fruit basket on my head (a la Chiquita Banana lady) is going to be too heavy. This will fit the bill quite nicely, I think.
Victoria@VictoryPaper
November 17, 2011
I was rewatching West Side Story last night (that darn Glee made me!) and during the song “I Feel Pretty” Maria totally dances around the room with a flower on her head that looks like this! So pretty!
fàtima -flowers by BORNAY-
November 18, 2011
ooooooooooooooooooooohhhhhhh
so cute!!!!!!!!!!!!!1
Mathilde
November 18, 2011
MAGNIFIQUE !!!! I love your blog !
Lindsey
November 18, 2011
I LOVE the animated jpg Jordan!
Kimberly Jones
November 21, 2011
How utterly adorable! I just love how colorful and whimsical these are! Great tutorial!
Laura
November 22, 2011
This is a cool DIY! I hope you don’t mind, i linked it on my blog!
http://frustratedwriterstyle.blogspot.com/
Laura.
Anneliese
November 27, 2011
Seriously so adorable! I love these. I need an excuse to make them. Thanks! And hope you had a happy Thanksgiving abroad!