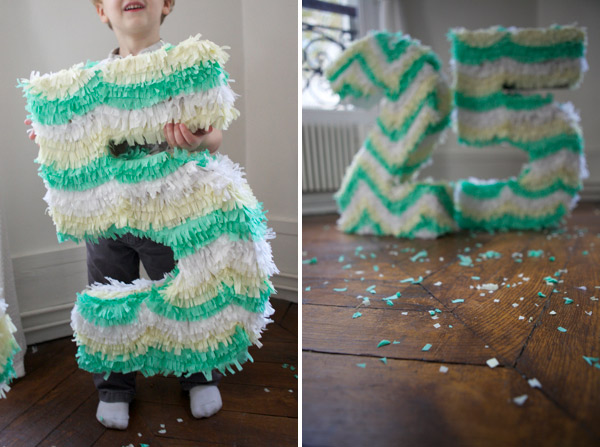
I’m starting a new series on Oh Happy Day on how to make different pinatas! Today’s pinata DIY is how to make a number pinata, though this could easily be a letter if you wanted to spell out a (short) message. This was a very fun project to do! Pinatas are so great and you really don’t have to wait for a party to make one. I love the idea of giving someone a pinata and filling it with their favorite things. But be careful, these pinatas are so pretty its tempting not to break them and just let them hang pretty in the corner. DIY instructions below.
Materials needed: Cardboard, Exacto, Pen, Ruler, Tape, Crepe Paper, Glue
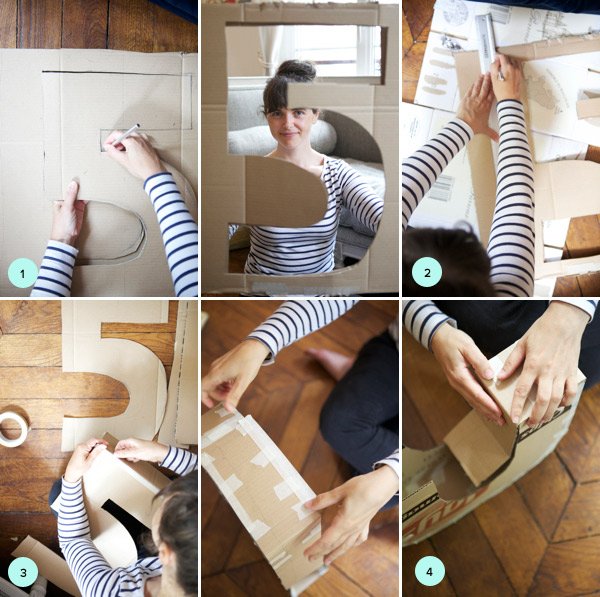
1. Making the structure. Stack two pieces of cardboard together. Draw your number and then cut through the two layers of cardboard at the same time. (Be sure to put some layers below them so your floor doesn’t get cut too! Our pinatas were about 20″ tall.
2. Cut strips of cardboard for the edging. Our strips were about 4″ thick.
3. Taking the strips tape together the top and the bottom piece on the seam. Reinforce it on the top and also on the inside.
4. When you get to an edge just make a crease in the cardboard so it bends easily. Making the structures is really easy and took about 20 minutes. These held together well after getting beaten with a stick but if I was making this for adults I would reinforce it with another layer or two of paper and glue. (Just apply glue to strips of paper and wrap the structures to give it extra support.)
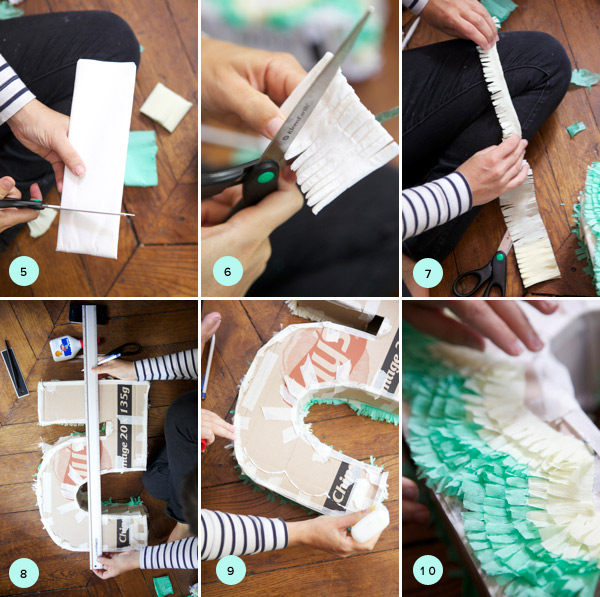
5. Decorating takes longer especially if you are doing a design. Take the crepe paper and make some fringey garland. (I explain in detail how to do that here.) First cut a strip of crepe paper about 3″ thick.
6. Cut each side of the strip into little pieces of fringe.
7. Unravel it and fold it in half so it is ready to glue.
8. I made a zigzag design and a scallop design for these two numbers. To maintain the design I drew lines on the number depending on how far apart I wanted the zigzags or scallops and then used that as a guide as I laid down the fringe.
9. Start at the bottom and draw the design in glue. Take the fringe and put down a layer.
10. Repeat adding glue and then another layer of fringe on top until your design is done. This part takes a while so best to put on some Friday Night Lights in the background since its a little mindless (and definitely goes quicker with a helper.) It’s nice because the fringe looks messy so it is really forgiving if you lay something down kind of crooked.
11. Cut a section at the top too add candy and then repair with paper, glue crepe paper. To hang cut two holes at the top and thread string through.
HAPPY PINATA-ING!


Colleen / Inspired to Share
August 15, 2011
Wow, this is so fun! A lot of work, but worth it!
kate
August 15, 2011
Wow, you make this look like something I might actually be able to put together! So awesome.
Jenn
August 15, 2011
So, so cool! I’ve never thought about making a DIY pinata- I love that this tutorial is totally unique. Thanks! 🙂
Kacie
August 15, 2011
My husband is turning 30 next month I can’t wait to make these. What to fill them with is the question!
Kacie
http://www.acollectionofpassions.com/
Marcella
August 15, 2011
I love this! The possibilities are endless with pinatas!
Pâtisserie Paris
August 15, 2011
Wow. They look awesome. I love the design on them 🙂
sharon
August 15, 2011
so beautiful!!
Rebecca
August 15, 2011
Jordan you are incredible & these are beautiful!
Ashley
August 15, 2011
You never cease to amaze, Jordan, and this DIY is no exception to that. Fantastic.
Margaret, Enrout
August 15, 2011
Love this Jordan! I’m going to make the “2” for my son’s birthday in November. =)
Kate
August 15, 2011
Bloody brilliant! I want to make this for someone special (preferably with only a single-digit birthday….)
Becca
August 15, 2011
Jordan! Too much fun! Did you know that Martha Stewart Crafts for Micheal’s just came out with fringe making scissors? Triple cuts! Made me think of you….
Maria
August 15, 2011
So unbelievable!!! I love this, will use it hopefully in the future!! thanks for the inspiration, jordan!
ana {lucky in love sf}
August 15, 2011
god – no matter how old I get, a pinata still looks like the coolest/funnest/best thing ever!
elizabeth antonia
August 15, 2011
sooo cute. definitely going to have to make a 3 for my little girl’s birthday in december. xo
jacin {lovely little details}
August 15, 2011
you seriously need fringe scissors, girl!
jacin {lovely little details}
August 15, 2011
(they will save you time cutting piece by piece :))
donaville
August 15, 2011
wonderful! love this 🙂
Debbie
August 15, 2011
You are full of amazing, original ideas! If only every blog were like yours.
Debbie
August 15, 2011
You are always full of such amazing, original ideas! If only every blog were like yours.
Sophia Harcourt
August 15, 2011
Thoroughly impressive. An American woman living in Paris, France making pinatas that are actually originally Chinese rather than Spanish. Too many continents for me, I’m dizzy:). Fantastic job by the way, they look great!
jonahliza
August 15, 2011
i heart this post. thank you! cant wait to make a pinata for the next party. i heart ohhappyday! have a great rest of the week.
Irene
August 15, 2011
Good stuff! I am Mexican-American and seriously, I was giddy inside after seeing this post. I’ll need to convince my sisters to make me a ’32’ for next month. ha!
tvmom
August 15, 2011
so excited for this series! love your number pinatas, I’ll have to try this! I recently made a chalkboard pinata for my son’s 1st birthday…so so so easy! http://www.amillionthingsilove.com/2011/06/603-chalkboard-pinata.html
Emily
August 16, 2011
what a fun project! i know you can do other numbers, but really made me want to turn 25 again! ha!
jaclyn @ thelateafternoon
August 16, 2011
i am so incredibly excited for this series!! i made my first pinata (a goldfish) a few months ago and have been looking for the right occasion to make another! can’t wait to see what other pinatas you come up with!
Will
August 16, 2011
Ahhh this is so fun! I can’t wait to try it out.
Lexi
August 16, 2011
Maybe a pizza box would be useful. Yours looks bigger than 20″ to me, though. My kids would love to help!
Jane Flanagan
August 16, 2011
This is amazing! You’re wonderful.
molly
August 16, 2011
you are a creative genius! this gets me so excited for party planning!
emily
August 16, 2011
love!
Meg
August 16, 2011
sersiously…what can’t you create is the question? NOTHING! you’re amazing.
Peaches
August 16, 2011
SWEET VALLEY HIGH! Never in my life have I wanted an excuse to beat candy out of a cardboard box! BRILLIANT. I cannot wait for the rest of the series. Please, oh please tell me there will be animal shapes in the mix….what would I give to make my own Rhinoceros?!?! Might just have to hang one up above my dining table all year round!!
Brigette
August 16, 2011
I had never thought of making my own, looks like such a fun project!
rebecca s.
August 16, 2011
fabulous!!! i am going to rope my husband into making this with me! thank you so much for sharing such fun, wonderful ideas. i cannot tell you how much i enjoy your blog. xoxo.
Collins
August 16, 2011
so much fun!
Jenny
August 16, 2011
You posted this ON my birthday AND i just turned 25. It was meant to be. I need to make these.
Jessica LaTour
August 16, 2011
I love the idea of a number pinata! The aftermath is much less traumatic than a mangled cartoon character. (I actually gasped when I read through that one step & thought you were referring to Friday Night Lights as being mindless. Must slow down when reading through such an exciting post!)
Ann
August 16, 2011
This is one of the greatest DIY’s! I can’t wait to find an application for it. Your blog is so delightful and full of great inspiration – I’m so glad I’ve stumbled across it.
Karina B.
August 16, 2011
Hi there! This idea seems fabulous. However, I have a question: Have you already used the piñata? How did it hold up to the beating? Seems like it would need a bit more reinforcement in the cardboard than just tape to hold up to the swaying and hitting. So, how did it do? Did it fall, or hold well?
bettijo @ PagingSupermom.com
August 17, 2011
I made letter pinatas for my cousin’s wedding luncheon (we did the bride and groom’s initials). It was a fiesta theme and these were just right as centerpieces for the food table.
Angie D in ohio
August 17, 2011
This is pretty amazing…..
Elle
August 17, 2011
These are so festive, I plan on making these for my bf’s 30th. Can you specify how you attached strings to them to hang them up?
Heather Sioux
August 17, 2011
There is actually something called fringe festooning that is really cheap & would save you the cutting steps!
http://www.factorydirectparty.com/25-turquoise-fringe-festooning.html\
great work! love it!
Jeanette
August 19, 2011
Thanks so much! You’ve inspired me to make my own wedding cake pinata rather than buying it. I have a box-set of Mad Men to help. 😉