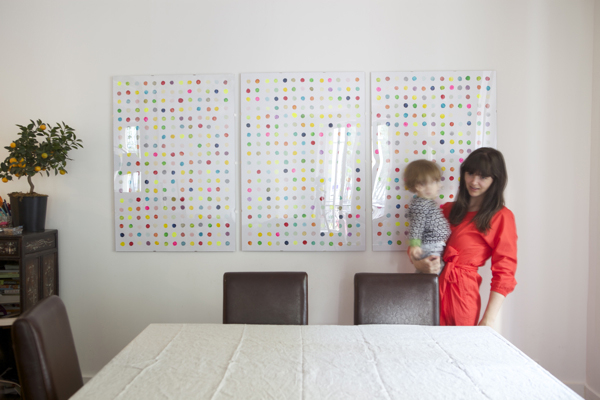
We are in a little bit of a funny spot since our home in Paris is somewhat temporary. I don’t really want to spend a lot on artwork or even framing since we’ll just be here for a year. Most of our budget is going towards practical things so art has gone to the bottom of the spending list. But we still want something to grace all our large blank white walls. I came up with a few projects I’ll be sharing in the next week or two on how to make art and frame it for cheap.
First up is this potato print artwork. I tried this technique first on a small piece of paper and I liked the result so then I made three large versions. It turned out so happy and colorful, it completely transformed the room. This project did take some time but was very affordable to make.
Materials: 5 potatoes, acrylic paints in rainbow colors, black, white, and fluorescents, paper cups, cheap brushes for mixing paints, plastic plates for mixing paints, ruler, pencil, large pieces of paper (however big you want your artwork.)
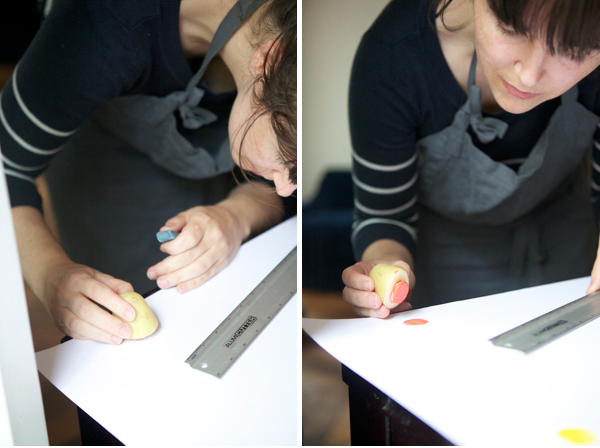
Step One: Using your ruler and pencil place little marks where you are going to stamp your potato. I did mine about 2″ apart.
Step Two: Mix paint. To get the greatest variety of colors mix your paint yourself in your paper cups. (Not to mention they come out so much prettier when they aren’t right from the tube.) Pull out your color wheel from elementary school and make darks and lights in the palate you want by adding whites or blacks or complementary colors. Be sure to add a little water so the paint is a nice consistency not too thick (and not too watery either.) I had about 18 colors in my palate 11 were bright and the other 7 were neutrals. One tip: If you are going for a colorful end result remember you need the neutrals in the artwork to make the brights really pop.
Step Three: Cut one or two of the potatoes in half and cut out a 3/4″ circle with a knife. You’ll want a few potato stamps so you can print with a few colors at the same time.
Step Four: Printing with one color at a time place the paint on the plate so you can stamp the potato in it. Then start to stamp randomly throughout the print. I kept a scratch paper nearby to test it when the stamp has too much ink. I had to erase the little pencil marks as I went and I started with 11-13 dots then went back and filled them in if I needed more of that color. It isn’t important that the stamping is perfect. Mine were a little sloppy but as long as I got in the vicinity of my pencil marking it still came out great. Continue stamping with all the colors until it is all filled out. Et voila! Your artwork is done.
Notes: Its important to do all in one sitting because your paints will dry out and your potatoes will get moldy. The painting part took 3-4 hours so get someone to help do the stamping to make it go quicker.
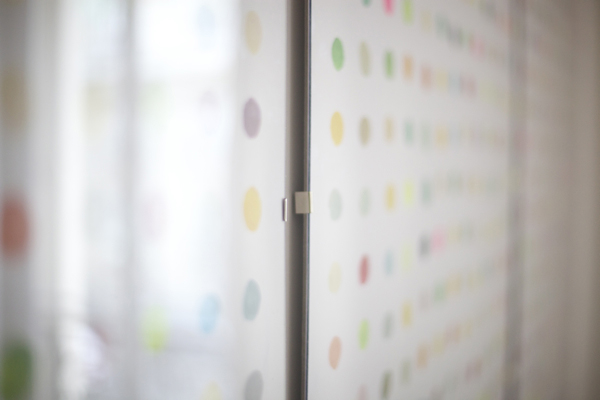
Framing: For framing we spent $6 on small metal studio clips and $30 on thin plexiglass from a Home Depot type store (they cut it to our specifications.) Then we backed it with some thick chip board, and then bound it with the studio clips. We were able to frame all three large pieces for about $35.
all photos by Oh Happy Day


kelly : pinetothepacific
June 30, 2011
genius, as usual! this looks FANTASTIC.
Laura
June 30, 2011
Wow! I’ll have to try that as a joint project with my daughter. Thanks for the tip!
birdie to be
June 30, 2011
OMG I love love love this! I would love to try this!
Sarah H
June 30, 2011
I love it! I think I actually like the unfinished version at the bottom more than every slot filled in. Very nice!
Izabella Dennis
June 30, 2011
This is fabulous!!! Who would have thought it was potatoes! I may have to try this at home …
Kristin
June 30, 2011
This is so awesome! I love it.
Kristin
June 30, 2011
What kind of paper did you use? It looks so white and I’ve had trouble finding big paper where it didn’t have a little yellow tint. Can’t wait to try this.
denese
June 30, 2011
amazing! I love it, and, I love what looks to be your cheery coral Mango dress. Upon seeing your post not long ago, I visited the site and bought that very frock!!
cheers!!
best – d.
Caroline
June 30, 2011
You are so clever. This is a great idea. We used to make wrapping paper this way as kids- but I love this grown up version!
Emily
June 30, 2011
Looks just like Damien Hirst’s dot paintings.
http://4.bp.blogspot.com/_GffrTOIM1Jo/TJgFOsa7ApI/AAAAAAAAAGI/K3ICt4MjySQ/s1600/Damien+Hirst+-+LSD+-2000+.jpg
Khali
June 30, 2011
Brilliant!
Nicole
June 30, 2011
This is so fun I can’t even take it. I have a couple empty walls that are just crying out for colorful artwork like this! And thanks for the tip about neutrals and bright colors, I really would not have figured that out myself!
Sharon
June 30, 2011
so awesome
kaela
June 30, 2011
wow those look so cute and i love that they are inexpensive! not sure where to get studio clips, chip board, or the big white paper since i live in the middle of the city (denver)…not anywhere near a home depot type store….but if i can figure it out i will certainly try this out!! looks great in your house!
Kacie
June 30, 2011
What a brilliant idea! Love it. Thanks for the inspiration. I think I may try this for our guest room!
Thanks.
Kacie
http://www.acollectionofpassions.blogspot.com/
caz
June 30, 2011
wow! fantastic.. it’s always hard to find cheap ways to decorate walls when renting and travelling… this would be cool even without the framing I think..
Thanks for the great idea!
Brittany
June 30, 2011
How fun! What a great idea!
Emily
June 30, 2011
Fun! I’m going to check into the HD plexiglass thing. 🙂
kl
June 30, 2011
Very clever! Who’d have thought? Love it to bits!
Andrea@FancyThat!
June 30, 2011
Fun! I love diy artwork–custom, personal, and cheap. All happy words.
jordan
June 30, 2011
@EMILY I know picture or framing stores usually have plexiglas onhand too.
@KRISTIN My sister had the paper and she gave me some. I’m not sure on the brand.
Sarah Robertson
June 30, 2011
I love love love it. If you sell (or make more) I will buy.
Kate
June 30, 2011
LOVE! LOVE! LOVE! Your keen eye for color is what makes this so beautiful.
Mariela
June 30, 2011
Love it!, great idea. Very colorful and fun.
Katie
June 30, 2011
I love this! This would be awesome for pretty much any room in the house and it can be so easily personalized.
stephanie
June 30, 2011
you are so inspirational! one of my favorite blogs by far.
This Good Life
June 30, 2011
Astonishingly simple yet effective in its beauty!
– And a lovely blog to boot! 🙂
All the best,
This Good Life
Erin
June 30, 2011
Ohhh my geesh! I just love this! It is the perfect colorful/crafty/summery/practicle/(and perhaps most importantly) HAPPY solution to ANY space! It looks beautiful 🙂
ainsley
June 30, 2011
what a super fun project! i love this! and the outcome…
LuLu
June 30, 2011
OMGEEE!!! I just love this idea. Even when reading it I wanted to go out and buy all the materials to give it a try! My sister is also obsessed with DIY artwork so I of course forwarded it along to her as well!
http://www.ACandidLife.blogspot.com
Penelope@thirdroomstudio
June 30, 2011
CUTE idea!
rebekkah
July 1, 2011
this is so cute and inspiring! thank you!
xx
http://lifeishappymostofthetime.blogspot.com/
Michelle
July 1, 2011
These look great – good idea. Always tricky when your living somewhere temporarily to make it look great for as little as possible but looks like your doing a great job..
Anna
July 1, 2011
You mention ersaing the pencil marks. You mean you did that before stamping (but how do you know where to stamp then…) or after (doens’t that make the paint bleed?)?
The result is amazig. i wonder what it would be like to use tints onf one colour… would be great in our living room!
right toys
July 1, 2011
Toys make a child happy and active. When a toy is there, perhaps a kid will not ask for anything else. One has to remember that a kid has world of imagination to live in, and toys give access to that land of imagination, constructed with joy. That’s what a toy mean to a kid. One can make a trip to http://www.righttoys.in/products.asp?brand=160 for further details.
Bri (like the cheese)
July 1, 2011
Oh, I really like it with some empty spots (bottom left picture) too!
Vicki Archer
July 1, 2011
This is os clever and looks brilliant….Have a happy weekend…xv
Rebecca
July 1, 2011
What a great idea, and it looks SO fun! 🙂
My Traveling Troop
July 1, 2011
Beautiful! Love how the colors pop off the white walls and paper!
Libby K
July 1, 2011
Wowza. That is so pretty. I kind of love it.
April Cole
July 1, 2011
FANTASTIC!
Very creative… love it :]
Meg
July 1, 2011
This is so lovely. Love the colors! And your dress in the first shots!
Hooay for polka dots!
Nicole
July 1, 2011
Wow, thankyou so much for this cheap framing idea!
sherri
July 1, 2011
This art work makes me smile!
Claudia
July 2, 2011
Love it!!! I’ve done something similar with a wine cork or a cork stopper from Belgian beers.
Ingrid Jansen
July 2, 2011
Oh happy DOTS!
Zoe
July 2, 2011
I love this so much I have been thinking about it all day.
Sonia
July 2, 2011
Love it! I did something like that using potatoes to my typography class, it was super funny. Love how it turns out, you can’t imagine it was done using potatoes!
Kisses!