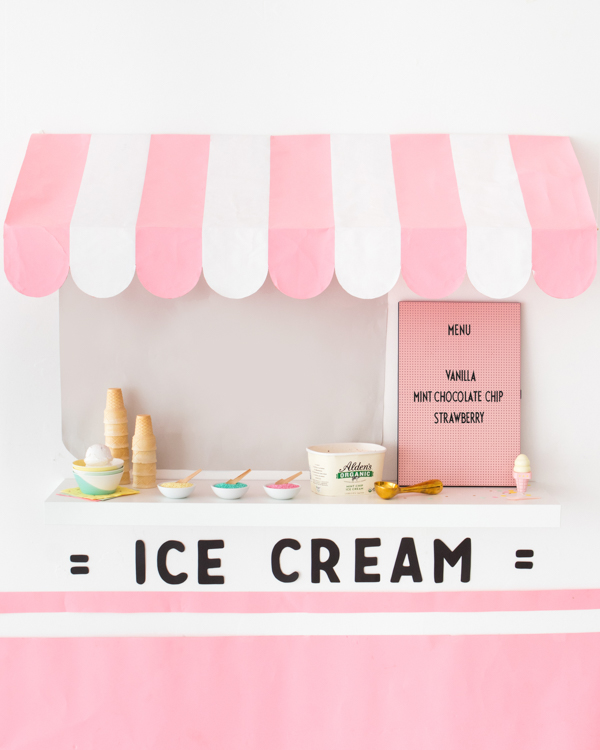
Ice cream trucks will always have a special place in my heart — I’m pretty sure I spent my first earned dollar at one growing up! For this installation, we borrowed all of the quintessential elements of an ice cream truck and turned our studio into our own little food park! It’s such a modern, interactive way to host an ice cream social. And who wouldn’t want to take have their photo taken ordering at the window?
If I had a little one, I’d make this a permanent fixture in their bedroom! Instead of a roll of paper, use pink contact paper to make the stripes last longer — the shelf can double for both playtime and storage!

Materials Needed: 26″ Savage seamless paper (in coral and gray tint), ruler, pencil, oblong dish, x-acto knife, scissors, artist’s tape, white acrylic paint, paintbrush, 1/4″ by 48″ wooden dowel, fishing wire, gaffers tape, cardstock
Step 1: It’s best to make for an area that already has a shelf, but if not, we used this from Ikea. Measure the width and depth of the top of the shelf. Then cut a piece of seamless paper that is the 2” longer than the width of the shelf and 8-1/2” plus the depth of the shelf.
Step 2: Draw a line to section off the top 3” of the paper and the bottom 5-1/2” of the paper. The remaining middle section should be the width of the shelf.
Step 3: Trace the bottom of the dish along the bottom of the 5-1/2” section to make a scalloped edge. Glue cardstock to the back end of the 5-1/2″ section. Then cut out the scallops.
Step 4: Apply artist’s tape to the pencil lines and paint every other section white. Let the paint dry before adding a second coat. Once dry, carefully remove the tape to reveal stripes!
Step 5: Fold back the 3” section at the top to create a tab, and the 5-1/2″ section.
Step 6: Time to hang the awning! Tie two long pieces of fishing wire to both ends the wooden dowel. This dowel will lay under the fold of the scallops and support the weight of the awning. Secure the ends of the fishing wire to the ceiling with gaffers tape, so the dowel hangs horizontally. Rest the fold where the scallops start on top of the dowel, then attached the 3” tab section to the wall with tape.
Step 7: Cut a rectangle with rounded edges out of gray seamless paper for a window. Tape to the wall to secure.
Step 8: Print your “ice cream” letters, and an ice cream cone design on cardstock. Then, tape the design to the wall.
Step 9: For the side detailing of the ice cream truck, unroll and cut a long piece from the seamless roll and tape to the wall, under the letters. Cut a 2” piece that is the same length as the first piece and tape above the larger piece, leaving a 2” gap between.
Step 10: Fill the shelf with all the essentials: ice cream, cones, and sprinkles. You’re all set!

Crafting by Justine Pon
Photography & Styling by Naomi Julia Satake
SHOP THE POST: Ruffle dress, knot slide sandal, letter board, letters, gelato plates, sprinkles napkin, ice cream scoop, giant ice cream bank, wooden ice cream playset


Samuel Novick
March 15, 2018
Oh this is so cute, this would be perfect for some of our events. Thanks so much for this article! Very helpful.
Julie Gallagher
March 15, 2018
This is the most amazing idea I’ve seen all year! LOVE IT!
Marie
March 15, 2018
Where did the ice cream letters come from?
We cut them out of black cardstock!
Indya | The Small Adventurer
March 16, 2018
This is the sweetest thing ever, no pun intended! My place has a very sweets n’ treats theme going on, and I’d totally set a permanent version of this up if we were able to affix things to the walls. Guess that’s something to put on the “when we own a house” list ?
Malia
March 16, 2018
So cute! I have to figure out how to make a version of this to use outside for summer parties. Unless you guys want to do that for us (pretty please!)
Zair
March 22, 2018
his is the sweetest thing ever, no pun intended! if we were able to affix things to the walls.
http://www.gunlukdairekiralik.net/