


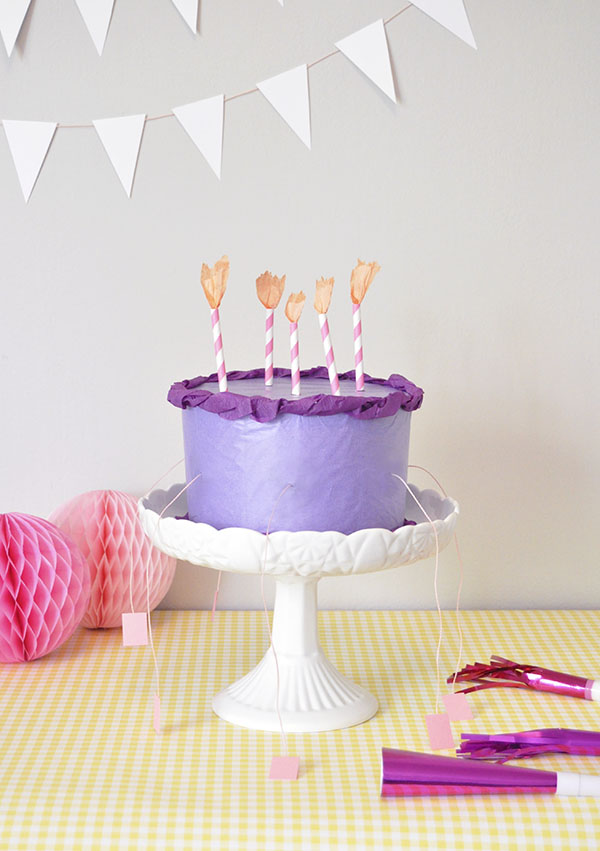
A little while ago I was looking through a 1950s craft book and read about the Christmas tradition of a Jack Horner pie. Traditionally, the book says you wrap small presents, tie each one to a string, and put all the presents in a box/basket with the string tails hanging out of the box – then your party guests each take a string and pull it to see which prize they get.
This tissue paper birthday cake was inspired by that idea – instead of loot bags, have party guests each grab a string, pull, and see what they get! Alternatively, this would also be a fun way to distribute prizes for game-winners throughout the party. (P.S. Fan of paper cakes? Make these candle and cake hats for your guests!!)


Supplies: Tissue paper (orange/peach for flames and any color for icing), crepe paper streamers
, card stock (to match tissue paper), paper straws
, pencil, scissors
, glue stick
, hot glue gun
, string
, circle punch
, cardboard cake base
, candy/prizes
Step 1: On card stock, trace and cut a circle that is just smaller than the size of your cardboard cake base. This will be the top of your cake.
Step 2: Cut rectangles long enough to wrap around the circumference of the circle you just cut. The width of these rectangles will dictate the height of your cake – the cake pictured is 4 1/4″ tall.
Step 3: Hot glue the rectangles together to form one long strip. Use the circle punch to cut as many holes as needed – remember that the candy/prizes have to fit through these holes later.
Step 4: Several inches at a time, apply a thin line of hot glue to the edge of the card stock circle and attach the edge of the rectangular strip.
Step 5: Do this all the way around the circle, cutting of any extra length but leaving enough to overlap and hot glue the ends of the strip together.
Step 6: Trace the cake top circle onto tissue paper and cut about 1/4″ outside this line. (This allows for some breathing room when attaching to card stock circle.) Cut two of these circles.
Step 7: Use the glue stick to apply glue to the top of the card stock cake and attach the first tissue circle. Gently apply glue again and attach the second tissue circle. Cut off any excess tissue.
Step 8: Cut two rectangles out of tissue paper that are long enough to wrap around the cake completely and slightly taller than the height.

Step 9: Use the glue stick to apply glue to the side of the cake several inches at a time. Gently smooth down the first layer of tissue, doing your best to keep the top edge in line with the top of the cake.
Step 10: Once the first tissue layer is glued down all the way around the cake, apply glue to the bottom inside edge and fold the tissue paper inside to attach. Repeat step 9 and 10 for the second tissue layer. (Note: Depending on the opacity of your tissue paper, you may choose to apply another tissue layer to better disguise the card stock holes.)
Step 11: Cut two lengths of streamer (or crepe paper cut down) slightly longer than the circumference of your cake. Hold the two strips together and hot glue them to the edge of the cake, twisting, scrunching, and fluffing as you go. The idea is for it to look like a piped icing edge.
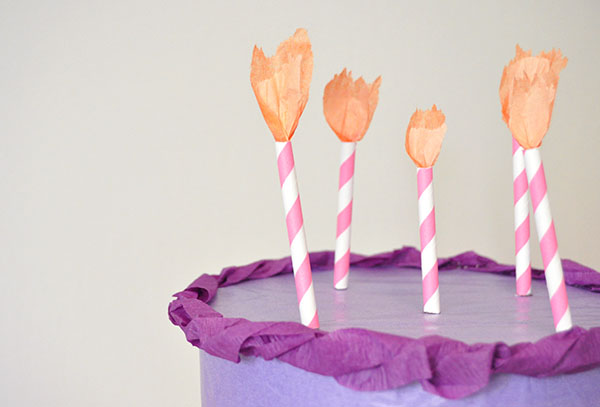
Step 12: To make the birthday candles, cut the paper straws down to about 3″ each. Rip a small piece of both the orange and peach tissue paper, layer them together, and twist one end. Use hot glue to attach the twisted end into the top of the paper straw. Repeat for as many candles as desired and use hot glue to attach to the top of the cake.
Step 13: Cut pieces of string into roughly 16″ lengths and tie/tape them to your prizes.
Step 14: Use your scissors to cut a 1/2″ slit into the tissue paper covering each hole. If your scissors aren’t sharp enough to do this, use a craft knife instead. Then thread the string from a prize through the slit, so that the prize is on the inside of the cake and the loose string is on the outside. Be careful not to tear the tissue paper when doing this.
Step 15: Once all the prize strings are threaded through the tissue, carefully gather the prizes together on the cardboard cake base and place the cake on top of them. Center the cake on the base and use tiny dots of hot glue to attach the two together.
Step 16: As before, hot glue and twist crepe paper to the bottom edge of the cake.
Step 17: Cut small tabs out of card stock and hot glue to the end of the loose prize strings. Once it’s time for your guests to collect their prizes, have them each hold a string in one hand and put a thumb from their other hand on the cake. Have everyone pull at once to reveal their prizes.


Anne's Scribbles and Doodles
July 17, 2014
Wow! This is amazing. I’ve made craft paper cakes for my mom when I was a kid but this is way cooler!
Shambray
July 17, 2014
How fun is this! Kids would LOVE this. I will have to try this for my daughter when she is older! Thanks for the fabulous idea!
Amanda
July 17, 2014
I love this! I had no idea that the Jack Horner pie started this tradition! In the south, an old tradition at bridesmaid’s luncheons was to have a “charm” cake. sterling silver charms were tied to strings and put in a cake. The bridesmaids each pulled a string to get their charm – a baby carriage meant you would be the first to have a baby, a ring – the next to get married, a horseshoe for good luck, etc. Cakes with prizes in them should be made for every occasion!
Carly
July 17, 2014
Ahh, what a cute idea! Humans are getting so creative with fake cakes, lately.
Cate
July 17, 2014
So cute! What are those adorable little plastic fruits?
Hi Cate – yes, Heather is right! They’re filled with a sweet candy powder; I found them at the dollar store. 🙂
Heather
July 17, 2014
@Cate
They look similar to something I used to get as a kid. They were filled with fruit flavored powdered sugar. http://candyaddict.com/blog/2006/03/06/retro-candy-flashback-candy-powder-filled-plastic-fruit/
Kali // 204 Park
July 17, 2014
So Creative!! I love it!!
xo, Kali
monique
July 18, 2014
I love this! It looks amazing 🙂 So creative and fun
Geetha
July 18, 2014
A-M-A-Z-I-N-G. Such a clever idea.
Rachel
July 21, 2014
This is so cute! Definitely will have to try this with all the tissue paper that I have.