Jordan is most definitely the queen of pinata crafting! I loved her mini pinata favors so much! I thought I’d come up with a slightly more simple pinata favor DIY. I think these little hexagon honeycomb shaped favor boxes and printable tags are perfect for a spring party and they won’t take super-long to make.
Materials: printable hexagon shape template, card board or cereal boxes, yellow tissue paper, scissors, masking tape
, paper glue
, printable favor tags “so glad you could bee here”, ribbon
, candy to fill your mini pinatas
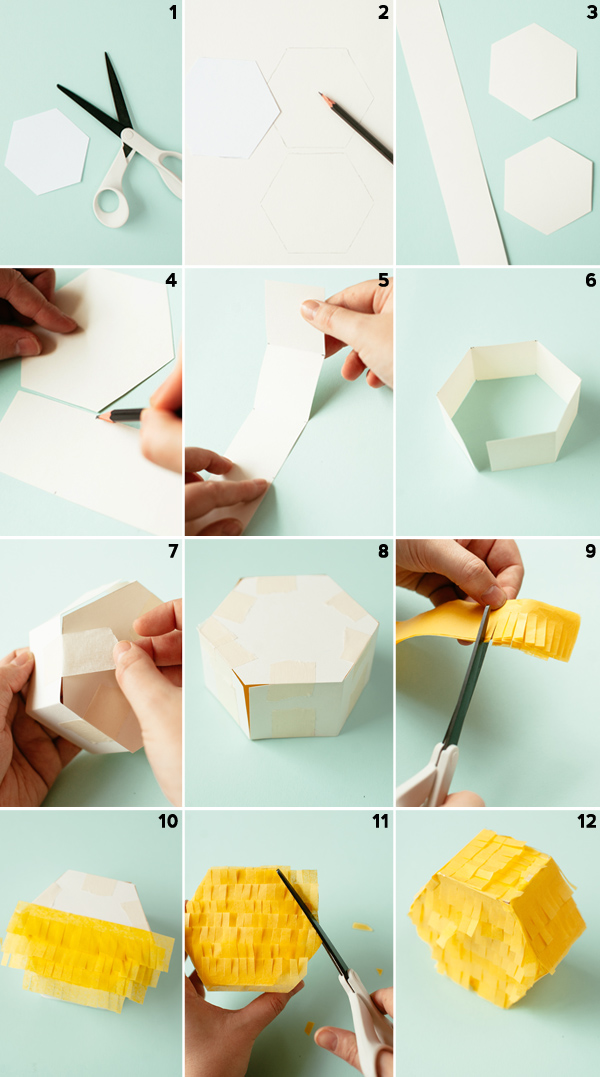
Step 1: Print and cut out your hexagon template
Step 2: Trace outlines of your template onto card board
Step 3: Cut a long even strip of cardboard (this will be the sides of your pinata, about 1 1/2″ is a good width)
Step 4: Mark your strips with a pencil, the distance between each mark should be exactly the length of one side of your hexagon shape
Step 5 & 6: Fold the strip 5 times at the marks, so that you get 6 sides, then cut off any excess
Step 7: Tape the strip to one hexagon with masking tape, then tape the 2nd hexagon
Step 8: Make sure you leave one corner of your hexagon box open – this is where you will fill in your candy
Step 9: Cut some fringey strips of tissue paper
Step 10: Attach fringe strips to the top of your pinata using paper glue. Start at the bottom and work your way up.
Step 11: Cut off any excess tissue paper along the hexagon shape.
Step 12: Repeat this on the back and sides of your mini pinata
Fill in your candy, then close the pinata. You can use a little bit of paper glue or a strip of tape to fix. Now print out the favor tags, cut out along the lines and punch a little hole into the top corner. With a thick needle attach some ribbon to the top corner of your mini pinata, then fiddle in the tag, tie a knot and you’re done!


Birdy& Bambi
March 4, 2014
Love it!!! So pretty!!!
Here’s what inspired us today….
http://lasagnolove.blogspot.de/2014/03/about-jealousy1-fertig-13032014_4.html
Love from Germany and thanks for sharing,
Bambi and Birdy
~amy~
March 4, 2014
absolutely darling!
Brandyn | Southern Distinctions
March 4, 2014
So cute! Anyone would love one of these.
Stephanie
March 4, 2014
These are too cute, I bet these would make a really cute party favor!
Definitely!
Amanda {Planning It All}
March 4, 2014
Great idea! Easy directions.
Megan
March 4, 2014
This is such a great DIY. Thank you for outlining the steps so well – makes it user friendly, approachable and do-able!
Absolutely love your blog.
~Sydney (Sister Style)
Thanks! Michaela did such a great job on this post!!
Rachel Follett
March 4, 2014
These are so cheerful and sweet! http://www.lovelyclustersblog.com/
Tess @ Tips on Life & Love
March 4, 2014
These pinatas are so cute! What other sorts of candy or goodies would you recommend putting in them?
Hey Tess! You could put any kind of candy in – as long as it’s small enough to fit through the hole. It would be fun to use honey-flavored candy!
chelsea
March 4, 2014
These are adorable!
Katie
March 4, 2014
Cute idea and they look easy to make! I will have to try this!
http://www.agirlnamedkatie.com
2moiselles
March 4, 2014
That’s so lovely!! Love it!
virginie
March 5, 2014
Super cute idea!
Jessica
March 5, 2014
These are super cute!
Faith
March 6, 2014
sooo love the idea….my Babu is turning 1 these fits well on her Beeday theme…… thanks alot….
Perfect!