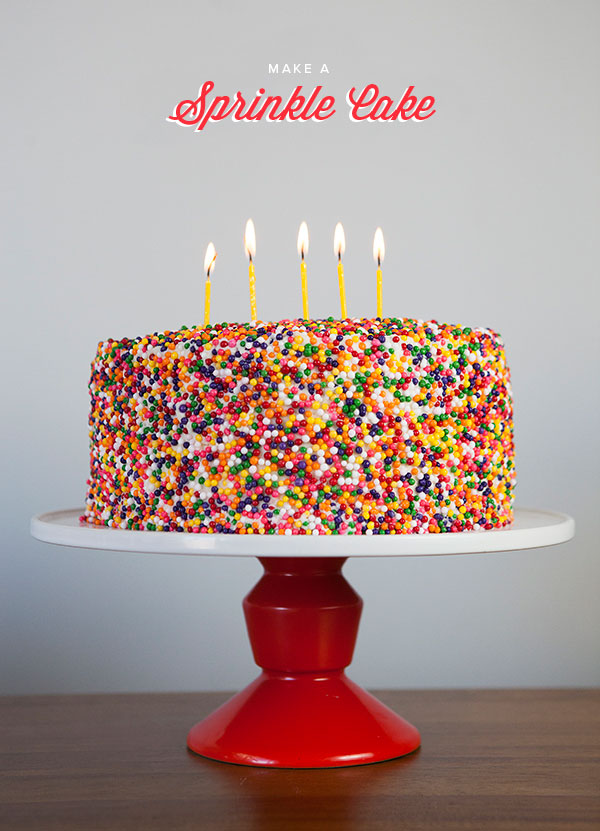
Who doesn’t love a cake made from scratch?! But when it comes to frosting it, things can get a bit frustrating. So in my opinion, the easiest way to decorate a cake is with sprinkles! Not only is it a foolproof way to finish off a cake, it also makes quite the celebratory statement, and it’s just so fun. I’ve learned that there is more than one way to sprinkle a cake (and unfortunately most methods result in a few extra sprinkles scattered about the kitchen). If you’re working with a larger layer cake, I’m a fan of the “pat” method – if it’s a smaller cake without layers, I recommend the “roll” method. Layer cakes tend to be more fragile, so while the “pat” method is a bit more tedious, there’s no chance your layers will shift. Smaller cakes or any cake that doesn’t have layers are sturdier and better suited for the quicker “roll” method. Regardless of your chosen method, one thing is for sure – cakes just seem happier when dressed in sprinkles! (PS – Check out the sprinkle cake in my first cookbook!)
Materials: Delicious cake recipe (here’s my favorite), sprinkles (about 1/2 cup for a standard 9-inch layer cake), buttercream or favorite frosting recipe, offset spatula, shallow tray, candles
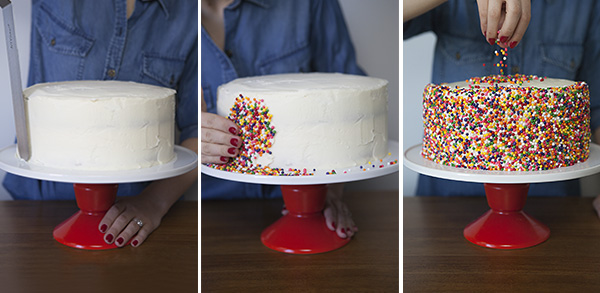
DIY Instructions for large layer cake – the “pat” method:
Step 1: Bake cake, cool and remove from pan. Wrap tightly in plastic wrap and freeze for at least 1 hour before frosting with buttercream. Cakes can be baked, wrapped and frozen up to 2 months in advance.
Step 2: Frost chilled cake with a layer of buttercream. It’s important that your frosting is fresh so that the sprinkles will adhere easily. Transfer your cake to a cake stand with rim (preferably) to catch any loose sprinkles. or, set your cake stand inside a shallow pan to catch the sprinkles.
Step 3: Using clean hands, gently pat handfuls of sprinkles onto the sides of cake until covered. Avoid firmly pressing the sprinkles into the frosting as it will make the cake look overworked and uneven.
Step 4: Add sprinkles on top of cake taking care to blend the top with the sides.
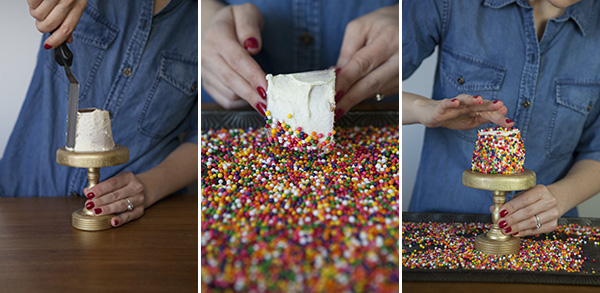
DIY Instructions for mini cake– the “roll” method:
Step 1: Follow step 1 listed above. I used a popover pan to bake my mini cakes.
Step 2: Frost only the sides of the chilled mini cake with a layer of buttercream, leaving the top unfrosted.
Step 3: Carefully transfer the cake on its side to a shallow pan filled with sprinkles.
Step 4: Gently roll the cake in the shallow pan until the sides are completely covered. Transfer back to the cake stand or serving plate.
Step 5: Frost the top of the cake with a small offset spatula and sprinkle, blending the top with the sides.
Photography by Kylie Whiting for Oh Happy Day


Brooke
February 11, 2014
Aw I totally love this! I’m no good making frosting look pretty so this is perfect. And now I really want cake, haha.
Kelcey
February 11, 2014
This is so cute- I am actually baking a cake right now and wish I had sprinkles haha
-Kelcey
hellokelcey.blogspot.com
Evelyn Theus
February 11, 2014
What a beautiful cake. I really like these colourful sprinkles.
Jesse
February 11, 2014
i’m making this for my son next year!
http://semiweeklyeats.blogspot.com/2014/02/parenting-ups-downs-and-inbetweens-vi.html
Casey @ The Maine Mrs.
February 11, 2014
Love this sprinkle cake! My frosting job is always a little less than stellar so this is a great way to cover my shortcomings.
Brandyn | Southern Distinctions
February 11, 2014
This is so cute and fun for any occasion!
STEL Style
February 11, 2014
so colourful cake, i love it!!!
http://www.stelstyle.com
Stephanie
February 11, 2014
That cake is just the cutest! Love those sprinkles!
Caitlin
February 11, 2014
how creative! i love that roll method! i always liked the look of a cake covered in sprinkled, but never thought about how to achieve it.
Lindsay // Shop Ella Lou
February 11, 2014
There is something so wonderfully cheery about a sprinkle-covered cake. I am definitely adding this to my birthday arsenal 🙂
Raluca | WhatWouldGwynethDo
February 11, 2014
Totally not trying to spam your post, but you guys might appreciate this take on the sprinkle cake we did for my son’s 2nd — so easy to add a stencil and personalize it:
http://www.pinterest.com/pin/138204282288046034/
So cute!!
suzy
February 11, 2014
! Awesome tip about freezing the cake! I’ve tried countless times to do a picture perfect frost job, only to despair when the cake starts to crumble and mix with the frosting. Also, way cute sprinkles–considering this for my toddlers birthday party next month. Cheers!
christine
February 11, 2014
After learning that sprinkles are called “hundreds and thousands” in Australia, I want to call them that all the time! except its 2 extra words..but oh so wonderful!
Kelly | Little Vegas Wedding
February 11, 2014
Ack! Where was this tutorial a few weeks ago!? I went with the pat method and as soon as I started, wished I could switch to the roll method. I’m still finding sprinkles all over the kitchen, despite doing it in the sink. 🙂 The cake was well received though – I did four layer of pink ombre within. It really is a stunning presentation and worth the work (and sprinkle-splosion!)
Yes, the process can be a little messy. 🙂 Great idea to do it in the sink!!
allie @ 6000 miles to home
February 11, 2014
so festive and adorable! I love the tiny version :).
http://6000milestohome.blogspot.com/
Lashley
February 11, 2014
I am a funfetti junkie, so I love how this would be funfetti-ish without all the nasty store bought mix/frosting additives. Real cake and real sprinkles, ftw!
Snappystreet
February 11, 2014
Oh how fun! Who doesn’t love sprinkles?! It looks gorgeous!
Lea
February 11, 2014
It looks so adorable! I love it.
Lea
February 11, 2014
It looks so pretty and adorable! I absolutely love it.
Eva
February 11, 2014
I LOVE sprinkles and i always get happy when i see such a gorgeous sprinkle cake. 🙂
Didn’t know the roll method but i’ll definitely gonna try it.
Tanks for this tipp. Love Eva
Jeanine
February 11, 2014
Sooo gorgeous yet I couldn’t decorate a cake that well to save my life
Tess @ Tips on Life & Love
February 11, 2014
This is my dream cake! How might you change it for Valentine’s Day? Maybe pink frosting?
Totally! Or, pink sprinkles.
Becca
February 11, 2014
So cute! I love how festive this looks! I’m impressed you don’t get sprinkles all over the whole kitchen when you do this. I’m a bit of a messy cook : /
XOXO
Becca | Ladyface Blog
abby - little city adventures
February 11, 2014
This is gorgeous!! And very informative! Thanks!
Jourdin
February 12, 2014
This is so adorable. I think I would pass out from sugar overload, though!
Ha!
Andrea
February 12, 2014
What a beautiful cake, and so simple!
xoxo,
Andrea
http://www.andreaeveryday.com
Pixie Ronn
February 12, 2014
I can’t wait to try this! Fab! x
http://pixieronn.blogspot.co.uk/
W. Brown
February 12, 2014
Photo’s are a piece of art.
Wendy
February 14, 2014
Such a fun cake! I love the cake stand! Where is is from?