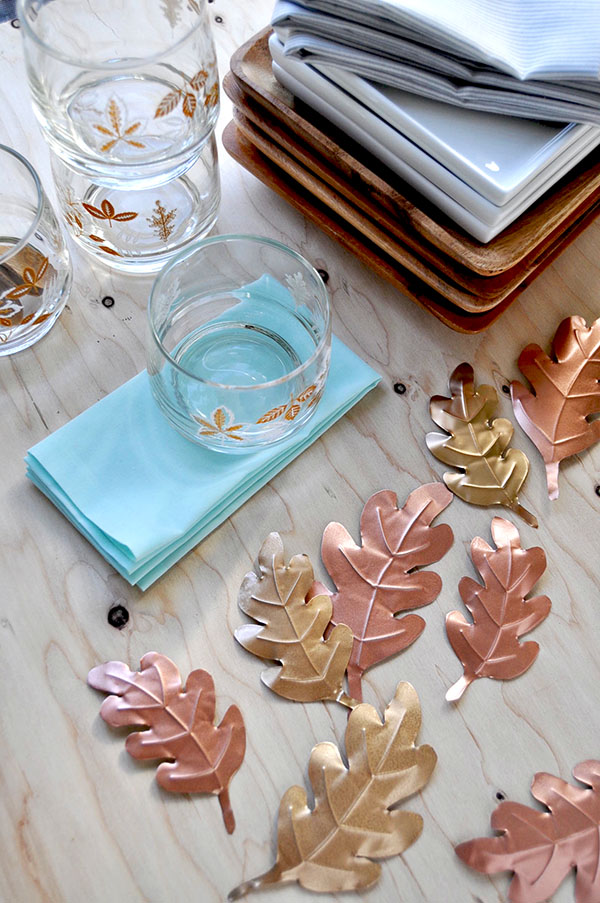
Thanksgiving dinner with my extended family is almost always potluck style. When we’re hosting, I always want to decorate the table but don’t know how much of the table will be covered with bowls, platters, and plates and how they’ll all fit together. With this in mind, I thought these metallic leaves would be a fun way to solve this little dilemma. Line them up along a table runner, scatter them around the table, or use them to dress up place settings – you can easily move them to accommodate whatever dishes your guests bring.
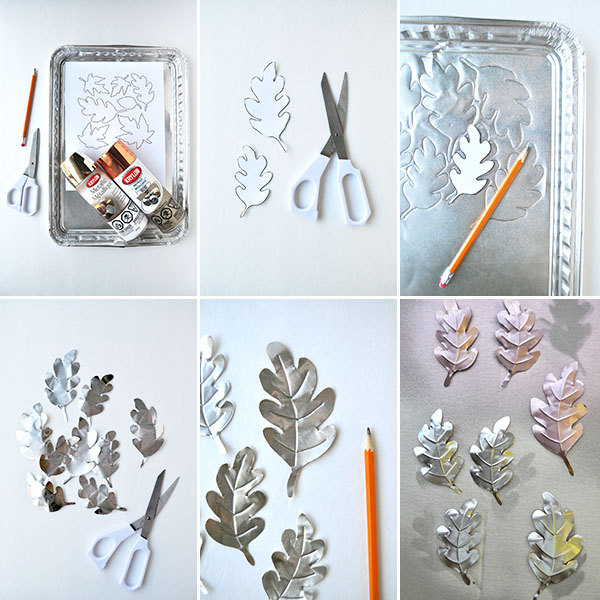
Materials: foil baking sheet, gold and copper spray paint, leaf template, scissors, pencil.
Step 1: Print and cut out your leaf template.
Step 2: Trace the template onto the foil baking sheet.
Step 3: Cut out the leaves. As long as you keep the leaves’ edges round, they aren’t sharp to touch.
Step 4: Draw veins on the leaves – do this on a semi-soft surface (such as a magazine) to create the look of embossed metal.
Step 5: Spray paint the leaves and let dry completely.


STEL STYLE
November 7, 2013
I love this decoration it’s really cute and original!!!
DIY ON MY BLOG
http://www.thestelstyle.com
Kayleigh
November 7, 2013
I love this! It’s so simple and easy with a great product! Great DIY
Kerry
November 7, 2013
I love this too. This looks like a project I could actually pull off! I could totally see hanging the leaves from a chandelier or stringing them along a mantle, as well. I might have to give it a shot!
Lori @ A Bright and Beautiful Life
November 7, 2013
Thanks for this really fun simple decorating idea. I already have some foil baking sheets and I think I’ll go pick up some spray paint when I’m out and about today so I can make some of these leaves for our fall decorations and then move them to the Thanksgiving table. This is my first time to your site and I’ve been having fun looking around. I came over from a link on Ritewhileyoucan.com . Have a lovely day.
maggie
November 7, 2013
Love this! Simple yet sophisticated.
Rebecca
November 7, 2013
I love this! Really sweet idea–and looks relatively simple to do too!
Rebecca @ tr[i]b[e]cca
LARY@Inspiration Nook
November 7, 2013
These are absolutely adorable! What a great idea.
Monica
November 7, 2013
This is so creative – you always have the best ideas!
Colleen Pastoor
November 7, 2013
I like that these could be stored from year to year unlike spraying real leaves… great diy!
Cintya
November 7, 2013
This is such a great idea!
Lynda
November 7, 2013
This is brilliant!
Kate
November 7, 2013
These are so simple and so beautiful!
Madelyn
November 7, 2013
Wow, so cute and classy Kathleen! You’ve done it again, you DIY genius!
Madelyn
November 7, 2013
SUPER cute and classy Kathleen. You have done it again, you DIY genius!
Nancy
November 8, 2013
Oh wow! This looks so cool and finally something that I – the one with two left hands and impossible to make anything DIY – can make too! Beautiful for this fall. Might start just today!!
🙂
XOXO
Nancy
meg
November 8, 2013
Brilliant!!!!!!!
http://happinessiscreating.com/
Grace @ sense and simplicity
November 8, 2013
Love these – they are so pretty and would mix well with real leaves and flowers. I could picture them done as holly for Christmas.
Amy @ Homey Oh My!
November 9, 2013
How creative, Kathleen! Absolutely love these!!
Alice
November 11, 2013
I really love this DIY! I’ll try to do it for Christmas 😉
Come to visit http://almostinsiders.wordpress.com/
Preeti Kaur
November 11, 2013
Great DIY! Totally love it 🙂
personalfashionhub.com
Madison
November 11, 2013
This seems so simple! I love it. I’m thinking of doing this and adding gold spray painted tree branches to my table as well. Stay tuned at my new blog: celebrazionedellavita.blogspot.com
Erin
November 12, 2013
I love this- using the grocery store baking tray is ingenious!
The florist I worked for back in the day made a wreath using the same method for Style at Home magazine. We used copper from the art supply store with the idea being that over the years it would oxidize and turn green. it was gorgeous but alot of work!!