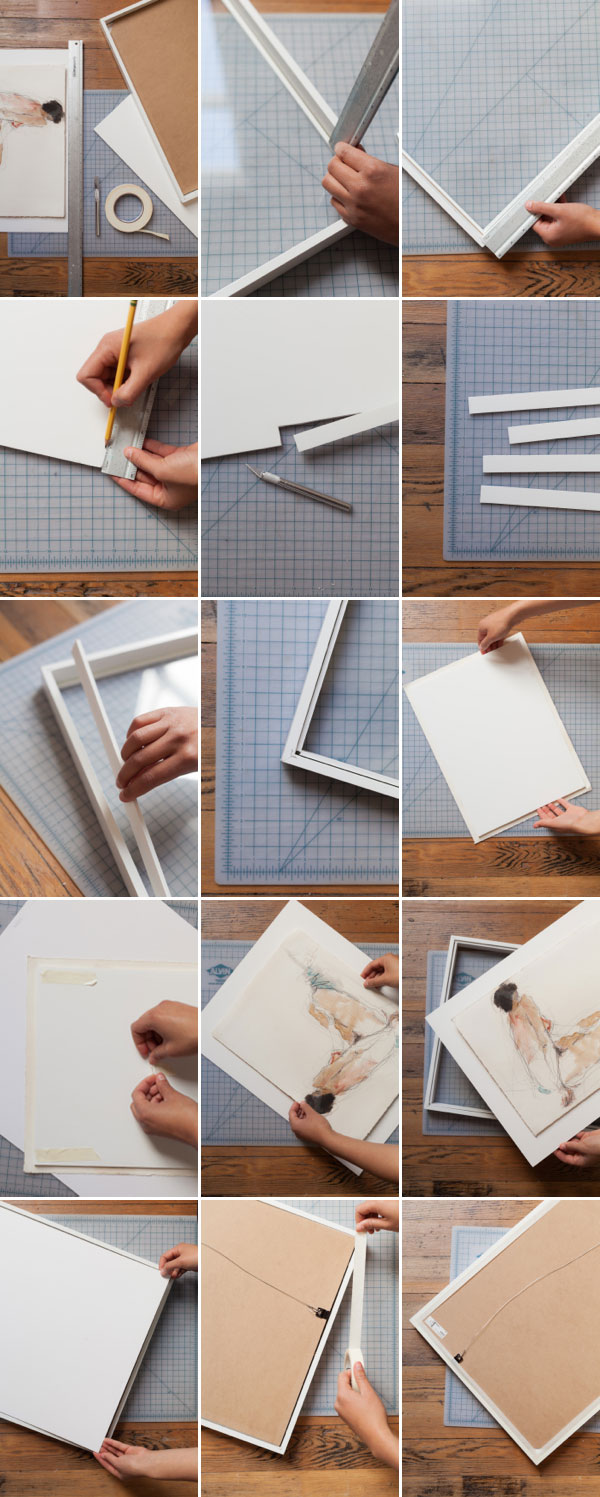
I had several people ask me about framing after we posted pictures of our apartment so I thought I would share this little framing trick that Paul taught me. It works best with artwork that is on paper like from a sketchbook because it shows off the texture of the paper by “floating” it. We just use Ikea frames for these but anything will work as long as it is deep enough. I used this method when I framed these sketches from the Alameda Flea Market. Click through below for full instructions!
Materials: Ikea Frame, 1/4 or 1/8 Inch Foam Core, Masking Tape, Double Stick Tape (We used Shure,) X-Acto Knife, Rule, Artwork (Smaller than your frame)
Step 1: Take the frame apart.
Step 2: Measure the inside brim of the frame – the length, the height and the depth.
Step 3: Taking those measurements, cut out strips from the foam core.
Step 4: Place the foam core strips around the inside edges of the frame taping them into place. (These will act as ledges.)
Step 5: Cut out another piece of foam core out, 1 – 2″ smaller than your artwork (but same shape as the artwork)
Step 6: Using the double stick tape, adhere the artwork to the foam core you just cut out. This will allow it to “float.”
Step 7: Tape the foam core to the back of the frame.
Step 8: Lay the artwork/foam core/back of the frame onto the ledges, face down.
Step 9: Re-assemble the frame, and you have your new shadowbox!
Still looking for unique (and affordable) ways to get art on your walls? Don’t miss my posts on making your own frames, abstract art, potato prints, and painted words!
Photography by Heather Zweig for Oh Happy Day
Art Direction by Jordan Ferney
Produced by Stacy Wichelhaus
Crafting and styling by Caitlin Barker


Jesse
April 24, 2013
Oh wow, I love how it’s set back like that! Great idea & tutorial, thanks! I want to learn how to do the framing where the image is floating in glass.. hard to explain, where you can see the wall behind the centered art – no matt, nothin… I’m imagining it must be sandwiched between the glass? Oops I rambled 😀
Elizabeth Beattie
April 24, 2013
Love, love, love!!! I am definitely doing this ASAP! Thank you!!!
Sarah
April 24, 2013
This is so awesome and a lot simpler than I thought! Thanks for posting =)
Pina
April 24, 2013
This is not a good idea. The acid from the tape will noticeably discolor the paper within a few years and destroy it in the long run. Always use acid-free glues to mount any artwork you want to last.
There are lots of archival tapes and glues!
Chris
April 24, 2013
How do you account for the little metal tabs that are embedded in the frame’s inner edges to hold the frame back in place?
A Pillow for Your Thoughts
April 24, 2013
Wow what a great idea for a piece of art from a sketch book! That is a very creative idea and it looks amazing!
Meg
April 24, 2013
This is great!
I am a HUGE fan of create-it-yourself artwork.
There are so many things you can do to make affordable art that is your very own. 🙂
http://happinessiscreating.com/
Danyelle
April 24, 2013
What a clever way to dress up a basic frame and inexpensive prints and artwork. Will be using this for sure. Thank you! xo
Monika
April 25, 2013
What I typically do for all my art is that I use place it between 2 really thin sheets of glass and clamp them together keeping a border of an inch or more depending on the size of the artwork and then frame them. I suppose its the sandwich glass concept, that way it doesnt matter what colour my wall is, the colour of the wall becomes the border and gives the floating effect. To hang the art, I glue on a hook behind the frame. so no wires, no foam required. I play around with the colour of the frame to make it more fun 🙂
Kacie
April 25, 2013
I love this. I love that it has a slightly whimsical air to it and the art could be anything from kids’ artwork to a cool photograph! Love. Pinning it now.
xo
Kacie
http://www.acollectionofpassions.com/
julie @ duet letterpress
April 25, 2013
i really love this look. thanks so much for the tutorial!
My Love Wedding Ring
April 25, 2013
Ooooh, this is a really effective look! Will definitely give it a try as you make it look so straightforward!
Stephanie
April 28, 2013
Jordan, I just finished looking through all of the recent images you posted of your current apartment and have to say I am truly inspired. What a beautiful, eclectic, inviting space you put together. I love everything about it! Oh and happy to read that the red wall got repainted next door?
Karen
April 28, 2013
I have an odd-sized print that is perfect for this. Thanks bunches for the tutorial! I also shared a link on my blog.
Karen @ annumography
marion chocolat et vieilles dentelles
April 28, 2013
i love those water colors. I have to paint again…