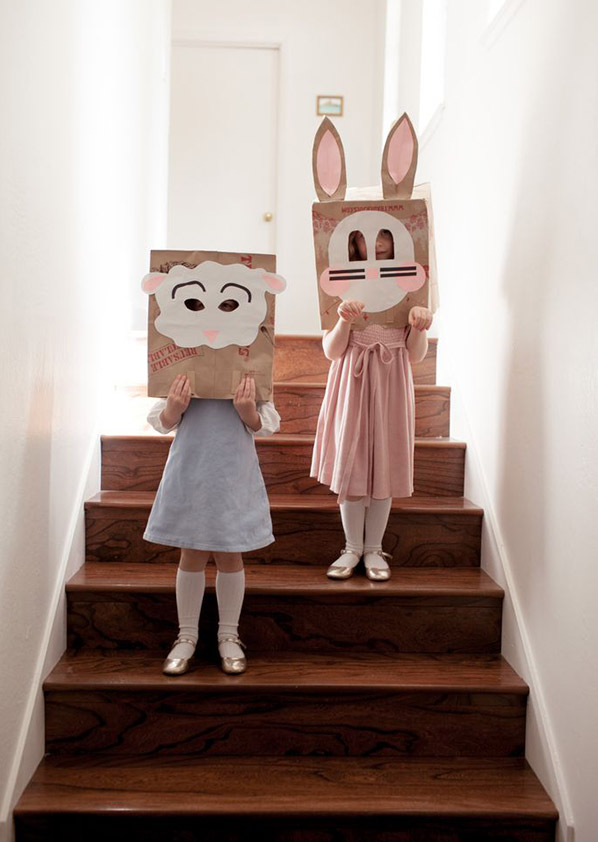
This week, we had a few extra shopping bags lying around our house. So in honor of the season, we decided to transform them into funny Easter Animal Masks. These are easy for kids to make, so it’s a great activity to do as a family. And they’re the perfect way to keep kids entertained during that Easter brunch.


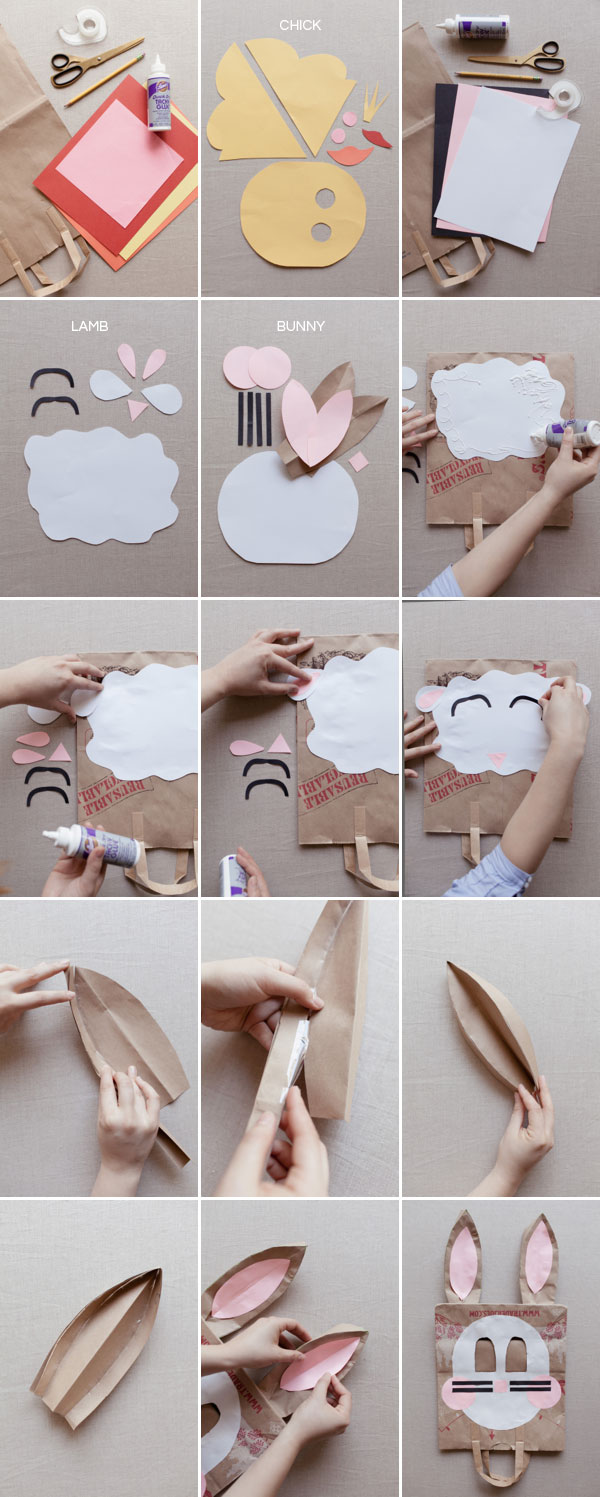
Materials: Scissors, Glue, Brown Paper Grocery Bag, Tape, Construction Paper (yellow, orange, red and pink for chick; white, pink and black for lamb and bunny)
For Chick:
Step 1: Cut out the shapes the chick; 1 large oval for the face, 2 small pink circles for cheeks, 1 big orange beak, 1 small orange beak, 1 fluffy feather shape for the head, 2 wings
Step 2: Lay the shapes on top of the bag and arrange in a pleasing manner, once you’ve got them where you like them, start gluing.
Step 3: Glue the wings on by folding a 1″ flap and attach them to the sides of the bag.
Step 4: Don’t forget the cute yellow feathers on top of the head. We also folded a small flap on the bottom of the feathers to give them a base on which to be glued. We found that the feather on top may need some coaxing to stand up and tape, may be useful in this process.
Step 5: When the glue is dry on the face, cut out the eyeholes. Tip: If you don’t have a child near by when doing this to measure their location we found that they are higher on the bag and closer together than you might expect.
For Lamb:
Step 1: Cut out the shapes for the lamb: 1: cloud shape for the face, 1 triangle for the nose, 2 eyebrows, 2 leaf shapes for the ears, 2 small leaf shapes for the pink inner ear
Step 2: Lay the shapes on top of the bag and arrange in a pleasing manner, once you’ve got them where you like them, start gluing.
Step 3: We found that lambs ears are so cute and floppy and that gluing them downward facing really made the look.
Step 4: When the glue is dry on the face, cut out the eyeholes. Tip: A lamb’s eyes are on the side of their head, so to create this look we made angled oval eyes.
For Bunny:
Step 1: Cut out the shapes for the bunny; 1 long oval shape for the face, 2 medium circles for cheeks, 1 square for the nose, 4 long and skinny rectangles for the whiskers, 2 long leaf shapes for the contrast in the ears.
Step 2: Lay the shapes on top of the bag and arrange in a pleasing manner, once you’ve got them where you like them, start gluing.
Step 3: Cut out the holes for the eyes, we chose a fun arch shape for the eyes to give the bunny more charm. Tip: If you’re unsure about where to put the eyes, cut out the shapes you want for the eyes and lay them on the face until you get them in a nice place, once there you can trace them and cut them out.
Step 4: Cut out both of the rectangular sides of another paper bag. These already have folds (hot-dog fold). Cut out 4 strips of the paper bag. Our strips were roughly 2” each.
Steps 5: Using the folded rectangle, cut out long leaf shape. This will be your bunny ear!
Step 6: Fold one 2” strip (hot-dog fold.)
Step 7: Carefully tape the folded strips to the earshape. 2 strips per ear.
Step 8: Repeat for ear #2.


Photography by Heather Zweig for Oh Happy Day
Art Direction by Jordan Ferney
Coordinated by Stacy Wichelhaus
Crafting by Irene Yu
Assisted by Harper Casimiro


Christin
March 19, 2013
haha, great idea! I want t be 6 years old again.
querSchnitt
March 19, 2013
*GREAT*
holunderbluetchen
March 19, 2013
Great idea, very nice pics :-)) helga
ashley
March 19, 2013
This is precious!! It reminds me of the “costumes” my brother and I would make out of paper bags.
meg
March 19, 2013
I am in the middle of a Trader Joe’s bag challenge (i.e make stuff out of their bags). I am totally going to point people to this post. What a sweet idea. 🙂
http://happinessiscreating.com/
Bea
March 19, 2013
These are so cute, I love them! I wonder how they’d go down at our work easter lunch? ;0)
http://thegoogleyear.blogspot.com.au/
Kate
March 19, 2013
Oh my gosh, these are hilarious and adorable. I love the photos!
Sarah
March 19, 2013
These are great:) I really love how over-sized they are…that last photo at the piano is a keeper;)
Xo!
Sarah
http://atticlace.blogspot.com
Grace Ann
March 20, 2013
This is the cutest thing I have seen in a long time! how fun! Love the girls’ knee socks and silver buckle-shoes too!
dancingapple
March 20, 2013
I’m torn between thinking it’s cute and getting an uncanny feeling a la The Shining.
giulia
March 20, 2013
so adorable…. i should’ve done this with the kids i babysat today!
Steve Grey
March 21, 2013
Your DIY masks really look cute on your kids! Thanks for the suggestion and taking time to put up the DIY steps.
Best wishes and have a great day!
Annmarie
March 27, 2013
I am interested in those beautiful gold flats! Source?
Rebecca
April 1, 2013
i adore these. too cute.