This post is sponsored by Dove® ClearTone™ Deodorant – designed to visibly reduce underarm dark marks and even skin tone.
Here is a really cute gift for someone someone getting married. It’s a Bride Kit that has little odds and ends you may need during the wedding day when it isn’t convenient to get to the grocery store. For the presentation we got a wood box and made a transfer using Temporary Tattoo Paper. I love the results and can’t wait to experiment more with it. Find all the complete sources and instructions below.
Click through for the free download, more photos and full instructions
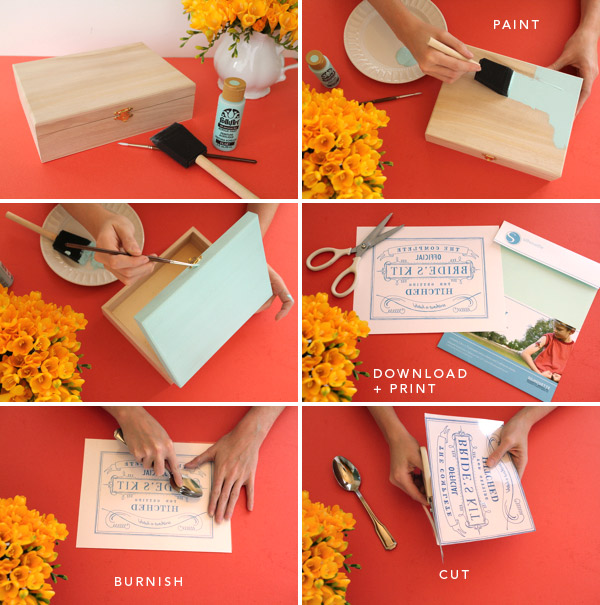
Materials Needed: Wood box 8.75″ x 6.75″ from Joann’s Fabrics, Paint and Paintbrush, Free downloaded image, Temporary Tattoo Paper, a spoon, scissors and items to fill the box like: Visine, headache medicine, lotion, perfume, chapstick, bobby pins, etc.
Step 1: Lightly sand the box. Paint the box with craft paint. You could remove the hardware or just carefully paint around it.
Step 2: Download the image here and follow the instructions on the package of the tattoo paper. The kind we used came in two parts, a white sheet, and a green sheet. Print the design on the glossy side of the white sheet on your inkjet printer with the photo setting. The image should be reversed
Step 3: Carefully peel the green sheet apart and place the adhesive face down on the design on the white sheet. You burnish it all over with something like a spoon to get it stuck down really well and get out any bubbles.
Step 4: Cut the design out right along the edge of the outer box of the design. Peel the other side of the (formerly) green sheet off, leaving just the thin, waxy layer over the design on the white sheet. It’s very sticky at this point.
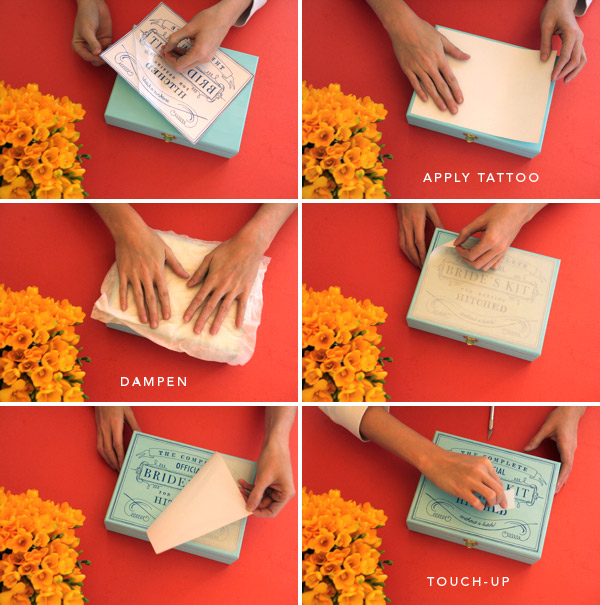
Step 5: Carefully position and stick the design down centered on the lid of the box. Stick down well everywhere.
Step 6: Lay a very damp (but not drippy) paper towel over the design and allow it to saturate the back of the white sheet for about 15 seconds. The paper should become translucent and you’ll be able to see the design. Rub any dry looking areas with the wet paper towel.
Step 7: Starting from one corner, slowly and carefully lift away the white paper backing from the design. If any bits of the design start to lift with the backing, lay it back down and rub those areas with the wet paper towel again. It should come away easily, so if it’s sticking, add more water.
Step 8: Once the paper backing has been removed, if there are any air bubbles where the film with the design is not stuck to the surface, you can use a little bit of the white backing paper to rub them onto the surface. (It’s very slippery and won’t damage the thin film the design is on. Don’t use your fingers because they will tear it and mess it up.) Once it’s dry, it’s much more durable, but you could put a clear coat of wipe on poly over the design if you wanted to make it more durable.
photos and styling by Alexis Birkmeyer


Audrey - This Little Street
April 26, 2012
This box is just beautiful, love it!
chiara
April 26, 2012
so cute and smart!
Loren
April 26, 2012
This is the best use of Temporary Tattoo paper I have ever SEEN!
Alexis
April 26, 2012
I love that it’s wedding season! I can’t get enough great ideas for my friends, definitely bookmarking this one along with these fun paper toppers: http://concarta.blogspot.com/2012/04/striped-tie.html
Hannah
April 26, 2012
So clever! and Cute!
Amy@OldSweetSong
April 26, 2012
Well you’ve really done it this time! That is amazing.
bevy
April 26, 2012
bride kit = genius! hmm, now has me thinking on the possibility of a baby delivery kit, those little odds and ends you need at the hospital, but due to pregnancy brain might of forgotten.
Angela Marie
April 26, 2012
I love the idea of using temporary tattoo paper! I wonder what else you could use it on… Oh the possibilities!
– Angela Marie @ http://sunkissedivory.blogspot.com
Rachel Root
April 26, 2012
Wow! Fantastic idea. This project comes just in time for my friend’s wedding!
robync
April 26, 2012
I absolutely love this the possibilities are endless with the tattoo paper!
http://knownitwasyou.blogspot.com/
Marie
April 26, 2012
What a great idea with the transfer paper! And you can personalize some of the goodies for the bride too. 🙂
http://www.happypaperplace.com/
Nicole Suchy
April 26, 2012
Jordan! Such a cute idea, and so easily converted for other types of occasions.
Just wanted to let you know that you may have a typo in the beginning of your post (because I would hope someone would tell me if I had a typo!) Instead of “gift for someone someone getting married”, did you mean “someone somewhere”? Have a lovely day! Feel free to delete this message and not post it after. No worries.
<3 Nicole
Marilou
April 26, 2012
This is truly lovely! Couple of friends are getting married this summer and this box and is a great and very unique present for each bride!thank you for sharing!
Tan
April 26, 2012
This is so amazing! I don’t know anyone getting married but myself! to make this for!
tere
April 26, 2012
genius!!
DELEITE DESIGN
April 26, 2012
Beatiful vintage kit!
Jaime
April 26, 2012
I am inspired to do this project as a Mother’s Day gift! Thanks so much for this great post. Love it!
Diana
April 26, 2012
This is such a great idea! I have two very close friends getting married in the next couple of months and what a perfect gift this will be!
erin
April 26, 2012
my sister gets married in june, i think i’ll have to make her one! thanks!
Hannah @ Sparrow + Spark!
April 27, 2012
This is such a lovely idea!
Fox and Beau
April 27, 2012
What a wonderful idea! I would love to make this for my girlfriend’s wedding! thanks for the blog!
brittany
April 27, 2012
ok, this is cool. and very helpful to the bride. nice one!
my honest answer
April 27, 2012
What an amazing DIY! I’d love it if you maybe had time to do some other designs… say something pretty for storing office supplies… I know, I’m cheeky, but it’s adorable and I have no use for a bridal one! I wish a friend would get married! For this, and because I like mimosas.
Also – my hilarious ‘captcha’ for this comment is Mrs. Vignot. How apt.
Carmen Evans
April 27, 2012
I love this, How fabulous! My little sister just got her acceptance letter into O’more for fashion design, I’m so proud of her! I’m going to make a version of this like a “fashionschool/college survival kit” 🙂 Can’t wait! I’m going to go buy the supplies today!
YAY!
Tonya
April 27, 2012
Amazing idea! However, I am not able to download the template. Every time I click on the link a blank page appears – I am just wondering if it is the link or my computer. Thanks!!
Jenni
April 27, 2012
Great idea and beautiful execution!
Simply Peachy
April 27, 2012
This is awesome! What a cute kit! Much better than the giant pencil case I used as my bridal emergency kit. lol
Gina
April 27, 2012
I love the graphics! Just perfect! Thank you so much for sharing the tattoo paper idea – fantastic!
Joyce
April 27, 2012
what a cute and perfect little box for the bride!
Lexy @ The Proper Pinwheel
April 27, 2012
Oh my gosh. Just when I think you can’t come up with a project more amazing than your last, you go and do something like this. I am so giddy about this one. A friend was just married last weekend. Maybe I could still send her a belated kit???
Kat
April 27, 2012
I have a ton of friends getting married and this is the perfect gift for the bride like the night or so before.
The Brides' Maid
April 27, 2012
I tell all of my Brides that a little kit like this imperative on the day of their wedding. This one is darling!
Stephanie
April 27, 2012
This is such a gorgeous idea. I had my wedding at home and set up pretty baskets in the bathrooms for guests with these types of things inside. Everyone commented on how useful and thoughtful they were.
Rhianna
April 27, 2012
This is such a rad blog!! Pity I don’t know anyone getting married any time soon. I’m sure I’ll find a way to tweak it a little for something else 🙂 Rhi xx
Jeannie
April 27, 2012
Hello! I have been following your blog for a few months now and I just have to say you are awesome!!! I love all of your projects, design, photography .. everything. You give me so much inspiration, I’ll send you some samples when I work on some stuff!! Thanks for all the great creative ideas. So excited to put them into use!
Paola
April 28, 2012
Que lindo!! Amei muito, adoraria fazer um assim! Beijoos
http://antonellaesuaboneca.blogspot.com.br/
Camille @ Makoodle
April 28, 2012
Clever idea! This is such a great way to add some DIY into your wedding plans. Love it. Thanks for sharing.
mamimama
April 29, 2012
cute post!
mamimama
Hannah @ Hither&Thither
April 29, 2012
Super cool, I love that the wedding industry is expanding and becoming more creative and fun!
Vanessa {vanilla and rose}
April 29, 2012
What a cute idea! It’s perfect.
Key Tags seller
April 30, 2012
What a lovely, lovely kit. I love everything from the vintage look of it to the cute little contents.