


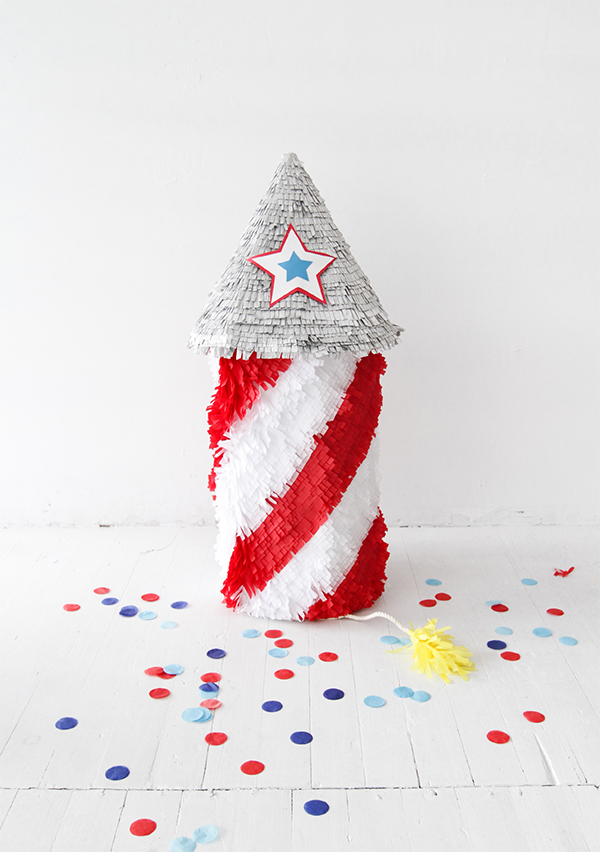
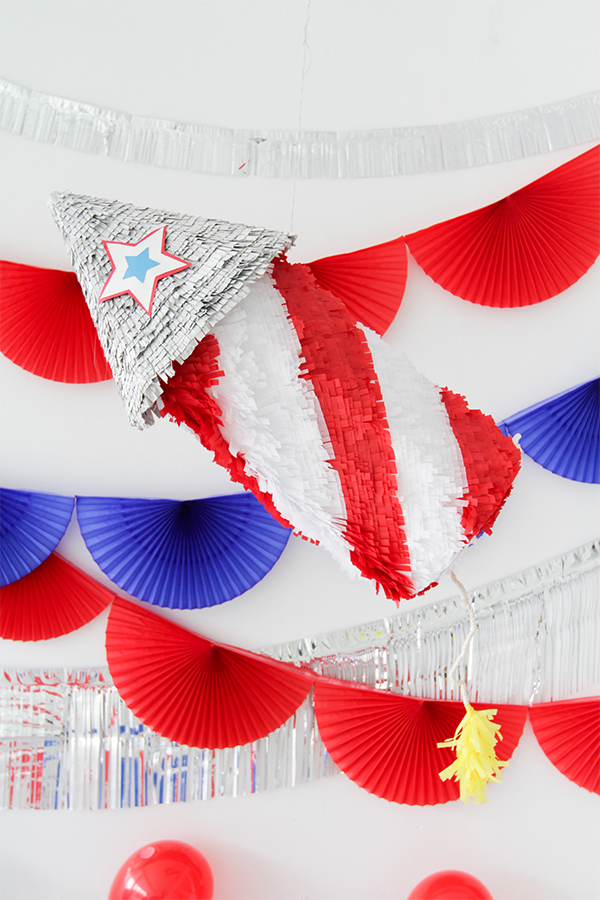
The 4th of July just might be my favorite holiday. It has everything I love: warm weather, backyard barbecues, lemonade, apple pie… and fireworks! So I can’t think of a better way to celebrate the season than with a giant firecracker piñata.

Although the 4th is less than two weeks away, there’s still plenty of time to make this simple DIY. Fill it up with confetti and red, white & blue candies so that when it explodes it looks like a real firework! (PS – More 4th of July DIYS right here.)


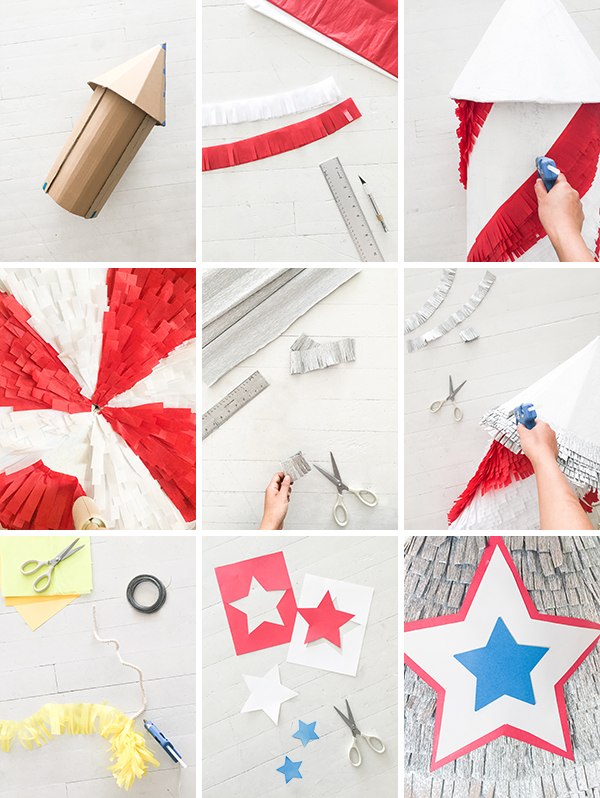
Materials: Cardboard, masking tape, x-acto knife or box cutter, pencil, newspaper, paper mache (1 cup of flour : 2 cups of water), white paint, tissue paper (in red, white, and yellow), crepe paper in silver, ruler, hot glue gun, cardstock (in red, white, and blue), glue stick, wire, rope
Step 1: Build the pinata base. To do this, we used a few large pieces of cardboard. First cut out a large rectangle (ours was 25″ tall by 43″ wide) and score with a box cutter it so it easily rolls into a tube. Apply hot glue to the edges to hold it in place. While the glue dries, cut a circle out of cardboard (ours was 13″ in diameter.) Attach it to one side of the tube with masking tape. This will be the bottom of the firecracker. For the firecracker top, cut a half circle out of cardboard (ours had a 16″ radius) and score with a box cutter so it easily rolls into a cone. Apply hot glue to the edges to hold it in place. Apply another ring of hot glue around the open side of the cardboard tube, and set the cone on top. Flip the entire firecracker pointed side down, and apply additional glue as necessary. Let cool completely before moving on.
Step 2: Add a layer of paper mache and newspaper to the firecracker and let dry for 24 hours. Paint the pinata white and let dry completely.
Step 3: Carefully cut a trap door into the side of the tube for inserting treats.
Step 4: Decorate the firecracker! For this pinata, we used both tissue paper and crepe paper fringe (red and white tissue paper for the base, silver crepe paper for the top). To cut fringe from tissue paper, use an x-acto knife and ruler. You can cut a bunch at a time by cutting through the stacks in a tissue paper pack. To cut fringe from crepe paper, we find it’s easier to use a good pair of scissors. Our fringe was roughly 2″ tall and 1 cm wide. Then, hot glue the fringe to the pinata, starting from the bottom and going up. You can use cardstock to add stars or other decorations on top of the fringe.
Step 5: If you’d like to add a fuse to the firecracker, cut a piece of rope that’s about 12″ long. You can thread wire through the rope so you can bend it and control the shape, or leave it as is. Cut a few pieces of yellow fringe and hot glue it around the bottom of the rope. Hot glue the other side of the rope to the center of the circular base of the pinata.
Step 6: Fill with confetti & treats!

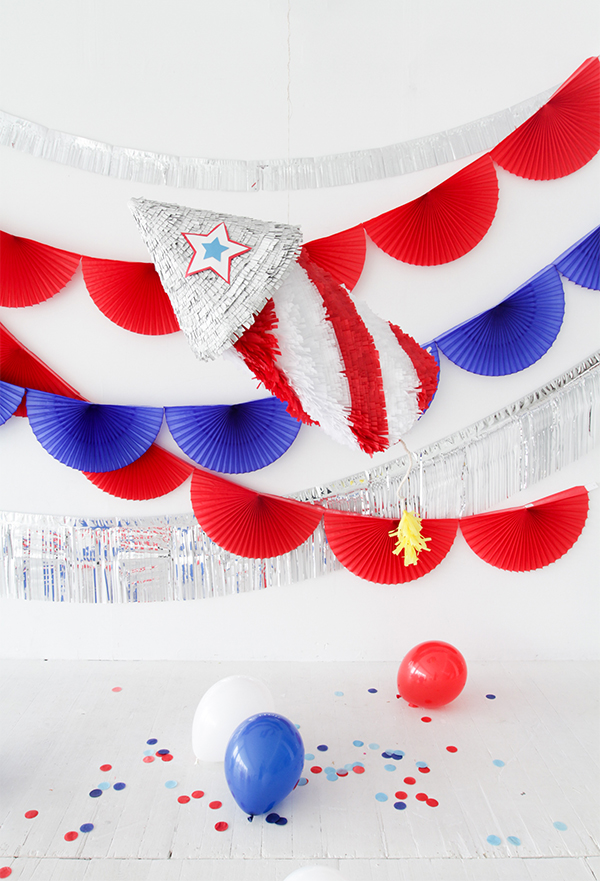
SHOP THIS POST: Fan garlands, balloons, confetti
Crafting by Naomi Julia Satake


TERRELL
June 21, 2016
This is beyond adorable!!! I can’t wait to get busy making one up! What a great centerpiece it’ll be! Thank you every so much for all your festive ideas!!!
Kari
June 21, 2016
What a fun 4th of July idea!
Kari
http://www.sweetteasweetie.com
Michelle
June 21, 2016
This looks incredible!
https://www.makeandmess.com/
Jessica
June 21, 2016
That’s perfect! x
http://jessicawoods.fr/blog/
Suman Patel
June 23, 2016
Hi Naomi
Amazing one
I really loved the way you crafted it. It is looking amazing.
fourth of july pictures in your craft are looking amazing. Its a great share indeed