


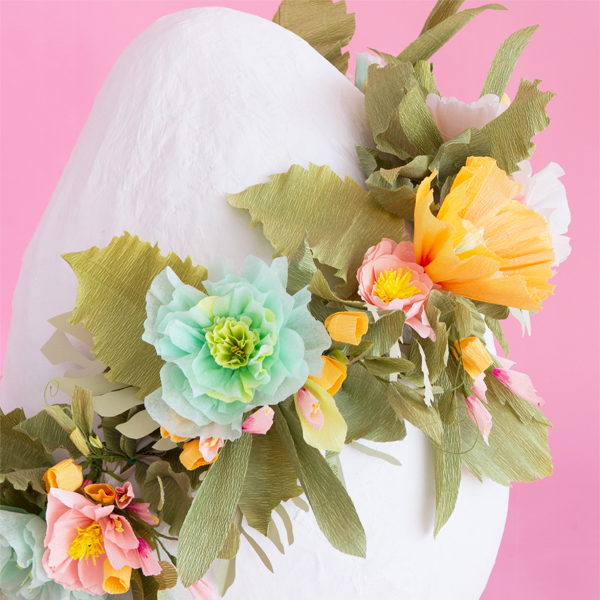
When we stumbled upon this vintage Easter postcard, we knew we had to make an egg + floral garland for ourselves. We’re believers in the “bigger is better” philosophy, so we also decided to make it GIANT (of course.) We recommend using this extra-large egg as the focal decoration for your Easter celebration. It also makes a great photobooth prop!

In order to make this DIY in time for Easter, you’ll need to get started as soon as possible (since the paper mache needs a few days to dry.) In the mean time, you can start on the floral garland. The key to this garland is to make a LOT of leaves. Go crazy. Take inspiration from the vines in your yard. We made a bunch of big leaves, along with smaller leaves, and vines. Add lots of variety! In addition to leaves made from crepe paper, we made a few from cardstock for a mix in texture.

Paper mache egg
Tools & Materials: 36” oval balloon, newspaper, flour, water, bowl, white acrylic paint, paintbrush, painter’s tape
Step 2: Using painter’s tape, tape down the knotted part of the balloon.
Step 3: Paper mache balloon. We used a 1:1 mixture of flour and cold water. Because of the size of the balloon, we recommend you do three or four layers. Allow 24 hours to dry between each layer.
Step 4: Once the paper mache is dry, paint with a white acrylic paint. You may want to do a couple layers of paint to achieve a pristine white color. Let dry for 24 hours.
5 foot paper garland
Tools & Materials: Crepe paper, cardstock, floral tape, floral paddle wire, wire cutters, hot glue gun, scissors, 2-1/2” wide single-faced satin ribbon, ¼” green ribbon
Step 1: Prepare by making a ton of individual flowers and foliage out of your crepe paper and cardstock, leaving long stems of floral wire. Since spring is all about young blooms, make sure to incorporate young leaves and flower buds, and make flowers and leaves in all sizes. Here is our favorite tutorial on paper flowers.
Step 2: Arrange a few flowers and leaves into 12 medium-sized bunches. Twist wires together for each bunch, making one big stem.
Step 3: Take two medium-sized bunches and twist the stems together into an “X.” Position the ends of the “X” so that the bunch can lay flat, with the ends pointing in opposing directions.
Step 4: Wrap the stems in floral tape to keep wires together and mess-free.
Step 5: Repeat with all of your medium-sized bunches until you have 6 large bunches.
Step 6: Take a couple smaller leaves and flower buds, and arrange 14 smaller-sized bunches. Twist wires together for each bunch, making one big stem.
Step 7: Take two of the smaller bunches and twist the stems into an “X.” Position the ends of the “X” so that the bunch can lay flat, with the ends pointing in opposing directions. Wrap the stems in floral tape.
Step 8: Repeat with all of your smaller bunches until you have 7 large bunches.
Step 9: Arrange your large bunches out in a line, end to end, and arrange in an order to your liking. Lay the smaller bunches in line between each of the large bunches.
Step 10: At this point, feel free to add some of your remaining leaves and flowers to bundles in areas that look a little sparse.
Step 11: While still preserving your arrangement order, take each bundle and turn it over so you can see the wrapped stems beneath them.
Step 12: Take two neighboring bunches and twist their stems together. Do this for the entire line until each bundle is joined with the bundle next to it. The bottom of the garland should look like there is one long wire conjoining it.
Step 13: If you have any remaining flowers, fill in parts that still look a little empty.
Step 14: Cut the 2-1/2″ satin ribbon to the length of your garland, leaving 1 foot of extra ribbon on each end.
Step 15: Cut fourteen 10” strips of ¼” green ribbon.
Step 16: Delicately place the garland on top of 2-½” ribbon, keeping 1 foot margin on each end.
Step 17: Using the strips of ¼” ribbon, tie the garland to the 2-½” ribbon before and after each flower cluster. Apply a little hot glue on the bottom of clusters and affix them to the ribbon.
Step 18: Your garland is complete!
Wrapping the Garland:
Step 1: On a clean surface, place the paper mache egg on its side. To keep it from rolling away, we recommend book ending the egg with something heavy on both sides.
Step 2: Carefully drape the garland diagonally over the egg.
Step 3: Taking your hot glue gun, glue the ribbon portion of the garland to the egg until it is completely wrapped.


Styling & photos by Amy Moss
Crafting by Naomi Julia Satake


Michelle
March 23, 2016
Wow, beautiful! I bet you can do so many things with these stunning paper flowers!
https://www.makeandmess.com/
Cintia
March 23, 2016
So great!
http://soldenochedecocrochet.blogspot.com.ar/
Amanda
March 23, 2016
In love with your tutorials. This is so fun!
http://www.theartfulscavenger.com/#!ROYGBIV/cmbz/56a668a40cf22a61cccc6f90
Paige Flamm
March 23, 2016
This egg is gorgeous!
Paige
http://thehappyflammily.com
Joanna
March 23, 2016
Last photo is the best haha!
bubblecrate.com
Kari
March 23, 2016
Pretty centerpiece!
Kari
http://www.sweetteasweetie.com
Amy | Delineate Your Dwelling
March 23, 2016
This is stunning and HUGE and I love it dearly!!