


I have made so many paper flowers through the years, but my favorite is a quick and dirty version I call my “5 Minute Peony.” This can actually translate to any flower. I usually just do a search for the shape of the petal and then you can make any flower in the world. The key to making these quickly is to do everything at once. When I cut out the petals, I do a huge stack at the same time (like 7-10.) And even when I make the fringe for the middle I’ll stack it so that I cut all of it in about 30 seconds. They aren’t super detailed or refined but they still wow and impress and are perfect for gifts or Valentines Day. Paper Mart has been our long time sponsor and I have been a huge fan for over ten years (I even bought all the supplies for my wedding from there years ago.) Their crepe paper comes in a million colors and you cannot beat the price.


Materials: Crepe paper, scissors, floral wire, pink cube boxes, x-acto knife, wire cutters
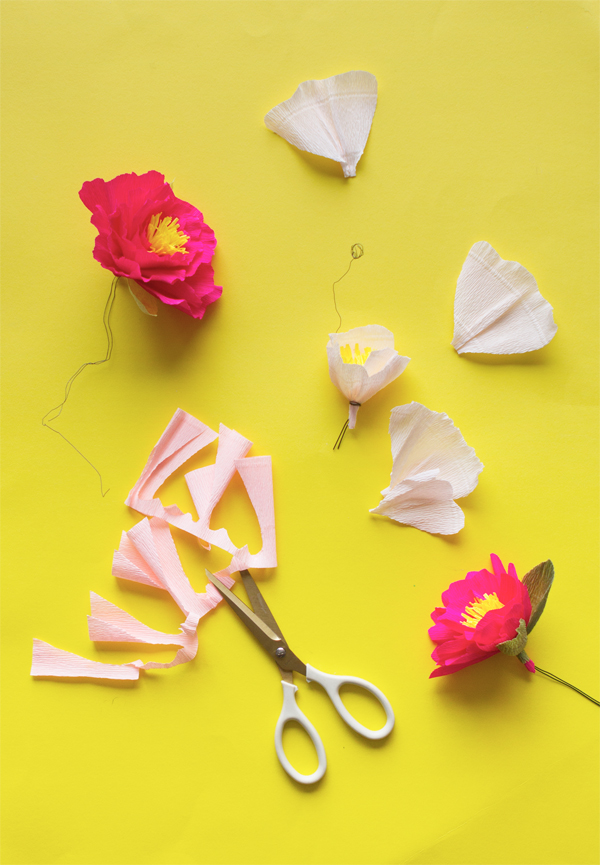
Step 1: Take a fold of crepe paper or tissue paper and cut off a 4″ section.
Step 2: Take the fold and cut along one side about 3/4 of the way through making thin strips of fringe.
Step 3: Cut long sections of wire about 10″ long and short sections of wire 3″ long. If you are making a lot of flowers then cut all the wire at one time for the process to go a lot faster.
Step 4: Fold the long piece of wire in half. Begin wrapping the petals around the center and pinching it tight around the base. When finished, tie a small piece of wire around the fringe to hold it in place.
Step 5: For the petals, take the fold of crepe paper and cut off a 4 inch section.
Step 6: Take that section and cut it in half the same direction as the grain. (Crepe paper has a grain and this will matter later on.)
Step 7: Cut out a petal shape so that the grain of the crepe paper goes from the top to the bottom. It should look like there are lines running from the top of the petal to the base. To save time, you can cut the petals all at one time by putting them in stacks.
Step 8: Take the petals and with both thumbs stretch the crepe paper so it makes a nice curved petal. This is where it will matter what grain the paper is going in so that it stretches right. Again, t go quicker you can even do this to a small stack of petals at the same time.
Step 9: Taking the center of the flower begin placing the petals around and then pinching it and holding it at the base. When you are happy with the fullness of the petals take a small piece of wire and tightly wrap it and twist it to secure it in place. When you are done you should have a nice simple flower.
Step 10: Trim the wire base.
Step 11: Cut out a few leaves using the same process as Step 7-8.
Step 12: Attach them to the base of the flower with wire and wrap tightly to secure in place.
Step 13: Use an x-acto knife to cut an “x” into the top of your box.
Step 14: Slip the flower through the hole and secure with tape on the other side. Voila! Fin.


This post is sponsored by Paper Mart. My favorite resource for packaging and craft supplies.
Styling by Amy Moss
Crafting by Andrea Ramierez


Michelle
January 11, 2016
Wow, they just look super cute!
https://www.makeandmess.com/
Cintia - Sol de Noche {deco crochet}
January 11, 2016
They look great! And the color is amazing!
http://soldenochedecocrochet.blogspot.com.ar
Kari
January 11, 2016
These will be perfect for an Easter party!
Kari
http://www.sweetteasweetie.com
Paige
January 11, 2016
These favors are so cute! I love them!
Paige
http://thehappyflammily.com
Terrell
January 11, 2016
These are a must make ASAP! Soooo adorable! Thank you for sharing!!
Denise
January 11, 2016
wow, so cute!
Eden Passante
January 11, 2016
Adorable! Love these!
natalie / half asleep studio
January 11, 2016
Oh, these are so beautiful! I kind of want to put them everywhere.
Melanie@Toots + Dill
January 11, 2016
These are absolutely adorable!! I have a paper flower kit I was supposed to give as a gift at home but I think I might have to keep it and attempt this prettiness!
Anna
January 11, 2016
Super nice pictures. Gorgeous looks!
http://www.patagonia-jackets.com
Elizabeth
January 11, 2016
I am beyond amazed by all the imagination, creativity, and sense of fun that goes into all of your posts. Thank you for all of the inspiration!
Beauty at Brunch
January 11, 2016
Wow these look so cute! Peonies are my fave. Will be saving this page to refer back to! Thanks for the tutorial!
Malou
January 12, 2016
Nice tutorial! They look pretty great
Annie Abbey
January 12, 2016
Ahhh aren’t these just the absolute cutest things! I wish it were spring so I could use these now!
Xoxo Annie
http://www.somethingswellblog.com/
Serene
January 12, 2016
These are really cute! Can you give some shapes of some other flowers as well? Im nervous that there’s no way I can make these like you do, but Im going to give it a try!
Susan Harper
January 20, 2016
Can you explain what you mean by a “fold” of the crepe paper? How much would that be? Thanks!