


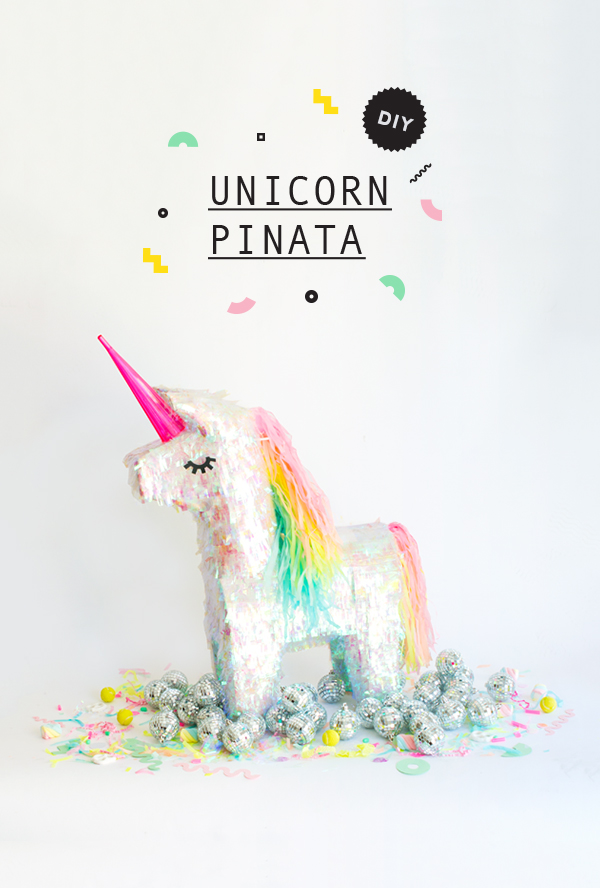
Everyone loves a good makeover story, right? Well, this one’s a doozy! We’re going to show you how to transform an ordinary donkey piñata into a shiny unicorn! I’m not gonna lie, this one takes some time but it’s WELL WORTH IT when the result is sparkly, iridescent awesomeness with a rainbow mane!


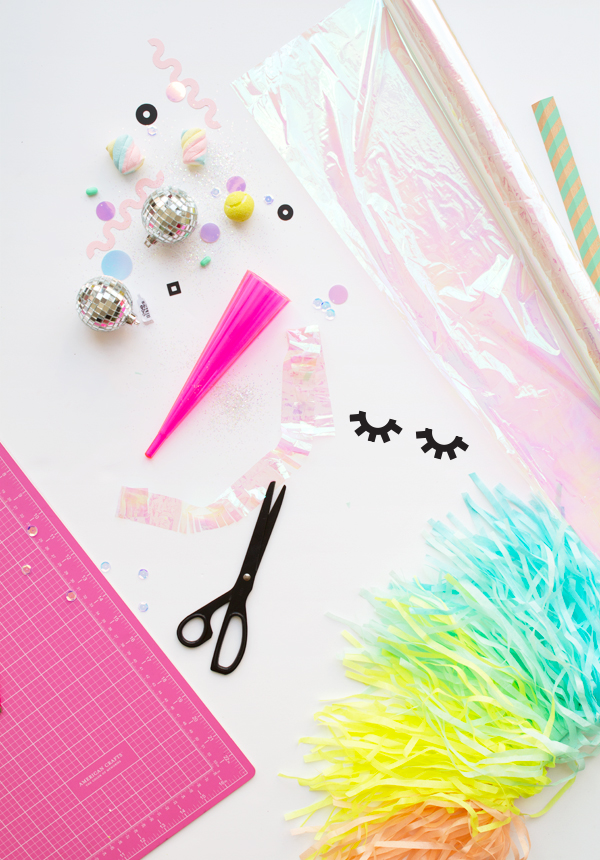
Tools and Materials: Donkey piñata, unicorn eyes printable, printer, white spray paint, scissors, x-acto knife
, cutting mat
, ruler
, white cardstock
, hot glue gun
, iridescent cellophane roll, range of tissue paper in pastel colors (we’ve used pink, peach, yellow, mint and blue), neon pink plastic champagne flute
Step 1: Remove existing tissue and decorations from the donkey pinata.
Step 2: Trim the ears with scissors to make them a bit smaller.
Step 3: Spray paint the entire pinata white.
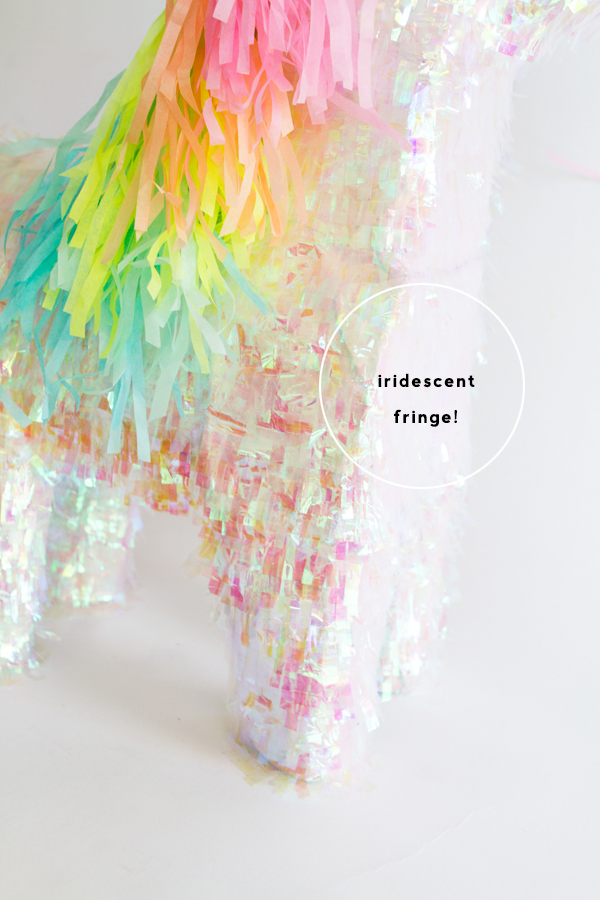
Step 5: Cut a 15” piece from the iridescent cellophane roll.
Step 6: Using an x-acto knife and cutting board, cut 1.5” strips out of the cellophane from the 15″ piece, repeat this step until enough is done to cover the entire pinata.
Step 7: Begin cutting fringe on one side of the strips, leaving some space at the top.
Step 8: Cover the entire pinata with iridescent cellophane fringe, start at the bottom of the legs, and work your way up. (When you get to belly, start from the middle of the underside and work up from either side.)
Step 9: Fringe long sheets of tissue paper for the mane and tail using an x-acto knife and ruler. Leave about 2″ of room at the top.
Step 10: For the mane, first measure a 3″ piece from the long side of a piece of cardstock. Cut it out, fold it in half, then fold each side in half again (in the opposite direction). Compare this piece to the height of the pinata’s neck. Trim off any part that extends longer than the neck.
Step 11: Glue together the middle crease of the cardstock then glue the fringed tissued paper (that you cut for the mane) to the outside of the cardstock on either side. (You may need to test out how much tissue paper to use before you start gluing – we found that we really only needed a 1/4 of a page of tissue paper in each color.)
Step 12: Glue the mane to the neck of the pinata. Cover over the sides of the cardstock base with extra pieces of iridescent cellophane fringe (so no one can see the base.)
Step 13: For the tail, cut out a 2.5” x 1” piece of cardstock, fold it in half then fold the edges in. Start to glue the fringed tissue paper to do the tail.
Step 14: Glue the tail to the back of the pinata.
Step 15: For the horn, detach the bottom part of the plastic champagne flute, glue it to the pinata’s forehead.
Step 16: Print out the unicorn eyes onto white paper, cut our the eyes and glue it to each side of the pinata head.
Step 17: PARTY!

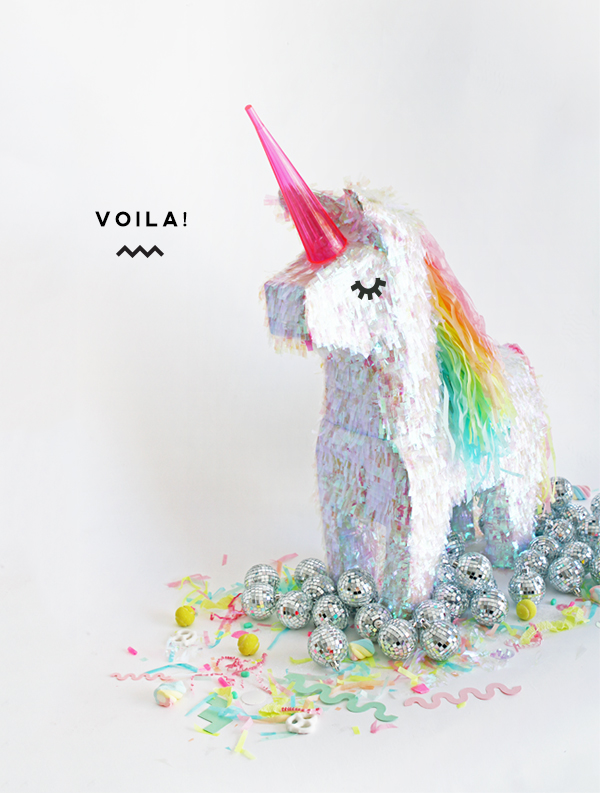
And you’re done. Time to party!

Art direction & styling by Amy Moss
Produced by Alison Piepmeyer
Crafting by Andrea Ramirez & Samantha Livermore


Rosie
August 20, 2015
This is PERFECTION! So clever, and cute, and fun! I just can’t get over the adorableness!!!
Julie D
August 20, 2015
Oh my gosh, how adorable! I have a donkey pinata I’ve been saving forever. Now I know what it was meant to be!
Camille
August 20, 2015
This is awesome! Reminds me of when my parents bought a baseball piñata and turned it into Hello Kitty for my birthday one year!
Deanna
August 20, 2015
Well, I need to do this. The eyelashes are such a cute touch!!!
monika
August 20, 2015
So cute and unique!
Anna of The Analog House
August 20, 2015
I love this! My daughter’s birthday is tomorrow and she would love to have a unicorn pinata. I also really dig the disco balls!
Anna of The Analog House
http://theanaloghouse.blogspot.com
Lindsey
August 20, 2015
Our daughter turns four at the end of September…do I dare?! We’ve got a boring Target piñata on top of the fridge just waiting for this. Thank you! She’s next to me squealing over the photos. 🙂
joy
August 20, 2015
SOOOOOOO cute! can you just make one for me?!?
Three Cheers + Co.
August 20, 2015
This is adorable!!!!
Nana
August 20, 2015
Amy this is amazing! My daughter flipped when she saw this piñata. We started planning her 5th birthday and she wants the dreaded disney princess theme…ugh! When she saw this she said ¨Princesses love unicorns, please I need this piñata¨.
Kelly
August 21, 2015
What a great idea! I will definitely be stealing this for my daughter’s birthday one day 🙂
Pooja
August 22, 2015
Too adorable! <3 Will you be selling this on your shop?
Cheryl
August 22, 2015
Oh wow, this is ingenious! I’m so going to make one even though I’m 27! Move aside kids!
Suzi Kern
August 23, 2015
this is perfect is there any teeny tiny chance that this one could be put up for sale?
md
August 25, 2015
the most beautiful unicorn i’ve ever seen!!!
limibug
August 27, 2015
How cool is this! Love the idea, think i’m going to try it some time 🙂
Kelsey Tanner
August 31, 2015
So perfect! But a month too late…. My son wanted a black unicorn birthday party when he turned 4 in July. We made unicorn horns (party hats worn on our foreheads), and decorated in black and silver. This would have been a perfect addition!
Mohammad Belitz
September 2, 2015
Along with the rest of her unicorn party that I have yet to share because I’m such a tease.
Emma Jayne
September 2, 2015
What a great idea. This looks amazing and such fun to make!! 🙂
Emma Jayne x
http://www.emmajayne-designs.co.uk
Amy
September 2, 2015
This is literally the cutest thing ever!
XOXO Amy
https://withlovefromamy.wordpress.com