


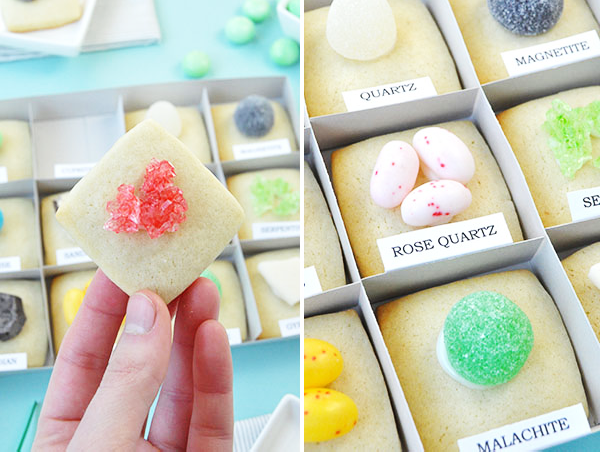
Do you have any rock collectors or nature nuts in your life? If so, this edible rock and mineral chart makes a really fun and unique gift! You could even make a few for the dessert table at your next nature/science themed party. (Looking for more edible DIY projects? Try these cookie cakes!)


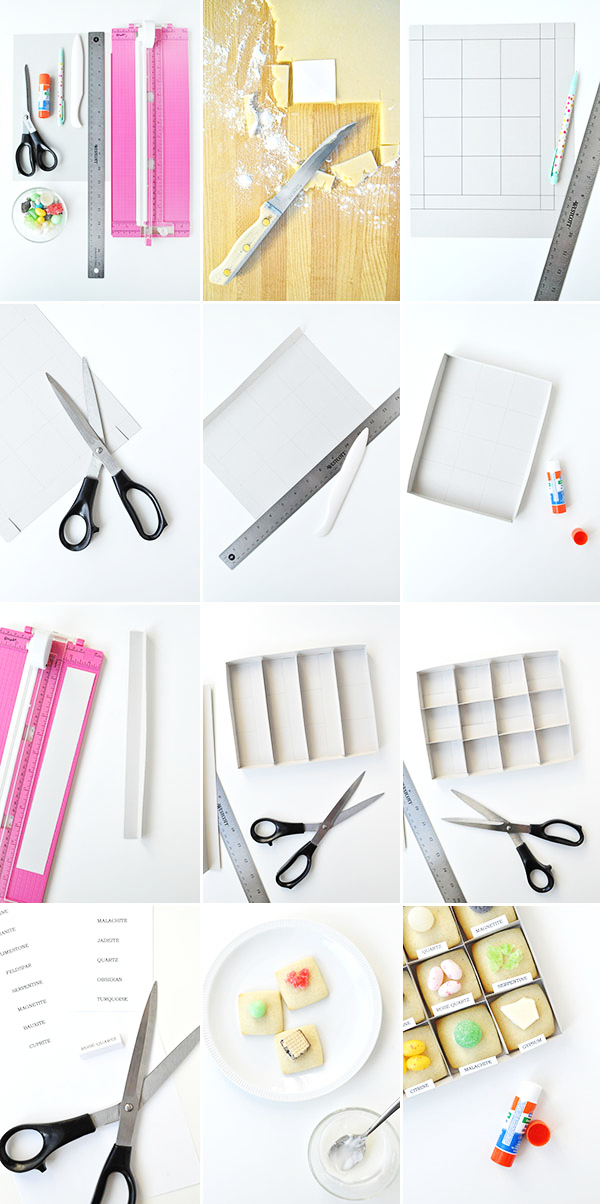
Supplies: Card stock, white paper
, scissors
, glue stick
, pencil, bone folder
, ruler
, straight edge cutter
, assorted candies, sugar cookie dough, icing.
Step 1: Roll out the sugar cookie dough and use a 1 1/2″ square template to cut out a minimum of 12 sugar cookies. I used this recipe for my sugar cookie dough so I followed the instructions there. Once the cookies are baked, let cool.
Step 2: On the card stock, draw a grid of twelve 2″ squares edged with 3/4″ rectangles on all sides. Cut off the excess card. (Note: make sure that your baked cookies fit into a 2″ square before drawing this grid. Depending on your cookie recipe and oven, the cookies may spread more or less, so adjust your grid accordingly.)
Step 3: Cut a slit on each corner, as shown below.
Step 4: Use the ruler and bone folder to crease the outermost lines.
Step 5: Fold the corner flaps over and use a glue stick to adhere closed, forming a shallow box.
Step 6: Use the straight edge cutter to cut several 1 1/2″ wide card stock strips. With the bone folder and ruler, crease and fold down the center of each strip.
Step 7: Cut the folded strips to fit the three width lines as shown below.
Step 8: For the horizontal lines, cut the folded strips into 2″ lengths and place on lines. Use a glue stick to attach all of the bottom flaps into the shallow box.
Step 9: Print out rock and mineral names on the white paper. Cut each out, leaving excess at the bottom for a flap; fold the flap back. (Make sure to the rock/mineral names you choose match the candies you have on hand – I used this as a guide.)
Step 10: Use icing (I made a simple powdered sugar and milk mixture) to attach the various candies onto the sugar cookies.
Step 11: Place the finished cookies into the box and use the glue stick to attach the rock/mineral names to their corresponding compartments.


Malissa
January 29, 2015
These are so fun and remind me of my childhood when I was obsessed with minerals!
Debbie
January 29, 2015
That is so so cool! you always amaze me with your imagination!!
xx
http://debsbug.blogspot.com
ANNE {Anne's Scribbles and Doodles}
January 29, 2015
These are amazing! I would honestly love to receive these. 🙂
molly yeh
January 29, 2015
i LOVE these!!!!! so cute and so fun.
Delphine
January 29, 2015
This is so so pretty and clever! Thanks for this Amazing DIY! Needs to try this asap. 🙂
Jessica
January 29, 2015
I love those, amazing x
http://www.wild-cherrytree.com
geraldine johnston
January 29, 2015
What a fabulous idea! I know a child or two who would be pleased to no end with such a gift! Thank you for posting 🙂
Lisa
January 29, 2015
Oh this is just so creative and darling! Can’t wait to try it!
Carly
January 29, 2015
This is fantastic! I was such a rocks and minerals nut as a kid, and would have loved to receive this! Heck, who am I kidding, I’d love it now! Do you mind sharing which candy you used for obsidian? Is that a sculpted piece of chocolate? Whatever it is, it looks great!
Hi Carly – I used a chunk of dark chocolate almond bark for obsidian. 🙂
danielle @ this picture book life
January 29, 2015
Incredible!!!1
Jessica
January 29, 2015
This is fantastic! Would you mind sharing which candies you used for the various rock types? I’d love to make this for my daughter’s birthday next week and guess I should start gathering supplies!
Hey Jessica! I used dark/white chocolate bark for obsidian and gypsum, rock candy for suprite and serpentine, gum drops for malachite, quartz, and magnetite, speckled jellybeans for rose quartz and citrine, a chunk of a wafer cookie for sandstone, a mint for jadeite, and a sour candy for turquoise. I’d recommend browsing the bulk candy store – picking out the rocks, minerals, and gems was my favorite part of this project. I hope that helps!
Judy Havrilla
January 29, 2015
Well, that’s adorable.
fashion blogger
January 29, 2015
so beautiful
a big kiss
http://tr3ndygirl.com
Christine
January 29, 2015
These are so ROCK-ing. 😉 Love them.
Christine at http://www.thebookwormclub.org
Britney
January 30, 2015
ohmygod ohmygod ohmygod. I’m dying over how cool these are!
Christina J Bollinger
January 30, 2015
Great idea! I think many people would be surprised at how many gals love the sciences….and cookies. 😉
ana
January 30, 2015
this is really beautiful!
R.Y.W.
facebook page
Kathleen
January 30, 2015
I saw this post and was immediately drawn! I loveeedd my rock collections as a child, and I’m also a Kathleen:)
Jade Johnson
January 30, 2015
I love this post, it’s so unique. Very tempted to make some for my best friend’s birthday!
Lynn @ The Actor’s Diet
January 31, 2015
I LOVE THIS. It reminds me of my favorite scene in Goonies – where they find the jewels in Mikey’s Marble Pouch. I always wanted to reach thru the screen and put those in my mouth (apologies if you have never seen the movie and have no clue what I’m talking about).
Ashley
February 4, 2015
This looks so fun! My mom still has boxes and boxes of rocks that I collected as a kid.
Meredithe
February 9, 2015
This is so unbelievably clever and simple. It is wonderful. Thank you!
Kari
February 11, 2015
This would make a great school project for kids as well!
Kari
http://www.sweetteasweetie.com