


Are you hosting a Halloween party this year? Make this miniature haunted village as decor but also a surprise way to hide candy! Arrange the paper houses on a window sill, tray, or tabletop and when someone wins a game let them pick a house to reveal their prize. P.S. Another fun way to include a haunted house at your party!

Supplies: Card stock (greys and blacks), scissors, circle cutting tool, cutting mat, bone folder, pencil, paint brush, back and white paint, ruler, hot glue gun.
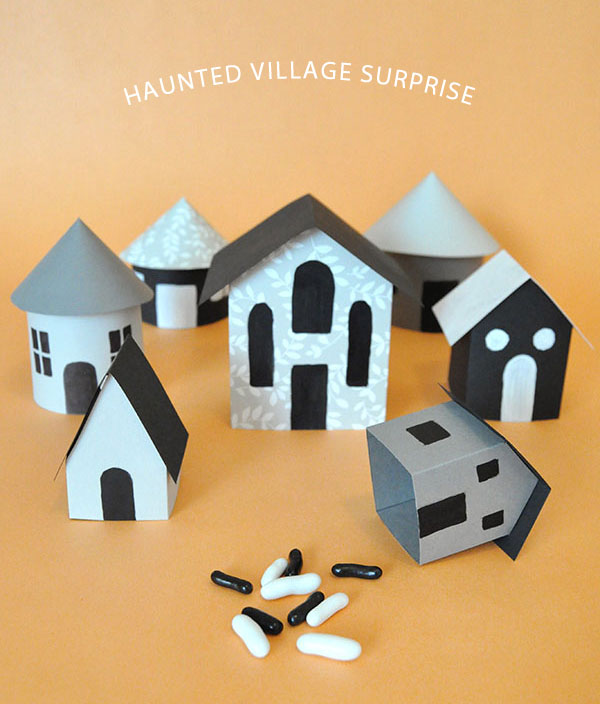
Step 1: For a round house: cut a long strip of card stock and draw doors/windows in pencil. The rectangle pictured is 2″ tall by 6 1/2″ long – play around different sizes for a more interesting looking village.
Step 2: Fill in the doors and windows with paint. Let dry.
Step 3: Apply a thin line of hot glue to one end of the strip. Attach the other end and hold until secure.
Step 4: To make the roof, cut a circle – this step can include some guessing and checking to get the right size. The circle pictured has a 4 1/2″ diameter. Mark the center point.
Step 5: Cut a slit to the center point and roll the circle into a cone. Adjust until you’re happy with the shape, holding it up to the house base for reference.
Step 6: Hot glue the cone together and cut off any excess/overhanging paper.
Step 7: Apply several small dabs of hot glue to the top edge of the house base and carefully attach the roof, doing your best to keep it straight and centered.
Step 8: Repeat! Adjust the height and width of the base as well as the height and overhang of the cone to get a variety of houses for your village.

Step 9: For a square house: Use a ruler and gridded cutting mat to draft the basic shape. This is totally customizable, all you need are four neighboring squares of equal size with a thin strip added on one end. Add equal sized triangles on top of the second and fourth squares. (The house below used 2″ squares with added 1″ tall triangles on top.)
Step 10: Cut out the shape you made.
Step 11: Use a bone folder to crease the vertical lines separating the squares. Fold.
Step 12: Paint windows and doors onto the house as desired. Let dry.
Step 13: Apply a thin line of hot glue onto the flap and attach to the edge of the square.
Step 14: The roof is made of a folded rectangle. For one side of the rectangle, measure one diagonal edge, double it, and add about 1/2″. (For the house pictured, this measurement ended up at 3 1/2″.) For the other side of the rectangle, take the length of the square and add about 1/2″ (2 1/2″ is what we used for the house below.)
Step 15: Cut out the 3 1/2″ by 2 1/2″ rectangle, drawing a line down the center of the 3 1/2″ side – this will be the very top edge of the roof.
Step 16: Use the bone folder to crease along the center line you just drew. Fold.
Step 17: Use small dabs of hot glue to attach the roof to the house base. Repeat! Adjust the size of the squares and the added triangles to make an interesting looking group of houses.


sarah
October 8, 2014
So cute! Thanks for sharing Kathleen. 🙂