Have you heard of Dinovember? I love how playful and creative you can get posing toy dinosaurs – I thought it would be a fun excuse to hold a dinosaur party! Make these paper mache dino egg invitations to get the party started. At the party, have your guests take part in a dinosaur posing competition – I’m sure the results will be hilarious!
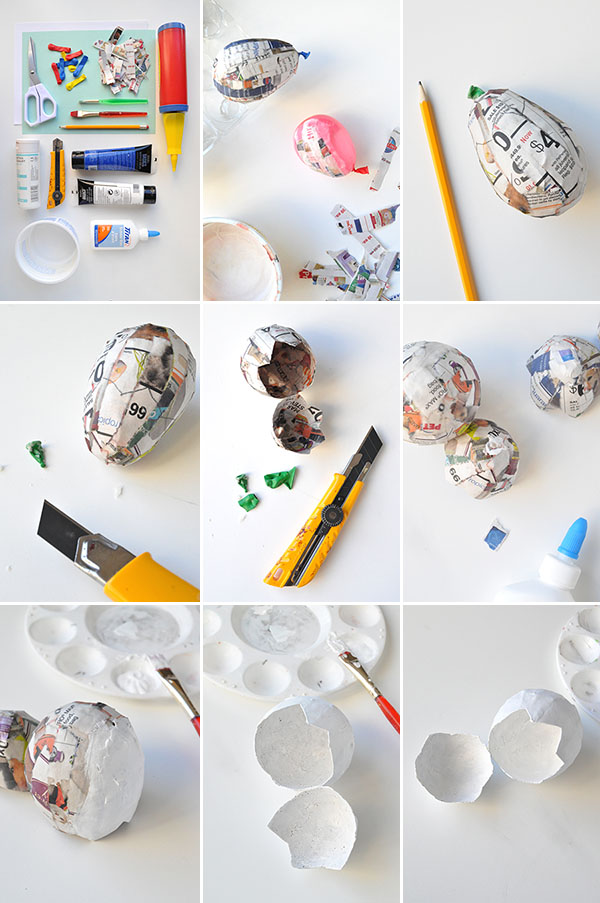
Supplies: Card stock, white printer paper
, scissors
, water balloons
, balloon pump
, newspaper torn into strips, paintbrushes, pencil, gesso primer
, paint
, craft knife
, glue
, container, confetti
Step 1: Use the balloon pump to inflate the water balloons. In the container, mix glue and water to form a paste and apply the thin newspaper strips onto the balloon with the paste. After one layer, let dry a few hours. Do another layer and let dry overnight.
Step 2: Draw a zig zag crack line along the hardened newspaper. Leave a small 1/2″ gap – this will act as a hinge, keeping the egg top attached to the bottom.
Step 3: Use the craft knife to cut the knot off of the balloon so that the balloon deflates.
Step 4: Cut along the pencil line you just drew and remove the balloon pieces inside.
Step 5: Use white glue and a small piece of newspaper to cover the hole that the balloon’s knot left.
Step 6: Paint the outside of the paper mache egg with white gesso primer. Let dry.
Step 7: Prime the inside of the egg as well. Let dry.
Step 8: Apply white paint to both the inside and outside of the egg, letting dry between layers. I did one coat on the inside and two on the outside. Be careful not to apply too much paint at once or the paper can soften.
Step 9: While paint is drying, print out your party details onto card stock and cut out. Make sure the cards will fit inside the egg, or fold to fit if necessary.
Step 10: Paint polka dots on the outside of the egg. Also paint a corner of white printer paper with the same color – you’ll use this later to seal the egg closed.
Step 11: Once dry, cut out one circle (the same size as the polka dots) for each egg.
Step 12: Put confetti and a party details card inside each egg. If your eggs are big enough, you can even put a small dinosaur toy inside too!
Step 13: Use white glue to attach the paper polka dot onto the seam, holding the top and bottom pieces together.
Step 14: Make as many eggs are needed!


Carly @ Zauberbear
October 15, 2014
Definitely absolutely making these to use for snail mail. Fabulous tutorial!
Jessica
October 15, 2014
Look how cute! Love it x
http://www.wild-cherrytree.com
Jordan
October 15, 2014
These are seriously so adorable!
I just went to a dinosaur birthday party too, these would’ve been so perfect 🙂
Charlotte
October 15, 2014
It’s so a good idea … excellent !
I like it… thanks. 🙂
x
Jspot101
October 15, 2014
This is amazing! Saving this for future kids!!
Annabel
October 16, 2014
How amazing is this! Well and truly filed under ‘things to make when it’s my turn to have babies’.
Annabel xxx
http://www.annadorabel.com
Ananasa
October 19, 2014
We love this one! A keeper for sure, great work!
Christine
October 20, 2014
These are DINO-mite! Too cute. Love Oh Happy Day’s work. It’s so inspiring.
With Love,
http://www.thebookwormclub.org