


I love exploring hardware stores for craft supplies – there’s always great inspiration to be found. The rope, twine, and cord section is my favorite – so many projects can come out of these materials, especially when they’re in an awesome palette. After finding a neon orange, pink, and yellow, I developed three ideas using this brightly colored parachute cord: placemats, placecards, and coasters. Either together or separately they would be perfect decorations for a cheerful party!


For the placemat: This method for knotting the cord can create a placemat, charger, or you could even keep going and turn it into a table runner.
You will need: Nylon parachute cord in neon colors, craft glue
, scissors
(fabric shears work well), and strong tape
Step 1: Tape down 10 pieces of cord in a row, about one inch apart. To make a placemat, each piece should be at least 50 inches long.
Step 2: Tie every two pieces of cord together into a double knot. You should have a row of five knots. Since this is the first row, use a little glue to secure them.
Step 3 : Tie a row of four double knots, using different sets of cord, so that the knots are placed between those in the first row. Space them so there is about one inch in between the rows.
Step 4: Continue knotting the rest of the length of the cord, alternating knot placement.
Step 5: Secure the last row of knots with glue and trim the excess away.


For the placecards:
You will need: Nylon parachute cord in neon colors, craft glue
, scissors
(fabric shears work well), 1″ wooden square blocks
, and strong tape
Step 1: Glue the end of the cord alongside one edge of the cube. Use a bit of tape to secure the cord while the glue dries.
Step 2: Once the glue has dried, tightly wrap the cord around the cube in one direction, covering the exposed end of the cord and gluing as you go.
Step 3: Tuck the other end of the cord underneath itself and use a little piece of tape to secure the wrapped cord while the glue dries.
Step 4: Repeat steps 1 – 3 with a different color cord in the opposite direction, covering the remaining exposed surfaces of the cube. This time, do not add glue to one of the faces of the cube as you’re wrapping cord (this side will be where the place card slides in).
Step 5: Slide a place card between two rows of unglued cord and set the table with the rest of the neon cord party crafts!


For the coasters:
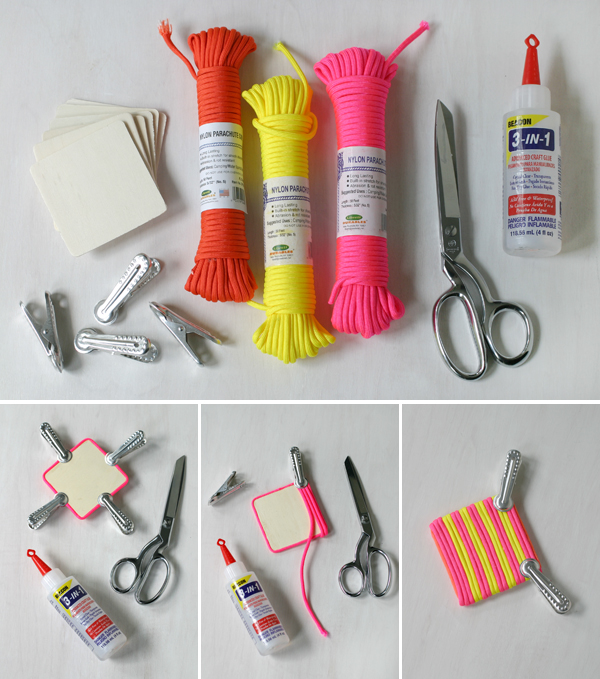
You will need: Nylon parachute cord in neon colors, craft glue
, scissors
(fabric shears work well), 4″ wooden square cutouts,
, and metal clips
Step 1: Glue cord around the outside edge of the wooden square. This will hide any wood that might show through. Use clips to secure it while the glue dries.
Step 2: Begin wrapping the wooden square with cord to cover the entire surface of the coaster. Glue the cord to the top and bottom of the coaster, leaving the raw ends on the underside. Use clips to secure the cord tightly as the glue dries.
Step 3: After the entire coaster has been covered in cord, let dry and use it to keep drinks from making a mess!


Brunna
September 2, 2014
Super inventive! Love the colour pallete <3
bobbie
September 2, 2014
How ingenious is this? And in a fun neon combo too! Lucky for us in San Francisco, summer is really only about to begin. Perfect details for an indian summer party!
Lauren
September 3, 2014
I love theses crafts! I’ve been looking for a reason to buy these parachute cords.
Lauren
September 3, 2014
This is so clever! I love the idea of making these for a dinner party, excellent choice to neon colours too.
http://www.betweentwo.co.uk
Christina
September 3, 2014
Love the cords you picked!
– Christina http://www.cityloveee.blogspot.com
Fili Yelny
September 4, 2014
Hey, I have the same rope in different color, and i don’t know what to do, and you’ve gave me some inspirations 😀 Thank you for sharing 🙂
http://www.filiandyelny.blogspot.com
Jamie from Wimbledon
September 5, 2014
I like the coasters best. This is a very good idea, you can even tie some knots to look better.
Thank you for sharing!