


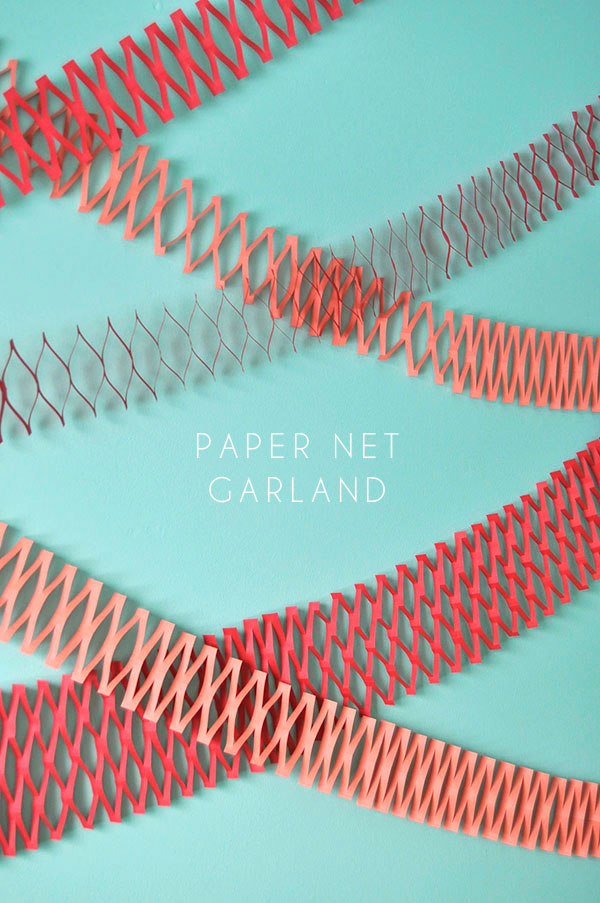
Aren’t vintage craft books the best? Some of the projects can be a bit outdated but you can find some real gems as well! This garland was inspired by Christmas tree decorations in an old Girl Scout craft book that I was thrilled to get my hands on. They’re so easy to whip up and you likely already have all the supplies.


Materials: Paper, scissors, glue stick, ruler, bone folder (optional)
Step 1: Cut your paper into a narrow strip – ours was 3 1/2″ by 12″ but you can play around with different widths.
Step 2: Fold the paper in half lengthwise – a bone folder will help you get a nice clean fold.
Step 3: Use your scissors to make cuts 1/2″ apart on alternating edges of the paper leaving 1/2″ of the width uncut.
Step 4: Continue this process for the entire length. When done, gently unfold the paper and carefully flatten the centre crease.
Step 5: Repeat this process as many times as you like! To make a longer garland, simply use a glue stick to attach the ends of two garlands together.
Step 6: For a wider version of this garland, cut a piece of paper 6″ by 12″. Fold the paper in half lengthwise and then in half lengthwise again.
Step 7: As before, make snips 1/2″ apart and repeat for the entire length.
Step 8: Gently unfold and flatten the garland in the same way. Use small pieces of washi tape to attach the ends of the garland to your walls.


Jesse
February 12, 2014
oh so much fun!
http://semiweeklyeats.blogspot.com/2014/02/parenting-ups-downs-and-inbetweens-vi.html
Nina
February 12, 2014
What a fun idea! I love garlands, particularly cool looking one’s that are easy to make!
Thank you!
Casey @ The Maine Mrs.
February 12, 2014
This is amazing and so easy! I will definitely be making these for my next party. Thanks!
Danielle
February 12, 2014
These are perrrfect for my next party! Thanks!!!!
Kristen
February 12, 2014
What an AWESOME idea! Thanks for posting! Ha and thanks for including step-by-step pics, might not have fully understood otherwise. 😉
Carly
February 12, 2014
Very cool, and it seems easy enough! Thanks for sharing!
Laura
February 12, 2014
This looks so cool! Thanks for sharing!
http://a-styled-life.blogspot.com/
Giovanna
February 12, 2014
Absolutely brilliant! You are an endless source of inspiration and joy! Thanx 🙂
Sarah
February 12, 2014
Love that you found it in an old book! It reminds me of honeycomb decorations, but looks much easier to make. Am going to make some now and put a few little hearts on them for Valentine’s Day. Thanks for the idea!
STEL Style
February 12, 2014
i love it, easy an original
http://www.stelstyle.com
Melissa Tedesco
February 12, 2014
Another great idea! I might just try this out for my son’s first birthday party. I already am planning on using some other DIYs you have published. Thanks!
http://alsothatsit.blogspot.com/2014/02/we-like-to-party.html
Anna
February 12, 2014
BOOM! This former girl scout just made some in her cubicle. Thanks!
Awesome!!
chloe
February 12, 2014
What a cute idea! It also looks super simple which gives it extra points in my book 😉
xox
chloe
http://popcosmo.com
Andrea Shepherd
February 12, 2014
I love paper decorations! These seem sleek and simple. I will have to try.
Rebecca
February 12, 2014
I love this! It’s so gorgeous and would be amazing to have a rainbow of these garlands up for a party! Thanks for sharing!
Kim Byers from The Celebration Shoppe
February 13, 2014
Darling paper garland! Great tutorial, too!
Stephanie
February 13, 2014
This garland is adorable!!
christamae
February 13, 2014
Oh my gosh. I love love love these. Will definitely have to make!!
alice
February 13, 2014
wow, what fun! I feel as if i might get myself confused but i may have to give it a try!
Katie Meyers
February 13, 2014
Love this! So clever!
lyndsay // coco cake land
February 13, 2014
super cute! great colours too, kathleen – love it against that green background!
Evei
February 14, 2014
Oh, I just love this. Perfect colors!
A Feteful Life
February 15, 2014
LOVE! I don’t remember doing anything like this in Girl Scouts!
Traci
February 22, 2014
So fun, and it looks easy. Bookmarking this idea, too. (I say “too” because it’s not the first time I’ve done that here.)
Paulette Leto
February 25, 2014
Great find! This makes me want to check out some DIY craft books at the library and see if they have any cool vintage ideas like that.