


by Jenny Batt
So, I was just sitting around the other day noticing how many grocery ads came in the mail the other day and I wondered what I could do with it. Why not make a pinata? So I grabbed my winter sale flyers and a few extra party hats and got to work. January will be a little more fun this year.


Click through for full instructions.
You will need: newspaper, balloons, glue, freezer paper (to protect work surface), 7 party hats (per pinata), scissors, hot glue gun, tissue paper, double stick tape


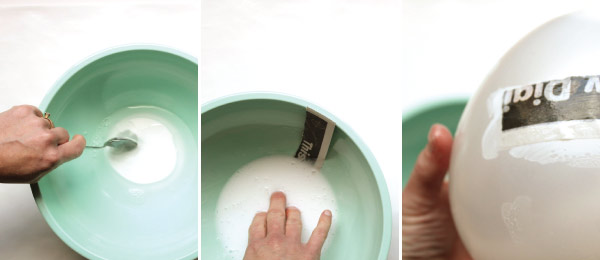

This is the first time I have attempted paper mache since elementary school and it was as easy as I remember. Messier, but easy. First, cover your work surface with extra newspaper or freezer paper. Tear your newspaper into strips. Thinner strips, about 1″ wide work better for the smaller balloons. Blow you balloon up only half way so it still remains perfectly round. Add glue to a large bowl, about 1/2 cup, and add water about 1/4 to 1/3 cup, and mix until thin but gooey. Soak each strip in the mix, gently scrape off excess using your fingers by sliding between two and add to your balloon. Flatten strip on balloon. Keep going. I used one full grocery ad, about 4-5 pages per balloon. Once covered completely, except for the very top knotted end, attach a string and hang to dry over freezer paper. Let dry overnight.
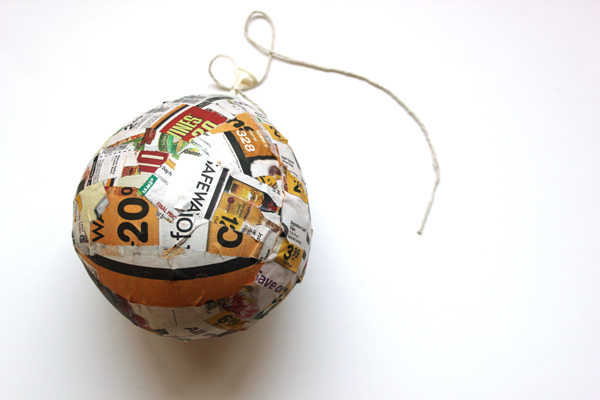


Once dry, cut off the balloon knot and cut a pretty circle at the open end. This will make the space to fill in candy or confetti later. Set out 7 party hats. Cut slits around the bottom of the party hat with scissors about 2 inches in. Trim the party hats about 1 inch shorter, leaving 1 inch slits around the bottom. Press out the bottom. Repeat with remaining party hats.
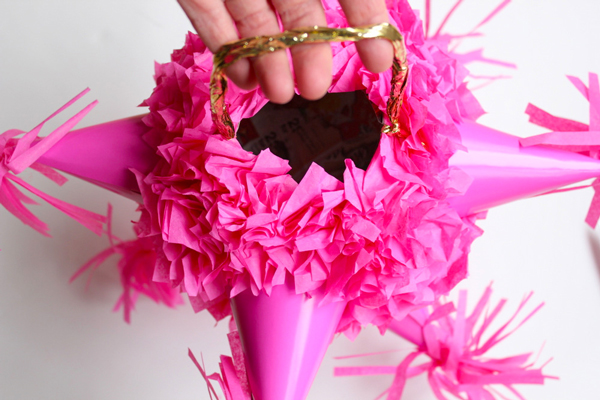
Cut out 5 inch squares of tissue paper. Cut fringe on one side and roll three sheets together. Twist top and insert into the top of each party hat. Secure with a drop of hot glue. Repeat with each hat.
Add hot glue to the flared out bottom tabs of the party hat and press into the side of the pinata base. Repeat with remaining hats until pinata is covered.
Cut small squares, about 1 to 2 inches, out of tissue paper. Add strips of double stick tape over the messy base of the pinata. Press a square of tissue paper over the end of your finger or a pencil and attach to the pinata. Cover the entire base. Using the tip of the scissors or a hole punch, add a hole on each side of the opening and insert string or gold mylar rope to hang. Ta-DA, a traditional style pinata, using some stuff I had laying around the house.


Chloe Moon
January 10, 2013
You are so creative!! That’s pretty awesome!!!
jessica
January 10, 2013
Oops ohhappyday is starting to look like a one trick pony….maybe time to move beyond the pinata’s, crepe paper and yarn balls.
Hi Jessica! It’s not an accident! I love crepe paper (its my favorite medium) And I have a pinata series because I love pinatas. Not sure what you mean by the yarn balls. I don’t think I’ve ever done project like that. I’ll always post about those things because that is what makes me happy.
Casey
January 10, 2013
I rarely ever read the comments on blogs and have never actually left one before. However, I just wanted to kindly refute the comment made by the previous reader. a) She is just being hurtful- there are far more constructive and kind ways to give criticism, b) if she was as talented and creative as you folk to begin with, she would have her own top-rated blog and not rely on you fabulous folks to provide her with ideas for which she probably claims credit for (I mean, that’s why we are all here, right;), and c) she is just plain wrong. Anyhow, keep up the great work…pinatas, crepe, yarn and all!
Courtney K
January 10, 2013
Looks like someone needs to watch this: http://www.swiss-miss.com/2013/01/the-thumper-rule.html
Lexy
January 10, 2013
What a fun take on a pinata! I love this one! 🙂
Mere
January 10, 2013
I love this project! Pinatas + Party Hats = joy²
Thanks for sharing this awesome tutorial!
Veronica
January 10, 2013
This is so cute! Just wondering though–is this pinata only decorative? What happens to the balloon if you try to hit it open?
Emma
January 10, 2013
Jessica, that was a pretty unnecessarily nasty comment. Stay constructive. I, on the other hand, love the resourcefulness of this post: turning waste into something useful and fun is awesome in my book. Keep up the fantastic work – love your blog!
Hester
January 11, 2013
There’s no such thing as too much pinata’s! Although I still got to make one… I agree with Emma, it’s so inspiring to see how you can turn things other people consider trash into something you can actually use to decorate your home! Whenever I’m diy’ing, I’m always looking for just these things, seeing we (like “we, people who have probably already everything we could ever wish for”) have already so many things we just throw away without thinking.
This girl loves to talk
January 11, 2013
well I love your pinata techniques and made a christmas stocking shaped one for christmas (which we ended up smashing at a new years eve party) to your other method of the cardboard shapes with rectangle strip joining them – previous year I made candy cane shape- and credited you – thank you!!
http://thisgirllovestotalk.blogspot.com.au/2012/12/stocking-pinata-christmas-tip.html
http://thisgirllovestotalk.blogspot.com.au/2011/11/candy-cane-pinata.html
Savanah
January 11, 2013
It’s totally okay to have piñatas in your house even when there’s no party, right? 😉 Yet another wonderful and beautiful post, Jordan. Thank you for sharing your creativity! 🙂
Laura
January 11, 2013
What a fun pinata! Love the color!
MAry
January 11, 2013
Hi there, love your blog, it definitely adds happiness to my day 🙂 im a craft-a-holic as well 🙂
just out of curiosity… the pink and red painting in the first display picture (on the wood dresser), is that a DIY painting?
if so, would it be ok to ask if you can show us how to make it? its gorgeous!
if not, no worries, you have good taste in paintings 🙂 thanks in advance !!
Verena
January 11, 2013
This is such a great idea!
Have a great weekend!
Verena
sarah
January 11, 2013
Love the pop of color! And it looks super simple!
Sar
http://www.etsy.com/shop/owleyevintage
Kati
January 13, 2013
This is the cutest!
-Kati
Bellenza Bistro
January 15, 2013
How cool and creative of you (as always!) to make a pinata out of sale flyers!
ROSI
January 18, 2013
No such thing as too many piñata tutorials. In fact I might make your whole piñata series and hang them all just because. Keep them coming Jordan, along with all your other fabulous ponies x