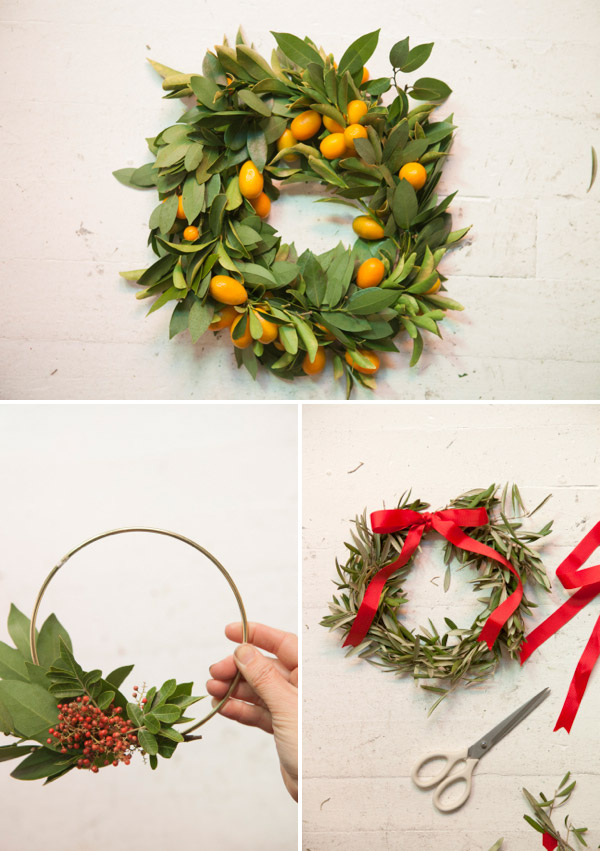
I’ve been busy making lots of wreaths and garlands for my family and friends so I thought I would put up a little wreath 101 post. Here are three types of easy wreaths you can make at home. I am not a trained florist but simple wreaths are something anyone can do. The materials I bought from the flower market in San Francisco but if you don’t live near a flower market (or don’t grow your own) you can order greens like this through the internet or through a local florist. There are so many types of wreaths to make but these are some basic skills and supplies you need to make any type you want.
Click through for the full steps.
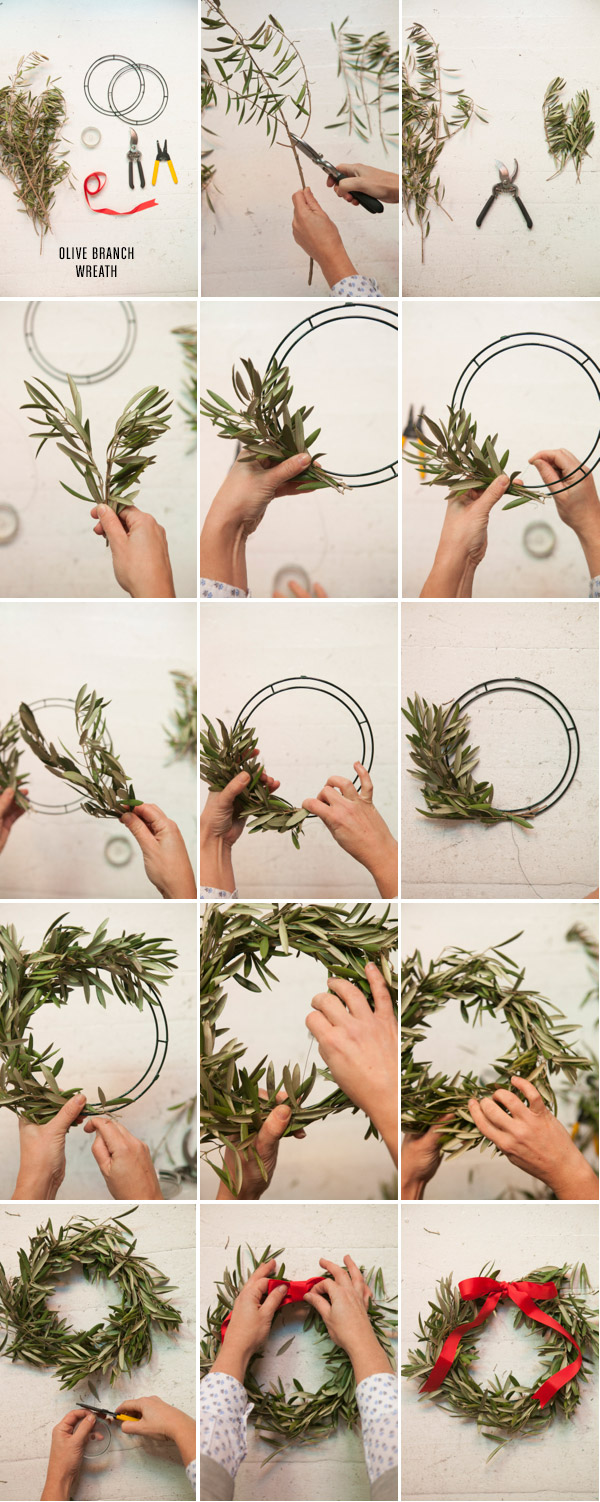
WREATH ONE: OLIVE BRANCH WREATH
Materials Needed: Olive Branches, Clipping Shears, Wreath Form, Floral Wire, Wire Cutter, and Ribbon
Step 1: Take each olive branch and cut it up into small workable sections.
Step 2: Gather 3-4 sections of olive branch and hold together at the base.
Step 3: Hold end of sections up to the wreath form and wrap the base 2-3 times until secure.
Step 4: Repeat Steps 2 and 3 but when attaching the branch sections cover up the exposed wire of the previous sections.
Step 5: Continue until the wreath form is covered. For the last step push aside the branches while wiring on the last section, then pull the branches back into place to cover the wire.
Step 6: After the form is covered tuck and pull the sections on the wreath to make them how you want. Tuck in or clip an unruly branch as desired.
Step 7: Attach a Ribbon.
WREATH TWO: KUMQUAT + BAY LEAF WREATH
Materials Needed: Kumquat Branches, Bay Leaf Branches, Clipping Shears, Wreath Form, Floral Wire
Step 1: Take each Bay Leaf branch and cut it up into small workable sections. Repeat with the Kumquat branches.
Step 2: Gather 2 sections of Bay Leaf and 1 section of Kumquat Branch and hold together at the base.
Step 3: Hold end of sections up to the wreath form and wrap the base 2-3 times until secure.
Step 4: Repeat Steps 2 and 3 but when attaching the branch sections cover up the exposed wire of the previous sections.
Step 5: Continue until the wreath form is covered. For the last step push aside the branches while wiring on the last section, then pull the branches back into place to cover the wire.
Step 6: After the form is covered tuck and pull the sections on the wreath to make them how you want. Tuck in or clip an unruly branch as desired.
WREATH THREE: BERRY + BAY LEAF WREATH
For this wreath you just attach asome greens to a brass ring but you leave most of the ring exposed. I like using brass macrame rings for this since they are prettier than just a regular wreath form.
Materials Needed: Berry Branches, Bay Leaf Branches, Clipping Shears, Brass Macrame Rings, Floral Wire
Step 1: Take each Bay Leaf branch and cut it up into small workable sections. Repeat with the berry branches.
Step 2: Gather 3 sections of Bay Leaf, hold together at the base.
Step 3: Hold end of sections up to the brass ring and wrap the base 2-3 times until secure.
Step 4: Place the berry section to cover the wire and wire it on carefully so the wire doesn’t show. You’re done!
All photos by Paul Ferney for Oh Happy Day


Hannah
December 20, 2012
These are beautiful, I’ve never made a wreath but am definitely wanting to try it out now! Have a great Christmas!
joanna goddard
December 20, 2012
these are beautiful, jordan!! xojoanna
joanna goddard
December 20, 2012
and happy holidays to you guys!
chiara
December 20, 2012
beautiful! your studio must have smelled divine!
Kerri from Happy Tuesday
December 20, 2012
I love these! You make the process look so easy and peaceful.
Laura
December 20, 2012
There’s still time to add holiday cheer around your home!! You could even change up the ribbon to keep them up after the holidays. Merry Christmas!!
Lottie :: Oyster & Pearl
December 20, 2012
Beautiful! I need to find a wreath form, my homemade wreath is looking decidedly misshapen.
Love the kumquats, also want to hang a few studded with cloves from the tree.
Abby
December 20, 2012
Do you know how long these will last/when they will start to look droopy?
Cheryl
December 20, 2012
I SO need to make a wreath next year. I’ve always wanted to – this is very helpful! a fresh, wreath – maybe with the scent of citrus, too! 🙂
little kitchie
December 20, 2012
they’re all gorgeous – LOVING the kumquat and bay leaf one!
this is lemonade
December 20, 2012
The kumquat and bay leaf one is my absolute favourite. I love the aromatic fragrance of bday leaves and the kumquats are simply cheering and so vibrant. I feel like this is one wreath you could very well put to good use after Christmas for something delicious 🙂
Rachel Cunliffe
December 20, 2012
Hi,
I have been hunting and hunting down here in New Zealand for anything which isn’t:
– an ugly green fake pine wreath to be decorated (e.g. like this: http://www.thewarehouse.co.nz/is-bin/intershop.static/WFS/TWL-B2C-Site/TWL-B2C/en_NZ/product/large/9400023458627_l.jpg )
– polystyrene circle
I was originally looking to buy a grapevine wreath, but I’m curious about the wreath form you’re using. I don’t expect it will be on sale here either, but is there any way of making one or buying something from a hardware store which would work?
Desperate to make a wreath for Christmas, but they’re just not a big deal down here (and certainly not a “real” one – plenty of overpriced ugly fake ones).
Thank you in advance for any suggestions and Merry Christmas!
Rachel
Sarah [ Sarah The Architect ]
December 20, 2012
I’m in LOVE with the Kumquat branch wreath. Gorgeous!
Laura
December 21, 2012
Such a gorgeous project! What a fun and beautiful gift to give.
Fluffy Oak
December 21, 2012
Very niiice
mundart
December 21, 2012
so so nice.
Carol
December 24, 2012
I LOVE THIS ! HAVE A HAPPY HOLIDAY : )
sarah
December 24, 2012
I love how simple these look, but they are stunning!
Sarah
http://www.etsy.com/shop/owleyevintage
Laura Trevey
December 25, 2012
A wonderful tutorial ~ happy holidays!!
Sweet Harvest Moon
December 26, 2012
Beautiful!
Merry Christmas!