We made this giant marquee sign last summer and I loved making it so when I saw these Mini Globe Lights I knew had to make a mini version. I actually made this project last month but forgot to take photos. So when I pulled them out of the bag the letters were a little bent after being ignored. They are made out of paper so if they are on a shelf they’ll be fine but from experience I just don’t recommend cramming them in a paper bag. This would be cute for a birthday party or even a Christmas party. Depending on how many letters have it takes 1-2 hours. The key to making this project go smoothly is getting the right glue
. See instructions and photos below.
Click through for full instructions and photos!
(p.s.: The letters don’t light up separately, it’s just a photoshop trick.
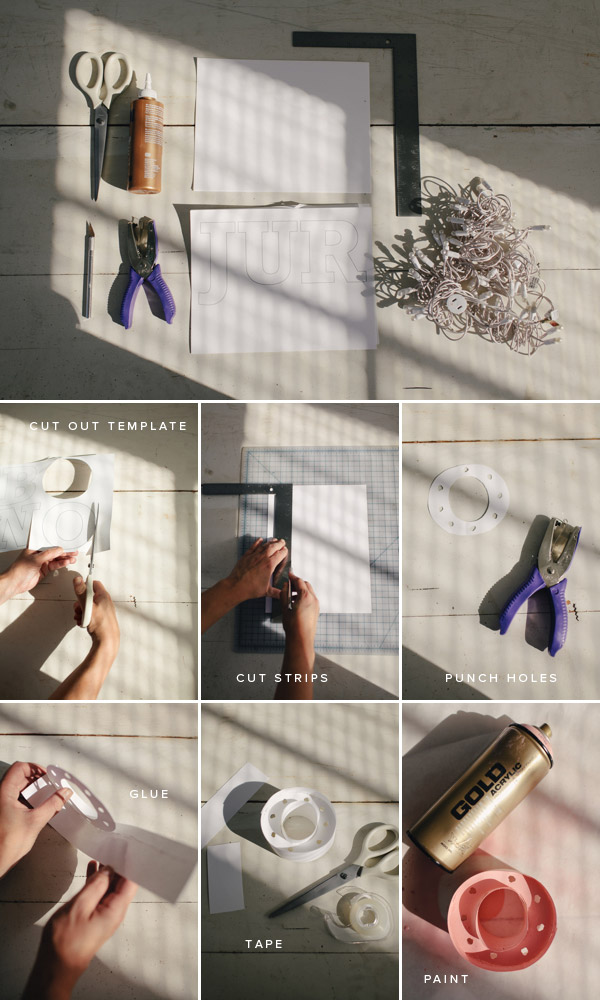
Materials Needed: Scissors, Quick Dry Tacky Glue, X-acto Knife, Whole Punch, Cardstock, Free Template, Ruler, Mini Globe Lights
Step 1: Download and Print the free template onto cardstock. Cut out the letters you need.
Step 2: Cut Strips 2″ Strips of Cardstock
Step 3: Figure out how many holes you need and make sure you have enough lights. You’ll want to leave a light in between each letter for space. Punch a hole. You don’t want these too small or too big. A standard hole punch is slightly too small so after you make the first punch, repeat on edges to make the hole a bit larger. It is ok if the holes aren’t perfectly round, you won’t be able to see them.
Step 4: Take the strips of paper and score where it will need to be bent (around the corners.) Once your folds are in place add the fast drying tacky glue about 3/4 of the way up the strip. Wrap the strip around the letter and hold for 30 seconds until it sticks. Reinforce with a few small pieces of tape.
Step 5: Once the letters are dry paint them. We just used spray paint, let it dry.
Step 6: Put the lights into the letters and plug in!
Credits + Contributors:
All photography by Heather Zweig for Oh Happy Day
Art Directed by Jordan Ferney
Produced by Ashley Rose Kirschling


Jessi
November 12, 2012
I want to cry this is so cute! I want to do a black and white one for my wedding. I live in Quebec and we are having the wedding in Virginia, so this will be a delightful way of bringing French to the Burbs! Also, I love love love your site.
Kristen M
November 12, 2012
Can you also include an ampersand.
I want to do K & S.
Thanks
Paola Sánchez
November 12, 2012
A M A Z I N G !!! thank u for sharing!!
Marie
November 14, 2012
This is super cute! I love the colors and the idea! 🙂
http://www.happypaperplace.com/
jane
November 14, 2012
target has the mini globe lights right now. 70 bulbs per strand. One question, it says glue 3/4 up the strip, which is the bigger side, where the lights show, or the back side where the cords will be? or will the letter be closer to the front or back of the strip?
The shorter side is where the lightbulbs are. Hope that helps!
Casey
November 18, 2012
I am so in love! These are so ridiculously cute. I was hoping to do one for christmas, but am at a bit of a stand-still:( I have read thru the tutorial, printed out the letters, cut out the ones I need as well as the strips…but as I start to assemble it, it just doesn’t quite match up with your masterpiece. Are your letters bigger and the outside strips wider than 2 inches? Also, did you use 2 of the letter forms per finished product? The tutorial looks as if the letter is glued to the bottom of the strip, but the example seems as if it is placed in the middle. I am SO sorry to bombard you with questions, but any advice you could give would be much appreciated! I adore your blog to no end…keep up the inspiration!