


by Jenny Batt
I’ve seen a lot of garland in my time, but these clay letters really make a statement. If you have ever made cookies, you can make this garland.

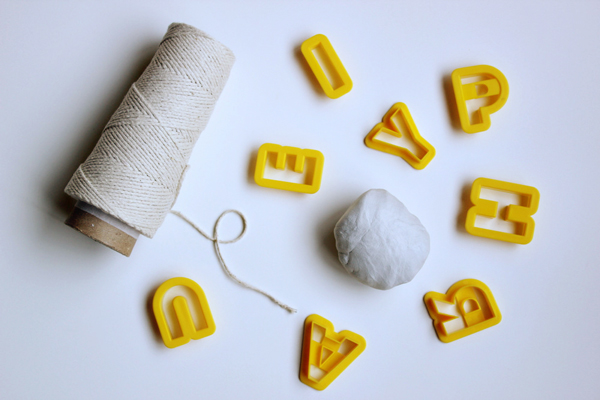
You will need: air dry clay, letter cookie cutters, wax paper or freezer paper, rolling pin, hot glue, cotton twine


Click through for instructions and photos!
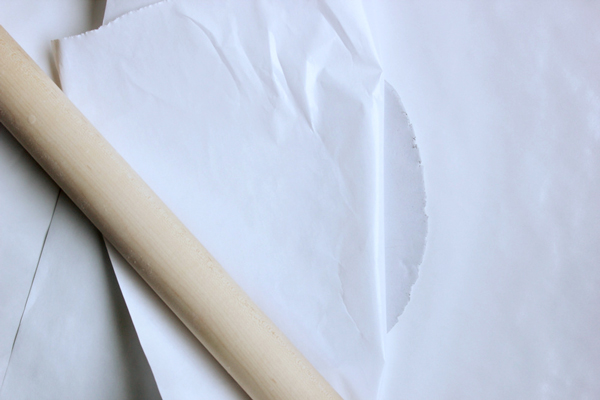
I chose a light colored air dry clay to work with because it is softer and easier to knead than oven bake clays. There is also the added bonus of not having to bake it, yay. The first thing you want to do is soften the clay by working it with your hands, just keep kneading it and squeezing with your hands until it is really soft. Next, lay out a sheet of freezer paper, the clay and a second sheet of freezer paper on top. Make sure the shiny non-stick sides are facing the clay. Roll the ball of clay flat until it is about .25″ thick.
Cut out each letter with the cookie cutters. These letters have indents for the open spaces inside the letters, like the “O” and “R”, but just smooth those over with you finger after you cut them out. I cut out all of the letters first and removed the excess material around it. It is easier this way and your letters move less. Make many fun phrases, it really is hard to stop with just one. Kids will love to help with this DIY, I let both boys help cut out the letters.
Set these aside and let dry. It will take about 24 hours to dry, but check them a few times before they are done and make sure they don’t curl. If they start to, just press lightly to straighten while they are still workable.


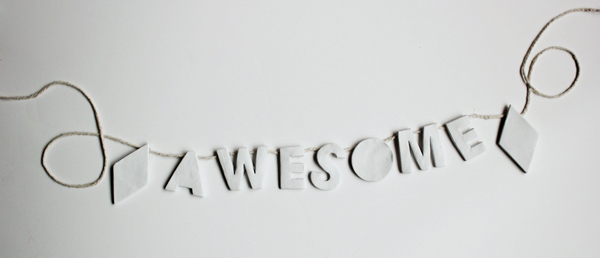
Once dry, heat up the glue gun. Set out your letters and space nicely. Flip over each letter vertically so they are upside-down, keeping the spacing. Cut a piece of twine to length. Add a drop of glue to the top of each letter and press the twine in. Add full lines across the tops of longer topped letters like “E”. Repeat for each letter and let cool.
That’s it. HURRAH! YIPPEE! You now have your own AWESOME garlands, no pun intended. Well, okay, it was. They clay can be painted or used as is. I plan on sending these to a few friends instead of cards as thank you gifts. What would you use them for?


Gina
November 14, 2012
I was just telling someone the other day how much versatility I have gotten out of my cookie cutter collection… but I have not done this! 🙂
Chrissi Holt
November 14, 2012
I love this I am thinking of making a star one for Christmas ..
Love Chrissi xo
http://www.christianaholt.blogspot.com
Tamara's Blend
November 14, 2012
Cool idea, this is gonna be great for the upcoming holiday celebrations!
http://www.tamarasblend.com/
Sarah
November 14, 2012
Love this! I’ve done something similar with painted letters on string and wrapped them around xmas gifts. So cute!
McKenna Ryan
November 14, 2012
This is such a lovely tutorial!! I was gifted a huge set of cookie cutters for my wedding and I would love to try this out with them. Thanks so much for posting this.
jessica
November 14, 2012
oh how i am loving this! i now think i need alphabet cooie cutters. thank you for sharing this brilliantly pretty project!
Gertrude from teapot.gr
November 14, 2012
Such a smart idea!!It’s surely one DIY that I’m going to try during Christmas!!
Jessi
November 14, 2012
how fun!
Theresa
November 14, 2012
I love this! Way more fun than your average thank you card!
Theresa
http://bomamma.blogspot.com
Amanda
November 14, 2012
Where did you get those cookie cutters from?!
Gina at willowday
November 15, 2012
Sweet and I love that these would be re-useable! As always, adorable!
These had me thinking of the clay alphabet containers I had the kids make for Christmas, last year, and later again, for teacher gifts, here:
http://www.willowday.com/2012/06/diy-alphabet-containers.html
and clay gift tags
http://www.willowday.com/2012/06/gift-wrap-18-neck-tie-wrapping.html
Elena @ Randomly Happy
November 15, 2012
What a great idea. I love how versatile it is and how easy too. Can’t wait to try something similar to spruce up my sad little mantel.
x Elena @ Randomly Happy
Sandeep
November 15, 2012
So simple and yet so awesome. Genius. Really love it!
abby
November 15, 2012
Love it! You are so talented 🙂 You always have the best DIY’s! xx
http://www.little-beast.blogspot.co.uk
Kathy
November 15, 2012
This is so creative! I never really needed to use garlands but this inspires me to start a cclay project
sarah
November 16, 2012
I might have to try that! How big do you think the letters can be?
http://owleyevintage.blogspot.com/
http://www.etsy.com/shop/OwlEyeVintage
Polly
November 16, 2012
These are really cool! It would be great to make a christmas one! I’m tempted to make a NOEL to go above the fireplace or something! x
Daisy and Finn
November 17, 2012
We’ve done these over the last few Christmas holidays as decorations for the tree. We used star shaped cookie cutters , some with tiny diamonte stuck on . all with gardening twine as the loop to attach to the tree.
We also made hearts & stars all stung together ( like an oversized bracelet)as Christmas cards , very simple , very lovely !
Paige
November 17, 2012
wow your blog is so amazing im surprised i havent found it before! i instantly shared the faceted vase DIY with my friend, I cant wait to try and make that!
would love if you checked out my fashion and DIY blog, punkrockparti.com!
xo
Paige
Anouka
November 18, 2012
It looks indeed awesome. Great job!
LUXESSED
Kristen @ miss prissy paige
November 18, 2012
I love this idea and have plans to create a holiday themed garland (and maybe paint with glitter)! Thanks so much for sharing this great idea! I’ve been following for a while and this is my first time commenting!
Diana
November 21, 2012
I love this garland! It also seems simple enough for a simpleton like me! I’m gonna try it!
Joy
November 24, 2012
What am I missing? The hot glue won’t stick to the clay letters? Help!