


by Jenny Batt
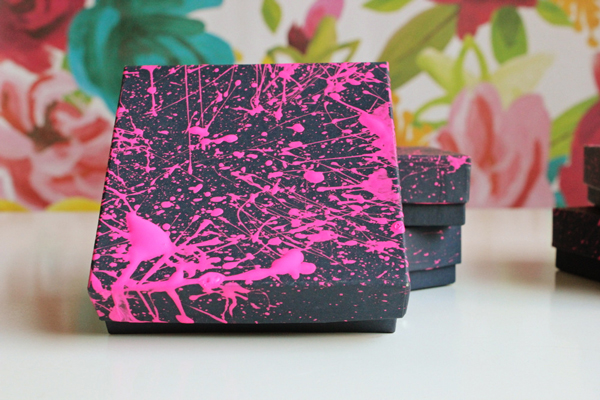
I’m old enough to remember the craze in the 80s first hand, ok, I was a kid, but I think that is where my love for neon originated. I had to incorporate it into some fun favor boxes. Whether for a birthday party or a wedding, customizing little boxes with a dose of hot pink modernizes even the drabbest of favors.
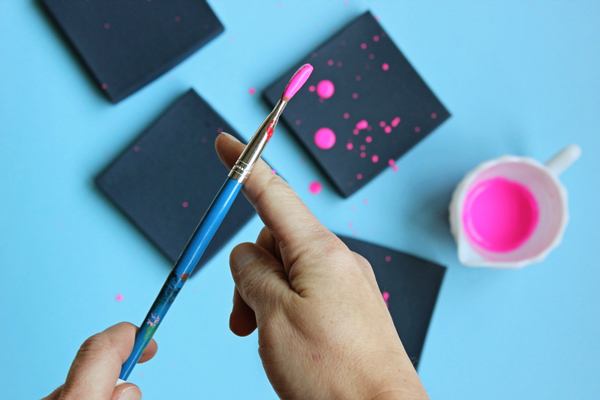
You will need: craft paint, favor boxes, medium to large sized paint brush, a bit of water


Click through for more photos and tips.
Take of the tops of the boxes and set on a large piece of paper or board outside. Squirt some paint, about three tablespoons, into a mason jar or container and add one teaspoon of water to thin the consistency slightly.
Dip your paint brush in and hold horizontally over the box tops. Tap, a hard tap, over the tops of the boxes to splatter the paint. You could also flick the end of the brush with your fingers, it gets messy!
Be sure to cover the tops and sides for maximum splatter paint design. I can’t stress enough that this is for outside and to wear your ratty clothes. I shot this inside and there was hot pink everywhere! Let the box tops dry completely. Simply pop the tops back on the boxes and fill with favors. Enjoy!


Splatter paint boxes would be fun as gifts, in large sizes, or use the technique to make paper cupcake toppers and garland. Ever since I made this, I have been thinking of gold splatters on black boxes, amazing, right?


Sarah
September 27, 2012
This is so fun! I would totally do this for a painting birthday party theme. Great project to do with the kids too in preparation for the party =)
– Sarah
agirlintransit.blogspot.com
McKenna Ryan
September 27, 2012
These are so cute!! I would love to do it with maybe three colors, peach, teal and gold. This would be so cute to do for any soiree. Also maybe changing the colors for christmas wrapping would be great. Thanks for the ideas!!
meagan
September 27, 2012
splatter painting is the best and fun for everyone….your artwork is always beautiful!
great idea for any gift giving.
xo the egg out west.
Kelsey Elizabeth
September 27, 2012
I love paint splatter! My obsession with jackson pollock in elementary school is still alive and well!
chiara
September 27, 2012
I like! Suddenly I can’t get Madonna’s Holiday out of my head – it’s 1983 and I have three pairs of scrunchy neon socks layered on top of each other!
Maja
September 27, 2012
this looks like so much fun 😀 😀
how2home
September 27, 2012
What a great idea! It must have been fun to make this tutorial, splashing paint everywhere 🙂 That’s definitely my kind of project!
Edna
September 27, 2012
I love that floral print in the background of the photos! Is that wallpaper or a large print? I must know!
Beautiful work as always, Jordan!
Trish
September 27, 2012
ha! These are so fun! Very 80s neon “saved by bell” style.
YESSSSS!
Trish
http://www.jellybonesblog.blogspot.com
Jenny
September 27, 2012
I think these neon splattered party boxes are just fantastic and so much fun for any type of party. I remember neon in the eighties and now my daughter loves it so I guess it has become timeless.
caroline
September 27, 2012
OMG i absolutely love this!!! gold on black would be perfect. maybe for bridesmaids gifts….!
Heather
September 27, 2012
Whattttt a good idea!
Alessandra
September 27, 2012
brilliant and so much fun!!!
thank you for sharing, xxx Ale
Ashley
September 27, 2012
LOVE. What a great way to decorate your Christmas packages and save yourself so much wrapping. Going to pin this immediately!!!
Jules
September 27, 2012
I am so inspired to do one now ! 😀
thanks for sharing!
xoxo, sundaesins.blogspot.com
peppermintblue
September 28, 2012
So simple and so gorgeous!
Greetings Birdyblue
Jeanne Rondeau
September 28, 2012
So simple and fun!
This technique would make beautiful wrapping paper!
-Jeanne, http://www.domesticspace.com
Kristin
September 28, 2012
I love these! It takes me back to slap bracelets, jelly sandals and way high side ponytails.
Cat
September 28, 2012
this looks so simple and fun! love splattering paint! 🙂
anna - Today I Like Blog
September 29, 2012
I love the colour you’ve chosen!!!
Caitlin Chaste
September 30, 2012
This is really cool! I might apply this brilliant idea in customizing my wedding ceremony supplies, particularly my favors. A litlle bit of creativity goes a long way!:)
Madeline
October 1, 2012
How fun! I can’t wait to do some splatter projects myself.
annie
October 2, 2012
This is a great idea!! Also, I, too, would like more information about the floral backdrop. It’s gorgeous.
Hannah B.
October 5, 2012
Love the project!
And pardon me for looking in the background, but the photos are styled so beautifully I couldn’t help myself! What is that floral wallpaper? I *LOVE* it!
Anja
October 7, 2012
Cute – and so easy! I have to try these for my next gift-wrapping!