


This series of Movie Night Posts is sponsored by Skinny Cow.
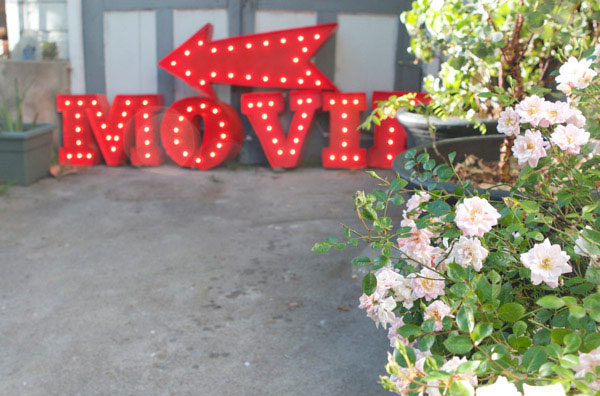
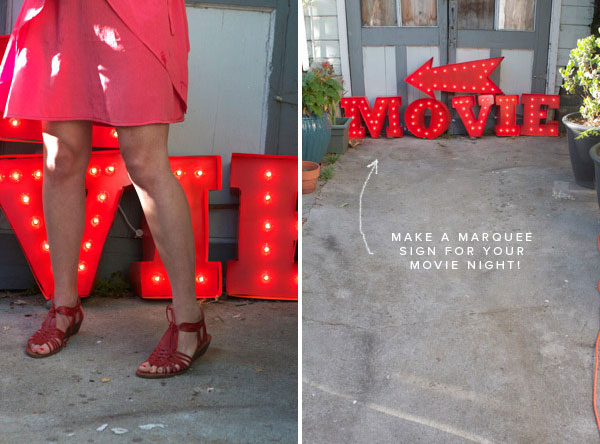
When we were brainstorming ideas for movie night decorations we kept coming back to vintage marquees and movies signs. So we put together this DIY using foam core and poster board. This would be awesome in a driveway or on the front of a house telling people where the movie night is. My friend Brooke told me about these strands of super cheap globe lights from Target, which makes the whole project really affordable. While the materials aren’t too expensive this took us a whole afternoon to make. The most time consuming part is cutting out the letters and then lining them. It took us about 45 minutes per letter. These would also be awesome in a kids room or for any event or party. Find all the instructions and printable template below. ps: See our movie night food ideas right here.


Complete instructions and dowload are after the jump.
Materials Needed: 1/8″ Foamcore, Box Cutter and Exacto, Poster Board, Free Printable template (download here), scotch tape, packing tape, ruler, string of lights (take the box apart for the circle template), spray paint.
Step 1: Download the free template It has the word “MOVIE” and an arrow. Tape the letters together and lay them on the foamcore.
Step 2: Cut out the the letter using the template as the guide. Go over the cuts until the letter is cut out.
Step 3: Turn the letter over so the backside is facing up and draw a line down the center of the letter.
Step 4: Using the box the lights came in as a template, draw the holes a few inches apart. This is where the lightbulbs will go through.
Step 5: With an exacto knife, cut out the circles.
Step 6: Cut a poster board into 5.5″ strips. These will go around each letter and will help them to stand.
Step 7: To attach the liners we used scotch tape. We liked how it looked when the face sat 2″ deep into the liner. The secret to getting good looking letters is to score the poster board before you bend it to get nice sharp creases. Once you’ve scored and bent all the folds begin taping in the foam core from behind about 2″ down the poster board. Make sure the tape is secure and reinforce it until it feels sturdy. We reinforced ours from behind with packing tape.
Step 8: Spray paint the letters your color of choice. We painted ours a nice orange-y red. Let it dry.
Step 9: Put the lightbulbs in the holes and then screw them into the sockets from behind. Make sure they are screwed in all the way or they won’t light up. We should note that if you are missing a lightbulb the other lights in the strand still work. Plug the lights in and that’s it! You have a pretty sign for your event.


by Jordan Ferney and Alexis Birkmeyer. Photos by Paul Ferney


Britt
June 28, 2012
Great idea (and instructions). Two Qs: Did you score with the exacto knife or something else and can we bribe you to offer other letter templates? This is genius. Nice work ladies!
Christa @ a*typicaljourney
June 28, 2012
This is so great! I’m thinking about doing our last name in these at our wedding – it’ll make the venue easier to find from the highway! How did you initially get the templates for the letters? Did you just find a font & print them on a large-scale printer?
Amelia
June 28, 2012
awesome idea!!! I’d like to make one to when I throw a party
Andressa Almeida
June 28, 2012
Boa Tarde,
Sou Brasileira, acompanho seu blog todos os dias.
Essa DIY foi ótima!
Sucesso!
bethany
June 28, 2012
Such a great idea!!
I am going to make these for an event this summer. Is there any way you can tell us now to make a template for different letters?
Thanks!
Kimberly
June 28, 2012
Dang homegirl…..you’re good ! I wanted to buy these from UO , but now I’m going to do it. Thank you!
Luna
June 28, 2012
You ladies have outdone yourselves. Suits almost any party really. Very cool.
Trish
June 28, 2012
This is an absolutely fantastic idea! I am looking for ideas for my engagement photos and this is SO cute and retro.
Love it.
Thanks!
Trish
http://www.jelly-bones.typepad.com
Amber
June 28, 2012
This is AH-MAZING. You might put Urban Outfitters out of the marquee light business with this one!
Christina
June 28, 2012
I just did this only using cardboard to make a Hollywood sign,it’s super easy!
Movie marquee sounds good too,
Melissa
June 28, 2012
This is amazing! I was just wondering how you got each letter to light up individually? Did you get a separate strand for each letter and put them on a timer or something? The Target lights you mentioned are 25 bulbs, so you potentially could get 2 letters out of 1 strand…right?
Thank you!
Lane
June 28, 2012
Love the idea, will have to make something like this for our housewarming next month. Do you know where we could get templates for other letters? Thanks!
Erin
June 28, 2012
This is brilliant. I want one to permanently hang in my house!
Jenloveskev
June 28, 2012
Yay! This is seriously the best timed DIY ever. I was sitting in a restaurant tonight wishing I could have their cool marquee kitchen sign for my house. Best DIY i’ve seen in such a long time. Great job guys. So impressive. I can’t wait to try!!
Ally
June 28, 2012
WOW.
I never would have thought that was made from foam! I totally thought that was sheet metal. I must make one of these. thanks for the tutorial! Amazing. I love all your projects! 🙂
Renee
June 29, 2012
Love the project idea, but what I really want to know is where you got those red sandals. Love them!
Amanda Jane Jones
June 29, 2012
Jordan. This rocks.
how2home
June 29, 2012
Thank you for this beautiful inspiration. I’m really excited to try this out!!! Have an amazing weekend !
Sarah C.
June 29, 2012
Holy cow! We are actually hosting a movie night on the lawn this weekend. I love a good project but I just can’t see pulling this one off. Perhaps a little sign but not the marquee letters… Love it tho!
Lane
June 29, 2012
So I was trying to figure out how I could make an entire alphabet like this for all my future marqee needs, but I’m ridiculous when it comes to stuff like that. Jordan, can you point us to a tutorial on how to create a template of giant letters, or can you make one for us? I’d pay to download it!
Anneliese
June 29, 2012
Totally brilliant! I was going to attempt something similar with the word, “TACOS,” using chipboard letters from the craft store but couldn’t figure it out quickly enough so I changed direction! Though I have to say this does look a bit labor intensive–but FABULOUS! Thanks.
Lesli
June 30, 2012
Seriously cool! I can’t wait to make my own! Thanks so much for inspiring me!
mel
June 30, 2012
Beyond amazing. Thank you so much for all the hard work that went into sharing this!
Hannah
June 30, 2012
Thanks so much for sharing this project!
I’ve found a few links that look helpful….
http://www.designsponge.com/2011/04/diy-project-paper-marquee-letter-lamp.html
http://ruffledblog.com/diy-carnival-marquee-letters/
http://www.instructables.com/id/DIY-Vintage-Light-Up-Marquee-Letters/step2/Designing-lettering/
I’m going to try the instructables to make a really large template for various letters. You can probably find something neat font-wise at dafont.com – it’s one of my favorites.
Meg
June 30, 2012
How did you get the lights to come on one letter at a time??
Rivka
July 1, 2012
It’s not dangerous to have the lights burning and all that electrical wiring against spray painted foam core? It looks a little scary to me.
Vanessa {vanilla and rose}
July 2, 2012
Amazing! What a great idea!
elli by studio34E
July 2, 2012
LOVE this idea!thak you for sharing such an amazing diy!!MPRAVO!!
Penny
July 2, 2012
Brilliant! I HAD to Pin it! http://pinterest.com/pin/186758715768248498/
Madeleine
July 2, 2012
How were you able to time the flashing of the lights?
The flashing lights is just an animated gif. I made for the post. It didn’t really do that! THe lights just stayed on the whole time! 🙂
It is just an animated gif I made for the post. Just a photoshop trick! They stay light up the whole time.
martina
July 2, 2012
if anyone else is looking for a similar font, I found one called “akenaten” that seems like it would work for custom letters.
The font I used was Rockwell Extra bold. I made the letters so they were 16″ high.
Elena @ Randomly Happy
July 3, 2012
Absolutely fantastic. Who knew you could make your own marquee letters. This would be great for a wedding or big birthdau party… or a kids room.., man, the ideas are endless!
x
Daniel Keane
July 3, 2012
Jordon, probably the coolest how to post I’ve seen. My sisters are going to love this! I like how the marquee sign letters are portable. Just an FYI for Madeline, a lot of local hardware stores sell a blinker that you can attach to a plug. If you had two light strings you could make the letters light and the arrow blink. Had to Google+ this one.
Eloisa
July 3, 2012
This is pretty. I’m going to make this on my son’s 7th birthday in December ( still lots of time to do this) Thank you for the inspirations!
Aidel.K
July 5, 2012
My mind is racing with word ideas!! This is brilliant. Thank you for the clear & informative tutorial. Wondering if my husband would mind seeing one in every room.
Renee - the Creative Orchard
July 6, 2012
Madly in LOVE with these DIY Marquee Letters! I’m feeling inspired to have a backyard movie night this summer… I had a similar idea but I was going to cheat and use already made craft cardboard letters. 😉
Margot Madison
July 6, 2012
That is a great idea! I’ve got a client planning a broadway themed party who would definitely like to see that!
Kelsea @ Pink Wonderland
July 6, 2012
Found this through Miss Indie’s blog… this is amazing! Adding to my list of DIY’s to try out!
Lin
July 6, 2012
This is the most awesome project! Did the bulbs get hot? I’d like to make a sign that would be on for more than just an evening. I don’t normally have fire anxiety, but…… just thinking.
Anika Louise
July 7, 2012
What a wonderful idea! Thank you for including the downloadable letter template as well!
Cathe Holden
July 7, 2012
Mindblowing! Way to go!! And thank you for the share.
sisi
July 8, 2012
Love this, I would like to do this for our brand!! We would upload to your comment once it’s done!