


This series of Movie Night Posts is sponsored by Skinny Cow.
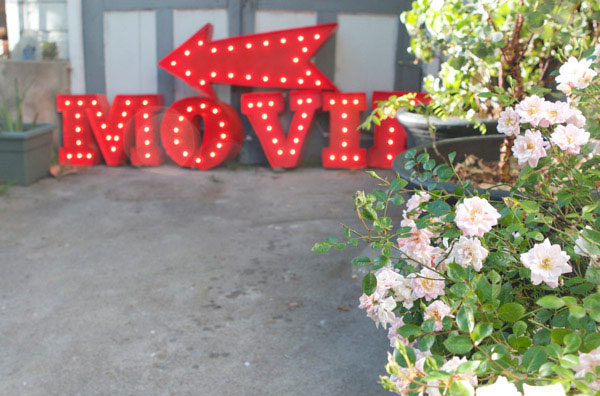
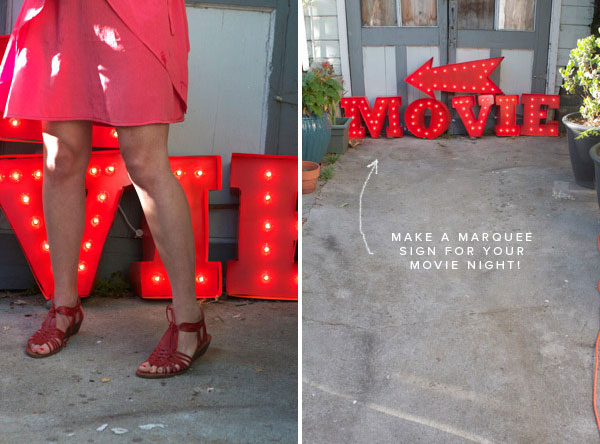
When we were brainstorming ideas for movie night decorations we kept coming back to vintage marquees and movies signs. So we put together this DIY using foam core and poster board. This would be awesome in a driveway or on the front of a house telling people where the movie night is. My friend Brooke told me about these strands of super cheap globe lights from Target, which makes the whole project really affordable. While the materials aren’t too expensive this took us a whole afternoon to make. The most time consuming part is cutting out the letters and then lining them. It took us about 45 minutes per letter. These would also be awesome in a kids room or for any event or party. Find all the instructions and printable template below. ps: See our movie night food ideas right here.


Complete instructions and dowload are after the jump.
Materials Needed: 1/8″ Foamcore, Box Cutter and Exacto, Poster Board, Free Printable template (download here), scotch tape, packing tape, ruler, string of lights (take the box apart for the circle template), spray paint.
Step 1: Download the free template It has the word “MOVIE” and an arrow. Tape the letters together and lay them on the foamcore.
Step 2: Cut out the the letter using the template as the guide. Go over the cuts until the letter is cut out.
Step 3: Turn the letter over so the backside is facing up and draw a line down the center of the letter.
Step 4: Using the box the lights came in as a template, draw the holes a few inches apart. This is where the lightbulbs will go through.
Step 5: With an exacto knife, cut out the circles.
Step 6: Cut a poster board into 5.5″ strips. These will go around each letter and will help them to stand.
Step 7: To attach the liners we used scotch tape. We liked how it looked when the face sat 2″ deep into the liner. The secret to getting good looking letters is to score the poster board before you bend it to get nice sharp creases. Once you’ve scored and bent all the folds begin taping in the foam core from behind about 2″ down the poster board. Make sure the tape is secure and reinforce it until it feels sturdy. We reinforced ours from behind with packing tape.
Step 8: Spray paint the letters your color of choice. We painted ours a nice orange-y red. Let it dry.
Step 9: Put the lightbulbs in the holes and then screw them into the sockets from behind. Make sure they are screwed in all the way or they won’t light up. We should note that if you are missing a lightbulb the other lights in the strand still work. Plug the lights in and that’s it! You have a pretty sign for your event.


by Jordan Ferney and Alexis Birkmeyer. Photos by Paul Ferney


lesley graham
June 27, 2012
WOW! you girls amaze me.
Ivy
June 27, 2012
LOVE this, Jordan and Alexis! Now I just need a backyard….and a projector!
Jenna Wray
June 27, 2012
Just amaz! Oh Happy Day (Jordan) you’re just so inspiring.
xo Jenna
Kate
June 27, 2012
quite possibly the coolest (and most difficult looking) DIY ever! I would love to make one of these of my name for my office!
Kate
http://www.theforgetfulwife.com
Kate It’s not that difficult! I promise! You could keep it simple and do the arrow in about an hour. 🙂
MeekandChic
June 27, 2012
So creative! I love it. This can be used for so many different events– the possibilities are endless!
Lindsey
June 27, 2012
AWESOME. Love the idea!!
Janae @ Bring-Joy
June 27, 2012
How long did this project take you do you think?
Each letter took about 45 minutes! We started around noon and finished up by dinner. If I was doing it again–for a movie night or something simple I probably would just do the arrow. It would take about an hour.
Katie
June 27, 2012
That is so cool!
The New Diplomats Wife
June 27, 2012
this is very cool – but way beyond by DIY capabilities – love it though!
LARY@ Inspiration Nook
June 27, 2012
This is by far one of my favorite DIY you guys have done! LOVE THIS!!! 🙂
Victoria
June 27, 2012
This is all kinds of amazing!! I might just consider this for our wedding (I’ve been getting a lot of those inspirations from you lately)
Kellie Hollister
June 27, 2012
Amazing! Can’t thank you enough for the great tutorial!
Evani G
June 27, 2012
Jordan this is incredible! The Oh Happy Day team never ceases to amaze!
Evani
http://www.simplyevani.com
Igor
June 27, 2012
I am stunned and beyond fascinated! This rocks!
Jenni
June 27, 2012
hi jordan! this is a wonderful project and i’ll be doing it for my upcoming wedding!! one question though… i remember in college design studio that spray paint would disintegrate the foam board! did you not have any trouble with this? maybe its only an issue if the paint gets on the actual foam inside?
Cathy M.
June 27, 2012
LOVE this idea!! Thanks for sharing the step-by-step instruction!
Liz @ Bella Vita
June 27, 2012
Wow! That’s so cool. I’m so inspired to have my own movie night now. As always, thanks for the inspiration!
Sumi
June 27, 2012
WOW! I am speachless!
martina
June 27, 2012
In response to the spray paint thing… it occurred to me when I was looking at the project that it would be easy enough to do without spray paint. I was thinking of doing it for my toddler’s room and the fumes didn’t appeal. Couldn’t you just do it with colored poster board (double sided) and cut out an extra piece to cover the foam core? Or use duct tape over all the pieces, McGyver style! That could even make it look like an old metal sign.
Stefania @ Revitalize with Stefania
June 27, 2012
wow that is intense! I love the idea of doing something like this for a kid’s bedroom
chiara
June 27, 2012
these are awesome! and you get to keep them and hang them in your house when you are done!
Lauren | Seventeenth & Irving
June 27, 2012
Wow, you have really outdone yourself this time. I cannot believe this is a DIY! It looks just like the vintage letters you would purchase at a flea market.
Katy
June 27, 2012
amazing. this could work for any number of events!
Holly Cromer | Blacksburg, VA Photographer
June 27, 2012
I’m not sure I’d have the patience to finish this project, but I definitely LOVE it!
magalerie
June 27, 2012
Wow! I’m speechless!
And the animated gif is so cute!
quyen
June 27, 2012
This is so creative! I would love to do something like this for my wedding reception. Are other letter templates available?
kathleen
June 27, 2012
ahhhh i love this! I’ve always wanted to buy these marquee letters, but they are always so expensive. this diy is just perfect! if you ever felt like it, i wouldn’t say no to other letter templates! 😉 i am thinking that i might incorporate this into my wedding/rehearsal dinner!!
barvara wendell
June 27, 2012
You are so creative!
I really like your red sandals. Could you tell me the brand?
979 yourtas
Sydney Ballesteros
June 27, 2012
That is such an awesome idea and affordable alternative!
~Syd
Sierra
June 27, 2012
I have been obsessed with vintage marquis lights (and fonts) recently and my heart just swoons for this DIY! Amazing job and thank you for sharing!
Kathleen
June 27, 2012
I’ve done this before and it’s easier than it looks! (It looks awesome in person, BTW.) The hardest part for me was creating my own template. Totally doable DIY, even if you’re not the best cutter.
jenniferL
June 27, 2012
wow! another creative project! i might have to try it if it’s as easy as you say, very fun!
gina
June 27, 2012
Wow, this looks so intense. This is so incredibly creative.
http://www.eatblogpray.blogspot.com
xo
Laura
June 27, 2012
It looks amazing! very, very creative! I like the animated pic!
Lau
http://fallinlove.com.ar/?lang=en/
mom in mendon
June 27, 2012
This is SO CLEVER.
Celeste
June 27, 2012
Soooooo CUTE! I love this idea. I think I might use this during the holidays to spell out something festive. Thank your Jordan and everyone at Oh Happy Day for filling my life with lovely crafts. Ya’ll should be on Craft Wars!
Yvette
June 27, 2012
Oh em gee!!! I am blown away by your craftiness! I just got a new projector for backyard movie nights. I so want to do this!
Emily
June 27, 2012
fantastic! how many strings of lights did you use for all the letters (and the arrow)? and did you loop the line between letters, or just plug in each letter separately? thanks!
Lisa
June 27, 2012
This is so very cool! While the project looks and sounds a little more labor and time intensive, I really want to give it a try. It’s just too good! Thanks so much for sharing 🙂
Tara Johnson
June 27, 2012
This is awesome! But it looks like a lot of work!
-Tara
http://madmaxandfamily.blogspot.com
http://blog.chron.com/madabouttown/
Odette
June 27, 2012
How on earth did you make the photograph flash like that? Amazing.
http://www.ungratefulbliss.com
emily // the daily smudge
June 27, 2012
You are one clever lady Jordan… every project you do makes me want to jump up from my desk and do it 🙂 thankyou ever so… this is going straight to the top of my ‘to make’ list!
Trina
June 27, 2012
very very cool!
xo . trina
Hannah @ Sparrow + Spark!
June 28, 2012
This is awesome! Such a fantastic idea, and so effective. Love it!
Iveta
June 28, 2012
brilliant!!
Brooke
June 28, 2012
I am speechless, this is just amazing!!!!! love this idea so much
Msanhle @ Fab 'n Fun
June 28, 2012
So clever idea! I love this so much. Gonna be useful in lots of things. Thanks for sharing!
My cute bride
June 28, 2012
I love it!!! Perfect for a movie themed wedding!
http://www.mycutebride.blogspot.com.es
deb
June 28, 2012
WOW! I would love to do my son’s name for his birthday. Really awesome.
So, I must know this — where did you get those adorable red shoes??
Leigh Anne Wilkes
June 28, 2012
Have been wanting to make marquee letters from my son’s wedding carnival reception to spell out love and now you have shown me how to do it – question though – what font did you use and any tips for making my own letters – I can use your O and E but need a L and V! Thanks so much