Here is a project I put together where you can make a journal or sketchbook out of a thrift store painting. It is a really simple process and gives a big payoff–a really special journal or sketchbook. It’s one of those projects that the first time will take you 25 minutes and then every time after will take about 10 minutes. These make very special gifts to give friends or just keep to yourself. In college I learned some bookbinding and the actual sewing of the pages can take a whole afternoon. I was so excited when I found you could buy book kits ready-made so you just make the covers. You can find all the directions below.
Materials Needed: Painting on canvas (I get mine from thrift stores), Paper Source book kit (I used this one), pencil, bone folder, exacto knife, a large brush, archival glue
, ruler, and a cutting mat. All of these supplies can be purchased in the bookbinding section of an art store.
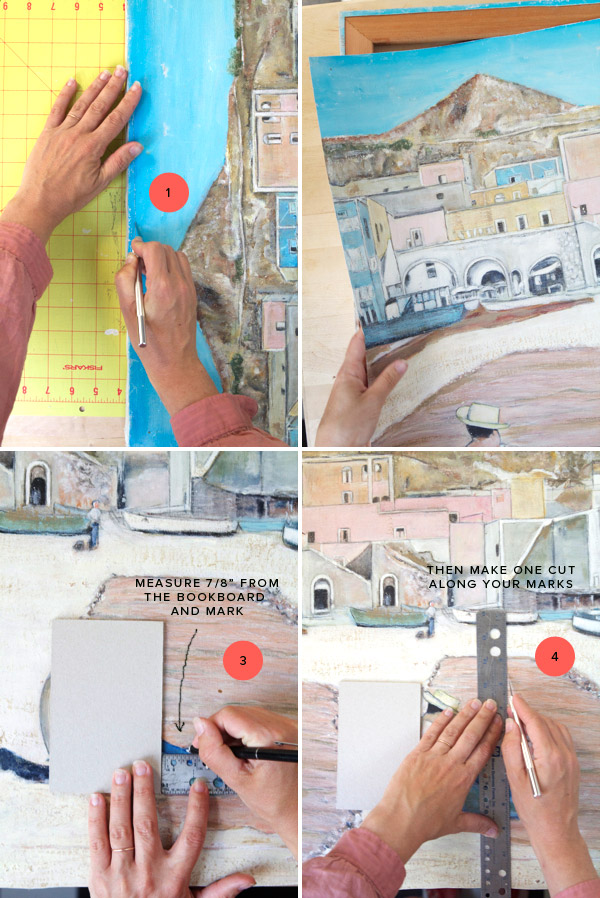
Step 1: Remove the canvas from the stretchers by cutting along the border with an exacto knife.
Step 2: Lay the canvas down on your work table. Place one piece of book board down on the section of canvas you would like to be on the cover.
Step 3: Next measure 7/8″ from the edge of the book board and mark it.
Step 4: Make the cut along the marks.
More instruction after the jump.
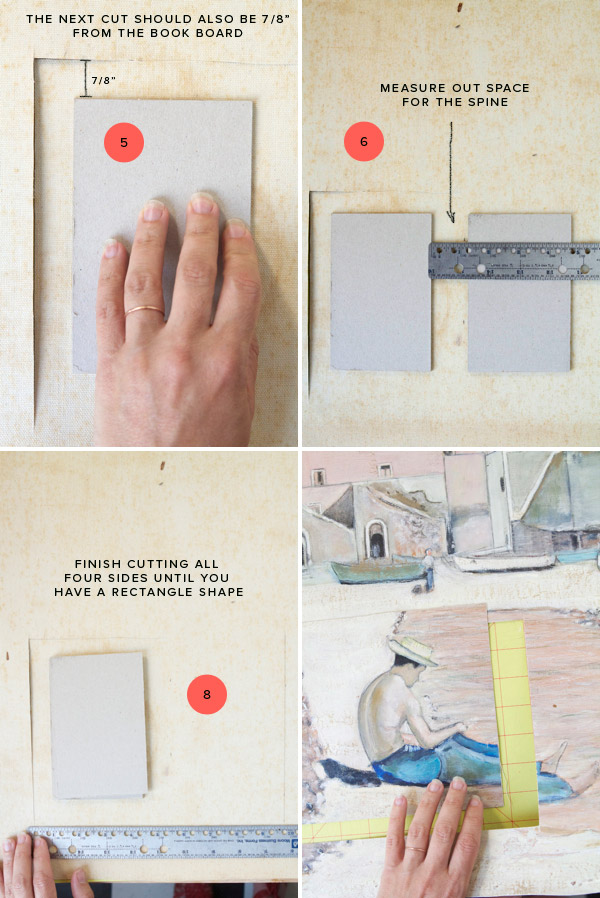
Step 5: Turn the canvas over (if it is easier) and measure out 7/8″ from the top of the book board and the bottom, then cut along your marks.
Step 6: Next it’s time to measure the spine. To determine a spine measurement: measure the thickness of the book and then add 1/4″ for each of the gutters, the total of these equal the spine width.
Step 7: Lay down the other book board on the other side of the spine, then measure 7/8″ border to find the last cutting line.
Step 8: Cut the last line and remove the cut book cover from the canvas.
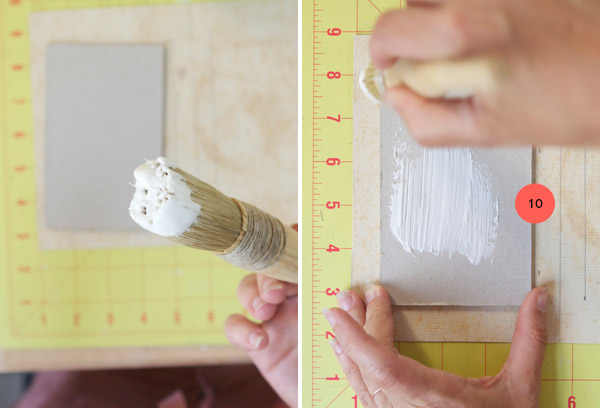
Step 9: Lay the book cover painting side down. Make three lines for the spine, they will be your glueing marks. Line 1 is in the exact center of the canvas. Lines 2 and 3 mark the edges of the spine where you will glue the book boards.
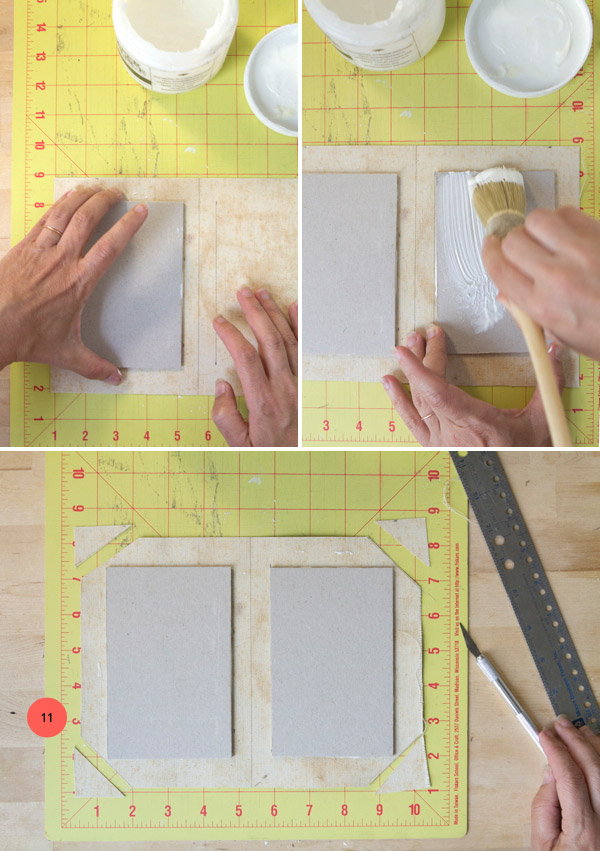
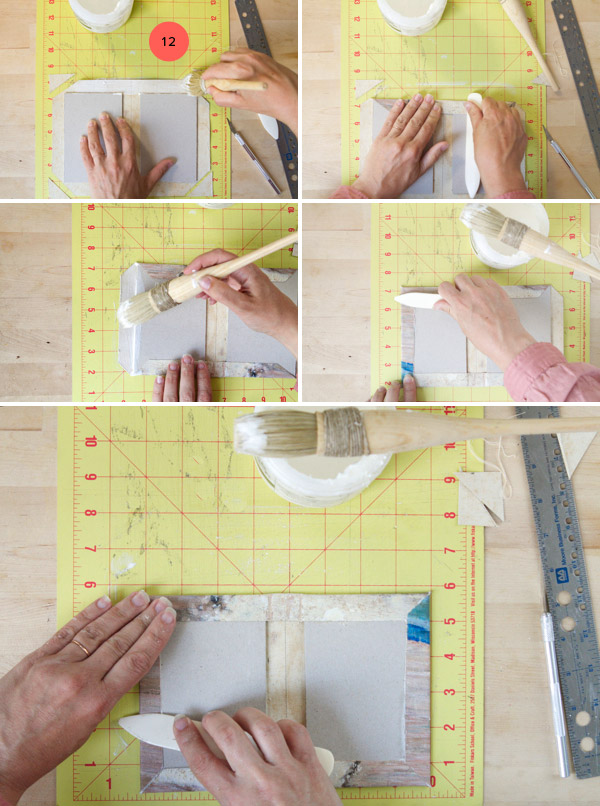
Step 10: Take your brush and lightly brush glue onto the book board. Turn it over and place it along the glue marks. Make sure the book board is straight and lined up to the marks. Repeat this with the second book board on the other side.
Step 11: Cut the corners off all four sides, see photo for reference.
Step 12: Next lightly brush glue onto the top flap and tightly fold it over. Use the bone folder to ensure the canvas is glued tight, especially go over the spine where the canvas is glued to itself. Repeat this on the other three sides.
Step 13: Once the book cover is glued down its time to glue the pages in. Line the text block up exactly where it should be glued, then using the brush lightly brush glue onto the top page of the text block. Be careful not to apply too much glue or problems with pages sticking together can arise.
Step 14: Open the book to make sure the pages are straight and make slight adjustments while the glue is still wet if needed. Repeat steps 13 and 14 on the other side.
Step 15: Once your book is glued together make sure there is no extra glue on the pages. If there is glue, carefully separate the pages before it dries. Place your book under a pile of very heavy books and let it dry for 24 hours. Voila!! It’s done!
Thanks to Alexis Birkmeyer for assisting and Paul Ferney for the photos.





Sarah
June 14, 2012
I’d almost fee like I’d be doing something wrong by cutting a canvas. Even if it’s thrifted. But I agree. This is genius. I remember wrapping my school books when I was younger =)
– Sarah
agirlintransit.blogspot.com
I asked my husband if he would be bummed if someone cut up one of his paintings and he said, “no more than if I found out it was in some bin at a thrift store.”
I like to think the journal or sketchbook will be valued as much if not more as the painting so it’s kind of like you are giving it new life. 🙂
Sarah
June 14, 2012
Excellent idea for those paintings that might look fantastic as a book but hideous on a wall.
Misha
June 14, 2012
I just love this…I wonder what else I could put inside that book…
Letícia
June 14, 2012
Beautiful. I`ve shared in my blog timeline on Twitter.
Thanks.
http://www.cutedrop.com.br
Ashley
June 14, 2012
So the painting itself doesn’t need to be treated with anything, then?
Hi Ashley–No, its not needed. If you wanted to make it a little more durable you could varnish it but it shouldn’t be necessary. I’ve been making books out of paintings for years and I’ve never had any problem.
Iolanda Duarte
June 14, 2012
Great Idea Its Amazind ! definitely going to try! <3
The Wife
June 14, 2012
This is a really fabulous idea. I have a ton of underutilized book making supplies, and this idea has compelled me to get them out of storage! Thanks for sharing this, Jordan.
Kristen
June 14, 2012
I love this idea Jordan! We miss you guys!
Erica
June 14, 2012
I’ve never heard of a book kit. Pretty cool. This is getting my creative wheels turning.
I love the idea of wrapping a book in painted canvas! That way you can always carry around a little piece of art with you.
Michelle A
June 14, 2012
such a great idea!
gina
June 14, 2012
this is really cool! I love canvases!
http://www.eatblogpray.blogspot.com
xo
Ana Maria
June 14, 2012
to all those thrift store paintings i’ve admired for their colors and textures – i now have a use for you! brilliant idea for giving unwanted paintings new life…because sometimes just can’t hang everything up. thanks, jordan!
jaclyn @ thelateafternoon
June 14, 2012
love this idea! i’ve been making handmade books using thick canvas fabric, but using a painted canvas creates such a gorgeous, unique look! i will definitely need to try this!!
http://www.thelateafternoon.com/make-your-own-handmade-book
Nancy Comelab
June 14, 2012
What a terrific idea! I love bookbinding and am always on the lookout for creative cover ideas.Thanks so much for sharing this, Jordan!
Jen
June 14, 2012
I feel like I must be hanging out in the wrong thrift stores! Those paintings are lovely, on the wall and especially on the book.
Hannah @ Sparrow + Spark!
June 15, 2012
This is great! I love giving used/ old stuff a completely new life!
MaxxSilly
June 15, 2012
It looks like you could probably make a few books out of one large canvas. You can crete a nice set from one painting and give it to someone. Great idea!
Msanhle
June 15, 2012
This seems not so hard to make! Such a nice idea to make. Though I think the painting material should be thick so the journal cover could be durable?
Thanks 🙂
http://fabnfun.com
Sparkle and CO
June 16, 2012
Nice idea! Thank you for sharing. Are you still in Paris?
Corner Story
June 18, 2012
Such a lovely idea! Especially for neglected paintings that might be too damaged to hang on the wall.
X
Nuvea
June 20, 2012
love giving new life & purpose to beautiful old things.