


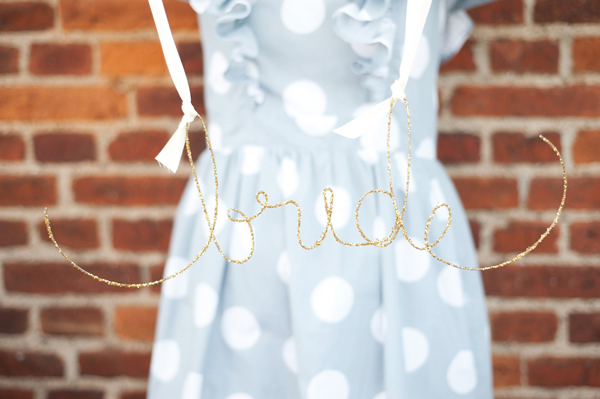
When I got married I used the wedding as an excuse to get my craft on. My mom, sister and I went nuts making everything from the paper flowers to the monogram initials on the gate of the reception site. Every so often I think of little DIYs that I would have loved to do for the big event like this glittered wire name sign for the bride and groom.


Materials: wire, wire cutters, gold spray paint, gold glitter, scissors, ribbon, spray mount
Step 1: Take your wire and leave a bit of room for the curve of the first letter of the word you are going to spell.
Step 2: Start forming the first letter in cursive. Keep the letters loopy so the wire is easier to work with.
Step 3: At the last letter leave some extra wire for extra flourish like the beginning of the word.

Step 4: Spray the wire name gold.
Step 5: Wait a bit for the first layer to dry and then turn it over and spray.
Step 5: Using your spray mount, spray a portion of the wire and then quickly cover it with some glitter. Make sure you’re working on a piece of paper that you don’t mind chucking afterward.
Step 6: Continue spraying and pouring on glitter until it’s covered. Let it sit while it dries.
Step 7: As soon as it’s dry, shake off the extra glitter and return back into the bottle.
Step 8: Tie a ribbon to two letters and tie to a chair.
Voilà!
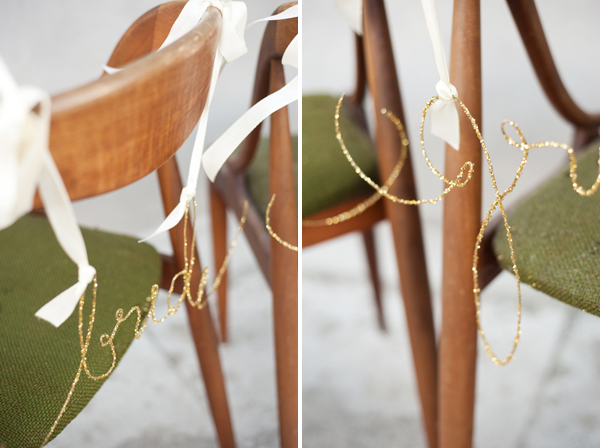

The beauty of this project is that it can be used for all types of events like monogramming a name for a birthday or bridal shower. Try mixing it up with different colors of glitter and ribbons to really funk it up.
Photography by Hilda Grahnat


Lisette
April 5, 2012
Those glittery words would look good spelling anything out. Thanks for the cute idea.
Stephanie
April 5, 2012
Great idea! Might do this for a friends baby shower that’s coming up…thanks!
Michelle
April 5, 2012
So adorable!
Hayley
April 5, 2012
My mom made some of these for my wedding (minus the glitter). She’s a calligrapher and loves experimenting with new media.
Molly@TheNestingGame
April 5, 2012
Those are lovely!
I celebrated my first anniversary by blogging about all the DIY details from my wedding last spring. Wish I’d thought of this one!
http://thenestinggame.com/2012/04/05/wedding-week-diy-details-part-2/
Mrs Average Bride
April 5, 2012
SOOOO pretty! Definitely going to be making this just for fun. =)
Aubrey
April 5, 2012
darling! too bad I am already married. Can I get more information about that adorable polka dot dress in the background?
michelle a
April 5, 2012
Genius!!!!
sharon
April 5, 2012
so awesome!!
Jo
April 5, 2012
Such a clever and pretty idea. Love it!
Judy Havrilla@cuteanduseful.com
April 5, 2012
I love the big swooshes at the ends of the words. Perfect touch. Was it hard to get the wire to go the way you wanted? May I ask what gauge (or stiffness, or whatever the term might be) the wire was?
http://www.cuteanduseful.com
brittany
April 5, 2012
@aubrey, the dress is by Finnish designers, Ivana Helsinki. It’s my favorite!
@judy, no it wasn’t super hard to form the letters. Hmmm, I don’t know the gauge but it was about 2-3mm in diameter if that helps.
Daniela
April 5, 2012
love this and save it for my son’s first birthday! thank you for sharing!
Ashley
April 5, 2012
These are too cute! I am going to make them for an upcoming baby shower on the favors.
Audrey - This Little Street
April 5, 2012
Super cute idea! And could be used on a lot of occasions 🙂
Savanah
April 5, 2012
So cute! And so useful. I’m thinking of using this idea against a solid color block to make a sign for craft shows 🙂
Lianna
April 5, 2012
so pretty! I love it! I will have to try that for my sisters wedding this summer.
Meredith Hayes
April 5, 2012
Hi, I just want to say I’m really enjoying this blog. I follow a heap of design and lifestyle blogs, but this one takes the cake! Straightforward yet-filled-with-variety-in-sentence-structure-writing, there isn’t a hint of “if you’re not already on this trend or buying or wearing this you’re a dip,” and I love your style and sense of humor! So thanks and consider me an appreciative fan!
P.S. Over a year ago my sister-in-law Michelle commissioned a painting whipped up by your husband, and we love, love, love it! One day when we get our superfluous shekels together we will come a-calling!
look see
April 5, 2012
Fabulous idea! Love it!
Kory Woodard
April 5, 2012
This is so genius! I could see it being used a a birthday party, too! Thanks for posting! 🙂
Iris
April 5, 2012
LOVE this idea….might try it for my sister’s shower coming up 🙂
Victoria@VictoryPaper
April 5, 2012
oh so elegant!!
pommettesduchat
April 6, 2012
Très très jolie idée ! A tester…
Maddie Flanigan
April 6, 2012
I love anything glittery. This is adorable and so so easy!
Alicia
April 6, 2012
This is so great! I’ve been married for years now and am still finding new crafts that I wish I could have done! Thanks for sharing this one!
Lexy @ The Proper Pinwheel
April 6, 2012
mmmmmkay, these are gorgeous. Really gorgeous. Glitter makes everything more dressed up. I don’t care if it’s a bag of trash. If it’s got glitter, it’s fancy. Thank you for sharing such a great project!
Shared on the blog today!
http://theproperpinwheel.com/2012/04/fresh-find-friday-30/
Felicia
April 8, 2012
Planning on making these for my daughters’ rooms…
simple, sweet and glittery. Love them!
carinissima
April 9, 2012
What a wonderful idea!
Ani
April 9, 2012
I really love this idea. 🙂
Laura
April 9, 2012
So lovely!
Christina
April 12, 2012
AH! I’m dying to know about the monogram initials on the gate of the reception site – I have yet to find any good ideas on ways to do this and the weddings in 2 1/2 weeks!
Marie
April 16, 2012
so cute! 🙂
http://www.happypaperplace.com/