This post is sponsored by Dove® ClearTone™ Deodorant – designed to visibly reduce underarm dark marks and even skin tone.
Here is a really cute gift for someone someone getting married. It’s a Bride Kit that has little odds and ends you may need during the wedding day when it isn’t convenient to get to the grocery store. For the presentation we got a wood box and made a transfer using Temporary Tattoo Paper. I love the results and can’t wait to experiment more with it. Find all the complete sources and instructions below.
Click through for the free download, more photos and full instructions
Materials Needed: Wood box 8.75″ x 6.75″ from Joann’s Fabrics, Paint and Paintbrush, Free downloaded image, Temporary Tattoo Paper, a spoon, scissors and items to fill the box like: Visine, headache medicine, lotion, perfume, chapstick, bobby pins, etc.
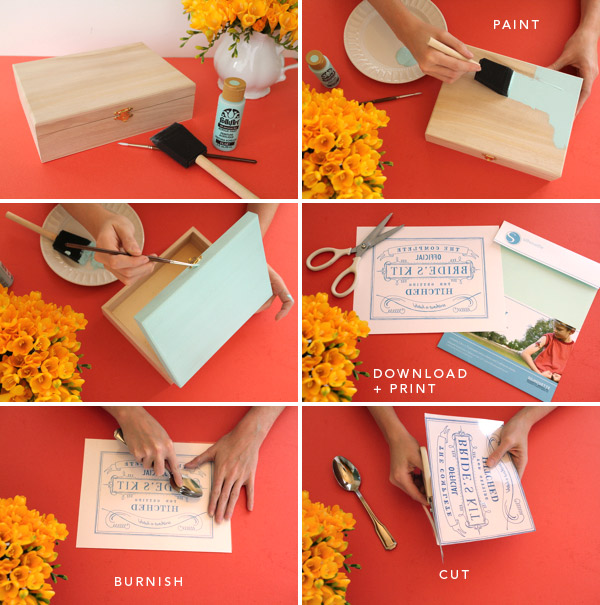
Step 1: Lightly sand the box. Paint the box with craft paint. You could remove the hardware or just carefully paint around it.
Step 2: Download the image here and follow the instructions on the package of the tattoo paper. The kind we used came in two parts, a white sheet, and a green sheet. Print the design on the glossy side of the white sheet on your inkjet printer with the photo setting. The image should be reversed
Step 3: Carefully peel the green sheet apart and place the adhesive face down on the design on the white sheet. You burnish it all over with something like a spoon to get it stuck down really well and get out any bubbles.
Step 4: Cut the design out right along the edge of the outer box of the design. Peel the other side of the (formerly) green sheet off, leaving just the thin, waxy layer over the design on the white sheet. It’s very sticky at this point.
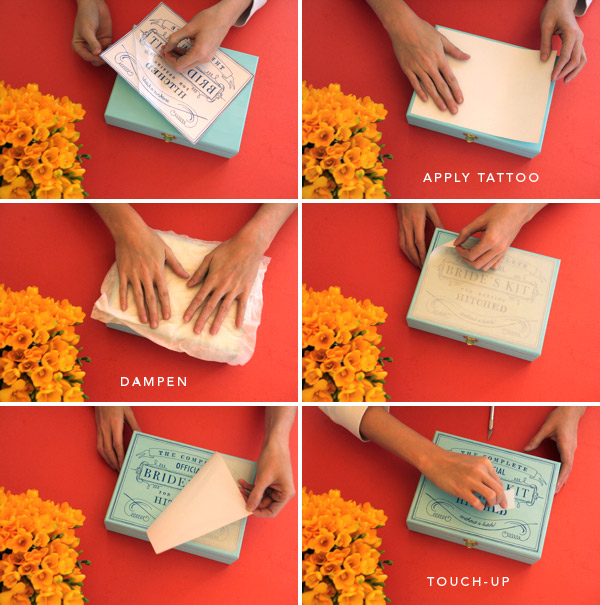
Step 5: Carefully position and stick the design down centered on the lid of the box. Stick down well everywhere.
Step 6: Lay a very damp (but not drippy) paper towel over the design and allow it to saturate the back of the white sheet for about 15 seconds. The paper should become translucent and you’ll be able to see the design. Rub any dry looking areas with the wet paper towel.
Step 7: Starting from one corner, slowly and carefully lift away the white paper backing from the design. If any bits of the design start to lift with the backing, lay it back down and rub those areas with the wet paper towel again. It should come away easily, so if it’s sticking, add more water.
Step 8: Once the paper backing has been removed, if there are any air bubbles where the film with the design is not stuck to the surface, you can use a little bit of the white backing paper to rub them onto the surface. (It’s very slippery and won’t damage the thin film the design is on. Don’t use your fingers because they will tear it and mess it up.) Once it’s dry, it’s much more durable, but you could put a clear coat of wipe on poly over the design if you wanted to make it more durable.
photos and styling by Alexis Birkmeyer


Shelby
April 30, 2012
Dear Oh Happy Day!
I have nominated you for the Versatile Blogger Award! Thank you for inspiring me everyday with your blog of treasures and talents… Head over to Tutus&Tea for a list of fellow nominees and the rules for this Award! Thank you and Congratulations!
Sarah {A Paper Proposal}\
April 30, 2012
SO adorable! Love the label.
Jane
April 30, 2012
I did something like this for a friend about five years ago when she was getting married. It had some stain remover, nail polish, an extra garter, chap stick, floss, some pins, a sewing kit, double-sided tape, perfume, mini-deodorant, etc. I put it all into a travel toiletry case with lots of little see-through plastic pockets so she can see what was inside and get exactly what she needed.
Jordan
April 30, 2012
My sister and best friend are getting married this Summer and so happy to make one of these for them! Thank you for the inspiration!!
Amanda
May 2, 2012
Very cute… a family friend is expecting her first child and I could see changing this up a bit for a Baby Survival Kit. Thanks for the inspiration.
Amanda
May 5, 2012
I have to say I love this. And I can’t wait to try it. I will post a blog when I have the exact details done.