


I have confetti on the brain. I can’t help it. It is just so fun and makes me smile. Another one of my favorite things? Vintage tablecloths. I had a great thrift store that used to get the best and brightest mid-century styles, but I think someone else caught on and now it’s all dried up. I still keep checking weekly, but for now I will just settle on making my own. I have two boys, so tablecloths are both heaven sent and a necessity. Now, since I can buy plain white tablecloths, my supply will be unlimited. Let the fun begin!


You will need: a tablecloth (Target has nice thick white ones), craft paint, circle punch, cardstock, freezer paper, tape and a paint brush.
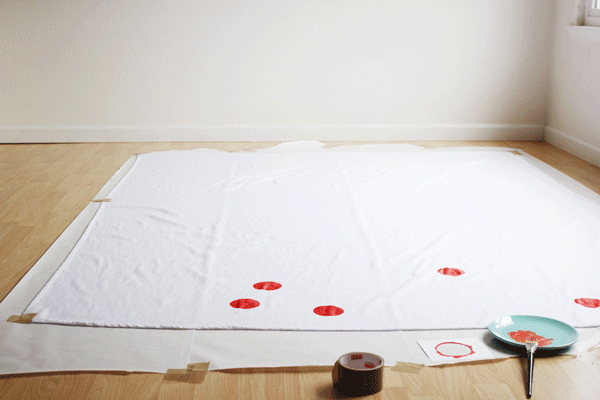
Wash and dry your tablecloth. While you are doing this, clear a space larger than the size of the tablecloth on a hard floor and tape lengths of freezer paper shiny side up. Overlap the edges a little. I popped my tablecloth right from the dryer down, eliminating any ironing. Win! Tape each corner of the tablecloth down, no need to be perfect, it just needs to stay put while painting.
Cut your cardstock into four pieces. Punch the center out of each card with your circle punch, I used a 2.75 inch punch. Make a bunch of these, you will go through about 4 for each color, depending on how careful you are.
Start painting, one color at a time. I used a different plate for each color. For each dot, place your template down and hold with one hand. Take your brush and work from the paper, like a stencil and paint your dot. It’s pretty fast, but be careful not to get the brush under the dot. If anything goes wonky, just carefully paint the edge smooth, and start with a new card, easy peasy. Go to town and think “scattered” like confetti!
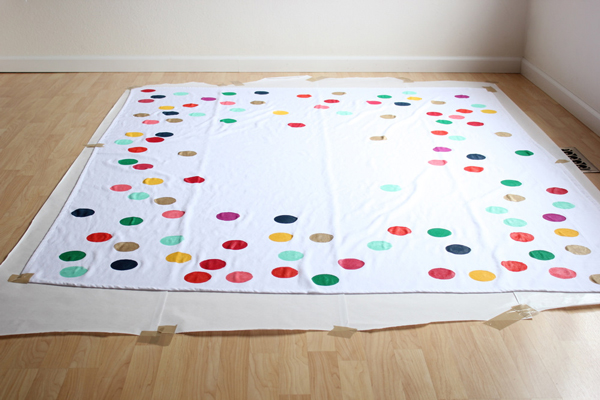
I had to add more colors after dinner time. This really goes fast, and is an easy way to update an existing tablecloth. I plan on making more confetti tablecloths from home decor fabric and old floral ones that need some love.
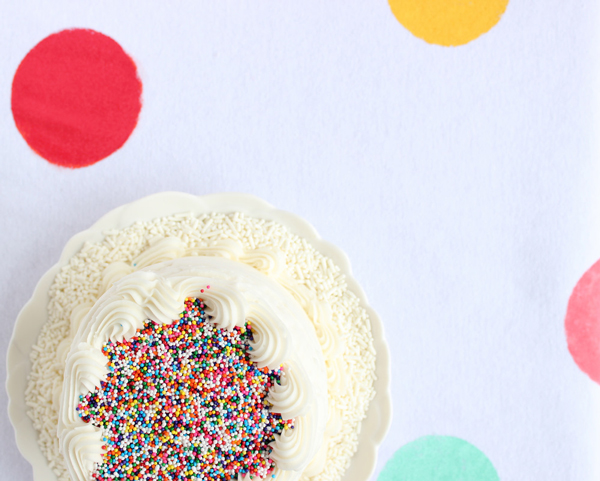
Just add cake and turn every day into a celebration.


Bianca
February 16, 2012
so simple yet so perfect. love
Sarah @http://agirlintransit.blogspot.com/
February 16, 2012
This is so beyond awesome. I swear, Pinterest must just LOVE your blog lol.
– Sarah
http://agirlintransit.blogspot.com
Rebecca - A Daily Something
February 16, 2012
You are brilliant, Jenny! Such a stinkin fun idea!
Kristy
February 16, 2012
I love it. You are so creative, thanks for sharing!
-Kristy
roeandlee.blogspot.com
Chelsea C.
February 16, 2012
Loving this one, Jenny! The colors are perfection.
erin
February 16, 2012
you could also use the freezer paper as your stensil. the shiny side of freezer paper will temporarily stick to your fabric once ironed. this is a great idea and im pretty sure this will happen soon in my house!!
brianne
February 16, 2012
Jenny hits it out of the park again! This DIY looks so cute with the confetti motif of OHD. Great job, ladies!
Ginny @ Chasing Sunshine
February 16, 2012
So fun, simple and bright…LOVE it!
Aicha
February 16, 2012
I think a table runner with smaller circles all over would be cute too! Trying this soon!
joyce
February 16, 2012
Ooh, I wanna try this! So fun!
Celeste
February 16, 2012
I love this! You have the best DIYs.
oilandgarlic
February 16, 2012
I’m saving this idea for future use, if I ever stay home with kids or if I suddenly become crafty or for a long weekend fun project..
Katie
February 16, 2012
Love it! What a simply way to spice up birthday decor.
Jill
February 16, 2012
Great idea! So bright and fun! Thanks for sharing. I can’t wait to try this.
– Jill
patti
February 16, 2012
Very Fun and attractive!
Alexandra
February 16, 2012
You are genius. Loving this homage to February Funfetti!
colleen @ hello olive
February 16, 2012
Great idea – I love it! So colourful and fun…
Elena
February 16, 2012
Simple, sencillo y precioso. Me encanta
Stephanie @ henry happened
February 16, 2012
I’m throwing a circle themed b-day party for my son next week and you are totally making my day with these awesome ideas!
Michelle {Sweet Mady}
February 16, 2012
So cute. So easy. So perfect! Love it.
Meg
February 16, 2012
Love love love this.
Linda squires
February 16, 2012
I love this…i will be making one!! Great to have for Birthday parties or when you throw a party for the kids of of school year!! Great Idea!!…Thanks
chiara
February 16, 2012
This is the best! So cheery and pretty. Love it.
paola@love+cupcakes
February 16, 2012
Oh my goodness! I love this so much! Another simple yet wonderful DIY inspiration. I can’t wait to try this out! Do you think it would work on something like a duvet cover or bed sheets?
Marie
February 16, 2012
Love this idea! 🙂
Nanette
February 16, 2012
You, of all bloggers in the world, need a “Pin It” button on your posts! 🙂
Brilliant, as always!
Ashley G
February 16, 2012
I love that tablecloth! It’s just darling. I think my boys would absolutely love the polka dots. I think I see one of these in my future.
Rose
February 16, 2012
I wasn’t sure about this but it turned out great!!
kurt
February 16, 2012
great looking tablecloth. what an effective way of dressing up a ho-hum white caterer’s table cloth. keep up the good work.
Jessie
February 16, 2012
love this SO much!!
Deb
February 16, 2012
I love this tablecloth! It matches my colors perfectly and is so fun. I’ll have to try it.
LucyExpress
February 16, 2012
Very cute!
Mary
February 16, 2012
I cannot wait to make this! So fun!
kelley
February 16, 2012
super cute idea. looks amazing as does that cake. did you make cake? love the sprinkles. over the top.
Kelley
Sarah @ Designsgood
February 16, 2012
That cake is adorable!
emily b
February 16, 2012
SO fun!!!
Angela
February 16, 2012
I LOVE this so much. It’s my daughter’s birthday this weekend and this is exactly what we need for the big day!
FestivePartyGirl
February 16, 2012
This is such a great idea. I love the look of the polka dots to make confetti.
Calíope
February 16, 2012
Great!
postcards and pretties
February 16, 2012
so cute!!
Tan
February 16, 2012
Ha! That’s fantastic! It would look great with different sized dots too.
Love it
vero
February 16, 2012
it’s so simple and yet SO GREAT! you rock, you are truly the best! jeje! cheers and thanks for sharing 🙂
Kate
February 16, 2012
Where does one find a circle punch? I’ve been looking for one and just can’t seem to find it anywhere!
Amy & Lisa
February 16, 2012
Great idea! Will have to keep this in mind for the next party! 🙂
sara
February 16, 2012
I Love this! I can’t wait to do this!
Shena
February 16, 2012
I love the stop motion photos. Beautiful post!
Kristin
February 17, 2012
So fun! I don’t do tablecloths but am scheming up something else I could paint this way. 🙂
Luna
February 17, 2012
honestly, your ideas are in my “wish i thought of that!” category. and you know what? i’m looking for just such a tablecloth for our son’s bday next month. thanks for sharing.
Jenny @ Hank + Hunt
February 17, 2012
Kate,
The punch I used for this project is HERE:
http://www.joann.com/paper-shapers-x-large-nesting-punch-circle-2-75-/xprd656932/
you can usually find a coupon for the store too!
xo
Jenny @ Hank + Hunt
February 17, 2012
Paola –
Love that idea! I was thinking about doing gold dots on a simple rag rug.
xo
Thanks for all the sweet words guys, this is one of my favorites!