


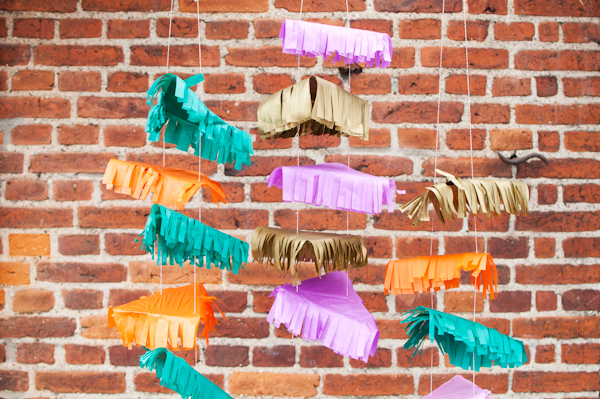
When I was in Nepal for a special project in June I stumbled upon some beautiful hangings cascading down the staircase of the architecture school in Kathmandu. Since they appeared to be made of paper I kept it in my memory bank and thought I’d give it a try here. The ones in the staircase were about 1 story high and twice the size, but I think these mini versions are more to scale for a home party.

Keep reading for the easy instructions!
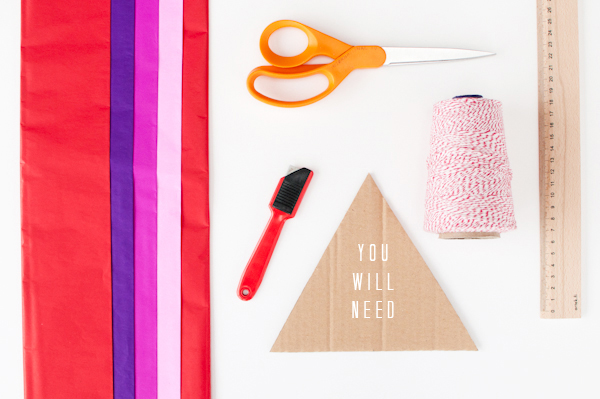
Materials Needed: tissue paper scissors, glue gun or double-sided tape, ruler, string, cardboard, x-acto knife
Step 1. Cut cardboard in equilateral triangles (same length on each side). The ones shown here are 16cm on each side.
Step 2: Glue the triangle to the tissue paper leaving about 3 1/2″ of extra tissue for the fringe.
Step 3: Do the same to the other side of the cardboard.
Step 4: Cut around the triangle leaving 3 1/2″ all the way around. For the corners cut a wedge so that the paper will fall down flat on each side.
Step 5: Create a crease in the tissue so the fringe lays flat.

Step 6: With the x-acto knife, cut a whole in the triangle in one corner.
Step 7: From the corner draw an imaginary line to the center of the opposite side and create another hole.
Step 8: Cut two strings of equal length. Give yourself enough room depending on where you want to place it.
Step 9: Create a knot large enough so the end won’t slip through the holes then slide them through.
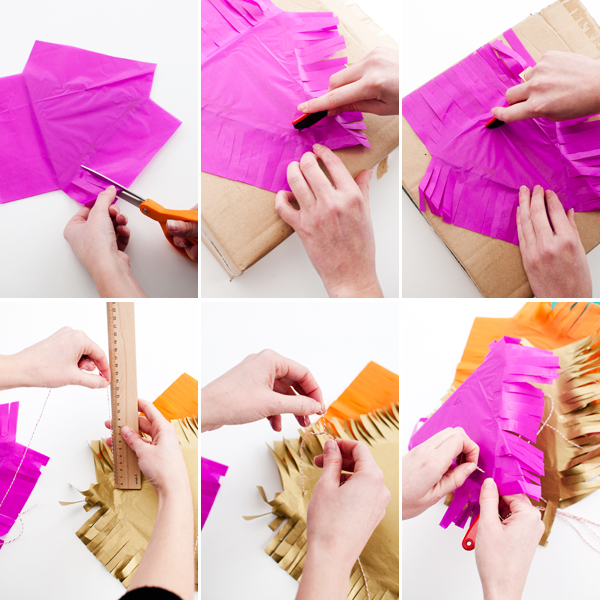
Step 10: Now, measure the length of the string according to where you want to place the next triangle. I measured the spacing at 15cm, slightly smaller than the size of the triangle. Double knot it.
Step 11: Slide the next triangle onto the string but make sure you alternate stringing from the corner and flat edge of the cut holes.
Step 12: String all the triangles on until you’ve reached your desired height.
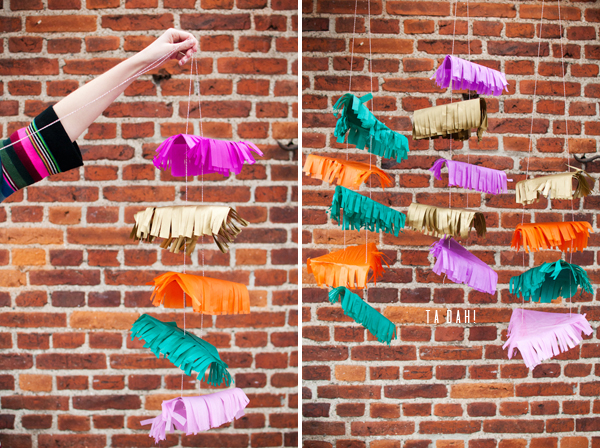
The beauty of these is that they can be used for any occasion. Do red/green for Christmas, red/pink for Valentine’s, shades of green for St. Pattty’s, or use a child’s favorite colors for a birthday. Enjoy!
photos by Hilda Grahnat


lesley
January 10, 2012
such great colors!! i love this so much.
Hannah @ Sparrow + Spark!
January 10, 2012
This is so lovely! Such a great idea.
Allison
January 10, 2012
I love these! They’d look do cool in in kitchen… & easy enough that I might actually make them!
Misha
January 10, 2012
Ooh! I just love these happy pieces of paper hangings!
Judy
January 10, 2012
Really nice. Great that you saw these in travel and looked closely. And, I love your cute outfit, your cute haircut, and your cute self! 🙂
cuteanduseful.com
Brooke @ The 13th
January 10, 2012
Brittany, these are fantastic! So glad you made a smaller version to share. I can totally see these in all sorts of shapes, too. Great DIY, thanks!
debbie
January 10, 2012
so happy and adorable! Love them. They would be perfect for a party…or I’d love to have them in my room!
Megan
January 10, 2012
Lovely! Kathmandu is filled with beautiful colors and inspiration like that. I loved it when I was there this summer, I can’t wait to go back!
jeni
January 10, 2012
yet another awesome party tutorial! thank you much!
FestivePartyGirl
January 10, 2012
This is a great DIY project. I love the colors you chose and can envision these in so many different color schemes.
Marie
January 10, 2012
Very cute and colorful! 🙂 I can see these hanging over a decorated table with some finger foods & goodies. 🙂
happypaperplace.com
Alexa
January 10, 2012
Oh wow…just looking at these makes me happy. Perfect for a little girls room!
Kate @ Peepthread.com
January 10, 2012
These are so fantastically versatile! Endless combo scheme possibilities. I am tempted to make some with newsprint.
Kendall
January 10, 2012
These are fantastic! I love them for party decorations.
Li
January 11, 2012
Love nepal! 🙂
Lissa (Bellenza)
January 11, 2012
Now THAT is truly festive! Thanks so much for sharing the inspiration!
katie m
January 11, 2012
unrelated…but i want that hair cut!!! right click.. save image… 😉
kate xo
collectandcreate.com
Meant4amoment
January 11, 2012
oh how perfect for a summer wedding!
Carol
January 11, 2012
Amaze gorgeous and easy to do it ….. love this party project .
Jessica
January 11, 2012
This kind of reminds me of a deconstructed pinata =]
Step Ladders
January 16, 2012
They look amaziing. It’s one to build with the kids I think.