by Hank + Hunt
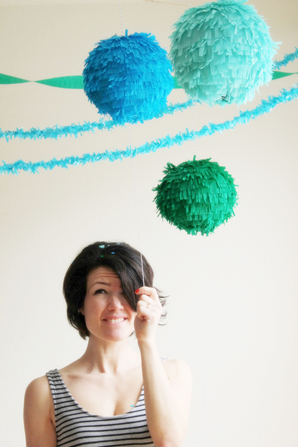
I was organizing my party box the other day, looking over my assortment to plan the decorations for my sis-n-law’s baby shower next month. I noticed a few of my paper lanterns had a few tears in them. I didn’t want to just throw them away, and since I am still crazy about fringe, I decided to cover them with the stuff. They reminded me of little round pinatas and it got me thinking…what if I filled that little hole on the bottom? We’d have a refillable pinata, that’s what! Fill. Pull. Party. Repeat.
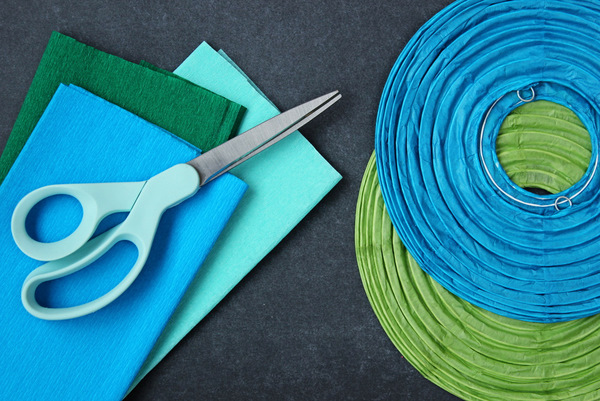
Materials Needed: small paper lanterns, crepe paper sheets, scissors, double stick tape, twine and freezer paper.
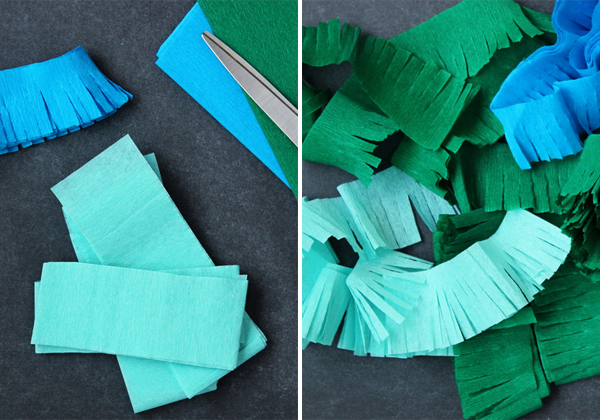
Cut 4-6 strips of crepe paper, 1.5 inches wide. Cut the fringe on one side, about every .25 inch, don’t go all the way through, leave a small whole strip to keep the fringe attached together.
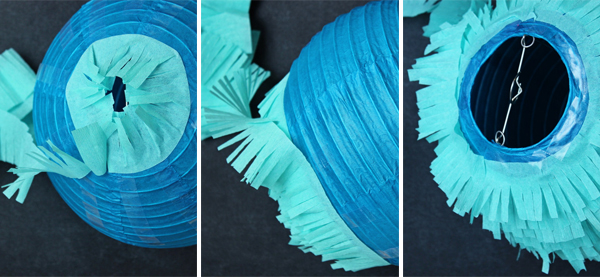
Insert the wire form to open your lantern. Put strips of tape around the bottom of the lantern, like rays of light from the bottom. Make them pretty long, and cover the whole lantern, top to bottom, for quicker results. I figured this out after I did one and it was much easier.
Unwrap the fringed strips and start wrapping from the bottom around. Be sure to press the strip down firmly to secure it to the lantern (and to ensure the tape is adhered well.) Work your way around the lantern in a spiral, adding tape or more strips as needed, until you reach the top. Add a piece of tape to the end to finish. Fluff the fringe a bit, and you have one spunky little lantern.
Take a 4- 5 inch square piece of freezer paper and cut a circle. Tape a piece of twine to the dull side. Cut two slits on opposite sides of the circle, this will allow the circle to sit flat in the lantern around the wire form. Insert the circle, twine side down, through the bottom of the lantern. Flatten with a wooden spoon from the top. You just want to make sure there are no big open holes where the “plug” doesn’t sit flush so the confetti will stay in.
If you have any extra fringed pieces left, cut them up for confetti and add store bought confetti for sparkle. Fill your lantern with a good sized handful.
Hang. Pull. Party. Repeat. I did a few test runs with these and they really do work great. No one will feel left out because you can just refill these babies and pull again! What trouble you could get into with these. Hide a prize in a whole cluster and have your guest’s pick which one has the prize? We already know Ms. A is expecting a boy, but wouldn’t this have been fun with an all white lantern and pink or blue confetti to do a gender reveal? Fun! Someone has got to do that and send me the pictures with the looks of surprise on their faces!







Trish
January 19, 2012
These are awesome!
bink & boo
January 19, 2012
This probably sounds silly, but I am going to do this for myself. I have a goal of being featured in a major magazine, and when that happens I am going to jump up and down, screaming and giggling like a 5 year old girl, and then I’ll pull the little string to release the colorful confetti from this lantern that I’m going to make. Thank you for the idea and inspiration.
-Wishing you sunshine & cheer!
Tina Ramchandani
January 19, 2012
This is super cool. Love the idea of putting prizes inside!
Tara
January 19, 2012
Why didn’t I think of that?!
Rebecca - A Daily Something
January 19, 2012
Jenny, these surprise lanterns are fantastic…what a fun idea. Love your photos, too…and the animated gif.
Jamie Wyckoff | Julia's Poppies Design
January 19, 2012
Oh, such a great idea! Love it! 🙂
Naomi A.
January 19, 2012
I love this, it’s so fun!! And I absolutely love the gif you made to illustrate it, it makes it even more festive <3
Emily
January 19, 2012
This is my kind of pinata. Fantastic idea! And actually love the face your’e making in the photo next to the gif. Hilarious!
Catherine
January 19, 2012
These make me think of Dr Seuss somehow! They look great.
Kelly R
January 19, 2012
This is brilliant! I love the gender reveal idea!
Hannah @ Sparrow + Spark!
January 19, 2012
This is so much fun! Love the idea.
teresa
January 19, 2012
Adorable!
Laura
January 19, 2012
Very cool! And love the gif. 🙂
arielle
January 19, 2012
this is maybe the greatest thing i’ve seen in a long time. permanent confetti drops. loving it!
Leah @ Freutcake
January 19, 2012
You are some kind of part genius! My favorite DIY so far!
Isn’t Jenny a genius?
Liz @ Bella Vita
January 19, 2012
So, so cute! Wonderful idea. I love that they’re reusable. Bravo!
I write about happiness and life: http://www.elizabethfarrar.com
bevy
January 19, 2012
this is the greatest idea i’ve seen as of late. maybe i won’t overlook those lanterns next time i see them on the clearance aisle.
Will @ Bright.Bazaar
January 19, 2012
LOVE this idea. Might use it for my chap’s sister’s wedding this summer. Thanks! You need a book deal stat!
kim
January 19, 2012
Love the idea and the colors — where did you find the gorgeous crepe paper?
JoAnna
January 19, 2012
FANTASTIC idea!!
elaine
January 19, 2012
This is adorable! Also, I love your little three picture ‘video’. Do you mind if I ask how you did that?
Amelia
January 19, 2012
I cannot wait to try this at home this weekend!
http://www.clotheshorsenyc.com
Julia
January 19, 2012
Wow, these lanterns look beautiful. I absolutely love them and I will try to make one for my son’s room 🙂
luxury watches
r8chel
January 19, 2012
Using tape is so smart and so much less messy than glue!
Iris
January 20, 2012
Love this idea….how fun!!!!
Vanessa
January 20, 2012
What a great idea! I love it!
gVide
January 20, 2012
Very cool but the animation is probably the coolest! Fun. I’m a pinata nut.
Gina
January 20, 2012
I forgot to say: Happy Confetti Day! I’m just starting a gift wrap series and posted (my 1st) about my favorite confetti gift wrap! I love confetti! (again – super fun idea! Will do!) Stockholm wishes to you!
lesley
January 20, 2012
so brilliant! never ceasing inspiration over here. thank you.
Melanie
January 20, 2012
Jenny, this is AWESOME! 🙂 Love the photos too.
Union Tom
January 20, 2012
I love it over here! How fun!
Mary
January 20, 2012
This is so awesome! I love the gender reveal idea!
Cha de retalho
January 20, 2012
Amazing!!!!!!
Alexa
January 20, 2012
These are pretty much adorable. What a clever and cute idea!
Morgan Smith
January 20, 2012
LOVE. I will definitely be making these for my Valentine’s party in pink and red – too cute and super simple! thanks for sharing 🙂
Charity Hall
January 20, 2012
Lovely idea!!
Sarah Park @ Sweetbox
January 20, 2012
I can always count on Oh Happy Day for the best Fringe DIY Projects!!! Thanks 🙂
Sarah
January 20, 2012
How fun – could totally fill with little prizes and candy and give each child at a birthday party their own pinata!
Jess (Where My Heart Is)
January 20, 2012
This is such a brilliant idea. I like the fact that you can reuse them.
Marie
January 21, 2012
I love the idea of a cute re-fillable piñata! 🙂 What a fun idea!
http://www.happypaperplace.com/
Louise@ButtercupDays
January 22, 2012
What a wonderful idea! I usually go down the road of making tissue paper poms for my kids birthday parties … but I think I’ll give these ago this year. Love the colours too! x
Simply LIfe
January 22, 2012
oh these are too fun! what a clever idea!
Kristina
January 22, 2012
What a wonderful idea! So versatile, I’m totally going to try it out next time I throw a party. Thanks for doing such a good tutorial.
DELEITE DESIGN
January 23, 2012
It´s really original. Thank you very much, I have to do one of them!
Juliana
January 23, 2012
i loveeeee it! this is one of my favorites!
Jude
January 23, 2012
I can’t wait to try this! I wonder if you’ve ever tried doing this with streamers, or if the crepe paper sheets is a must? Great post!
You don’t have to use sheets but the quality is usually a little better and it is much faster if you can cut it in folds. 🙂