


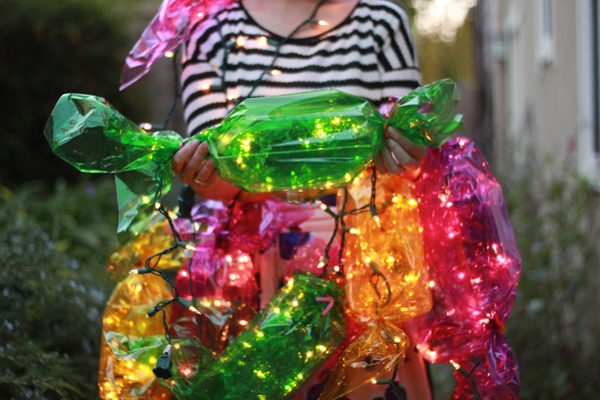
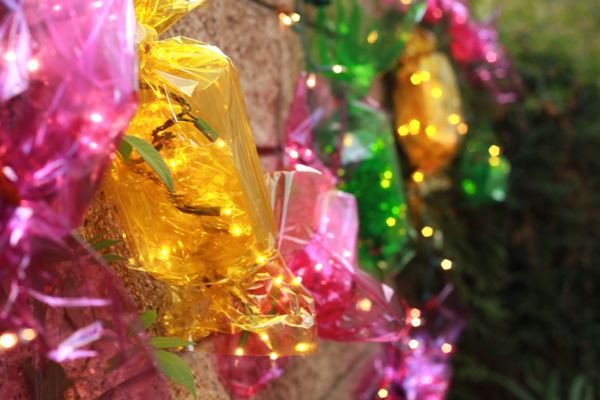
My mom always had new and exciting ways of transforming our house during the holidays. One of the most memorable transformations was a real-life candy land. I specifically remember her singularly putting up these candy garlands on the second story of our house, which now, years later, I see deserves major applause. She took simple materials and created a sweet wonderland any gingerbread man would be jealous of.


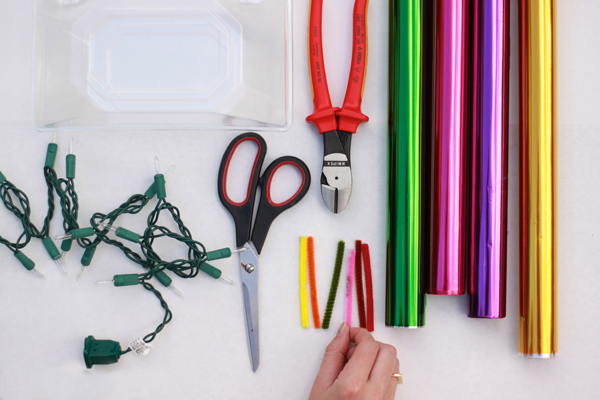
Materials Needed: corsage boxes, string of lights, scissors, wire or pipe cleaners to fasten, wire cutters, cellophane rolls in different colors, tape
Step 1: Cut a piece of cellophane about 18x 18″.
Step 2: Wrap the string of lights in the cellophane piece making sure you leave the beginning and end of the string out so it can connect to your power source and/or the next piece of candy. This will create the “crackle” of the candy.
Step 3: Put the package of lights into the corsage box and secure it closed.
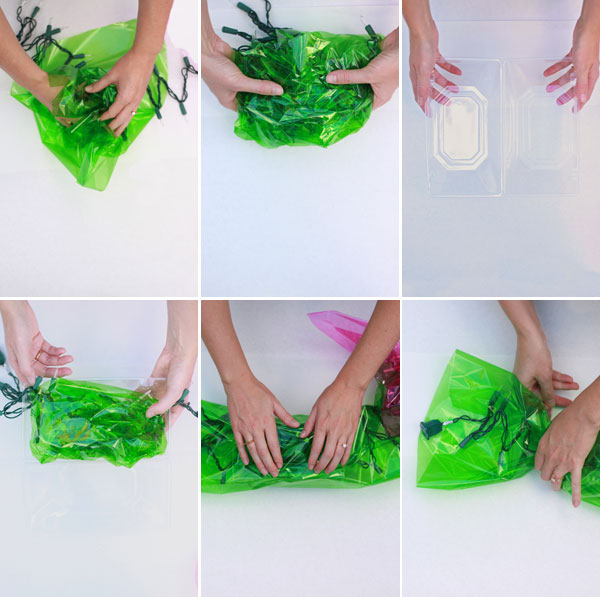
Step 4: Wrap a larger piece of cellophane around the corsage box making sure there’s enough left over on each end to create the candy shape. Tape it close on one side.
Step 5: Using the wire or pipe cleaners, twist to secure at each end of each side of the corsage box.
Step 6: Leave a few lights in between each “piece” of candy and then repeat until the strand runs out. Use as many strands as you’d like for the space you intend to use.
Step 7: Plug in and watch your candy come alive!

photos by elove photos


Jennifer
December 1, 2011
AHHHHHH!! I love THESE!!!
Molly
December 1, 2011
wow! I can’t wait to try this 🙂
Chris
December 1, 2011
these are just magical! I wouldn’t mind having them up all year 😉
Annabelle
December 1, 2011
That is a super cute idea! Willy Wonka meets Christmas! It looks like it’s fun to make too.
Hannah @ Sparrow + Spark!
December 1, 2011
So so cute! A great project. I love sweets/ candy because of all the colours!
Peaches
December 1, 2011
SHUT UP. This is nothing short of amazing! I am doing this one for sure! Just moved into a big midwestern house with a front porch and no clue how to dress it for a funkadellic Christmas….until now! THANK YOU!
Holly
December 1, 2011
This is so fun – I might have to try it. And a very clear tutorial – thank you!
Carrie
December 1, 2011
Clever lady! Hope to have an excuse to try this sometime…
love+cupcakes
December 1, 2011
Oh, I would have loved this as a kid…heck, I love it now! What a wonderful way to make the holidays or even a birthday party more festive. Thanks for the inspiration!
Lia
December 1, 2011
such a yummy idea!
Shandra
December 1, 2011
These are great! However, there’s no danger from having the lights wrapped in cellophane over a long period of time? Obviously I wouldn’t leave them on when nobody’s home but what about throughout an evening?
Misha
December 1, 2011
o.my.gosh! My son would just die! He told me that we MUST have white lights on the outside of our house and color lights on the inside. I think these would count!! ahggg. Thank you so much for sharing.
Leah @ Freutcake
December 1, 2011
Love this idea! So fun for a kid party.
Mary
December 1, 2011
this is remarkable!
kait
December 1, 2011
Is there any reason to be concerned about the lights overheating after being wrapped in cellophane and then boxed in plastic?
nichole
December 1, 2011
Holy amazing! Those are so cool.
Rachael
December 1, 2011
Wow! These are great!!!
Melissa@Julia's Bookbag
December 1, 2011
This IS AMAZING!!!!!!!!!!!!
Charlotte
December 1, 2011
This is really clever and pretty but is it a house fire waiting to happen?
brittany
December 1, 2011
We didn’t have a problem with overheating years and years ago when we did this and I’d assume lights would be even better these days…
Danyelle
December 1, 2011
Thank you for sharing such a creative idea! It’s fabulous!
Kimberly Jones
December 1, 2011
Absolutely gorgeous! And so creative! I really love these festive lights!
Style and Bride
December 1, 2011
Hi There so love to share this with our readers.. Thats AMAZING.. big tick from the team at S & B
Kelli Anderson
December 1, 2011
yayayayay! so beautiful, cheery and bright!
Janie Carpenter
December 1, 2011
The decorations are beautiful, I will try this for myself… Thanks for Sharing
Misha
December 1, 2011
I think we are going to put these up in our church window! If we do, I’ll send a picture :))
Patricia (@CichLee)
December 1, 2011
Yummy and bright!
Michelle Cummings
December 1, 2011
I just love this idea! Even for a birthday party!
Lissa (Bellenza)
December 2, 2011
Kids would absolutely love this! Thanks for the great tutorial. 🙂
Annie
December 2, 2011
This is adorable! 🙂 LOVE IT!
Stephanie
December 2, 2011
This is amazing!
It seems a little expensive considering number of boxes and strands of lights you’ll have to use, but I’d say it’s definitely worth it in this case 🙂
Teresa
December 2, 2011
Great idea! I wish I had the materials to do this, but maybe next year.
Possibly dumb question- I have trouble navigating this site. There doesn’t seem to be a way to go to the “next” or “previous” post. Am I missing something?! Help!
Molly @thewaffler
December 2, 2011
One word: cool!
Lana
December 2, 2011
What a fun and whimsical idea ~ love it! 🙂
Stephanie
December 2, 2011
Love these. I have seen these before in decorations, and now I know how they are made. Thanks for the tutorial.
shutterbug
December 2, 2011
What a sweet idea! I love it! I would love to see more photos of how the rest of your house is decorated!
Lot
December 2, 2011
How you come up with these is beyond me. So clever!
Jules
December 2, 2011
Love this! I’d definitely use LED lights and in my neck of the woods, plastic deli containers.
Irene
December 2, 2011
Genius!
Pear Tree Greetings
December 2, 2011
Wow! These a such a cute idea! Oh what fun 🙂 -Dani
Lindsay
December 2, 2011
This is so fantastic! I’ve always wanted my house to look like a real life gingerbread house =]
Martha
December 3, 2011
amazeballs!
Teresia
December 4, 2011
Love it! Love it! LOVE IT!!!