


With the holiday season comes festivities. My mom always told me…never show up to a holiday shindig without a tiny thank you for your host or hostess. So, I have been thinking and I dreamed this little diy up. Seriously, I had a dream and in it I was creating this diy. Painting, photographing, wrapping…I know it sounds corny, but it went a little something like this…


Materials Needed: wood flatware , glitter paint (I used Martha Stewart Crafts Antique Silver-The secret to this whole project is the glitter paint. Unlike regular glitter the glitter paint doesn’t get glitter everywhere and when dry the glitter doesn’t come off on your fingers! Really!!), and a paint brush. To wrap these lovelies for gifting: wood berry box, 2 sheets of parchment paper, wire twine and pinking shears.
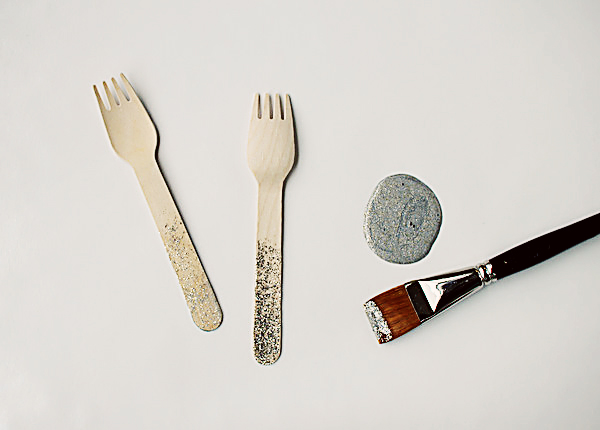

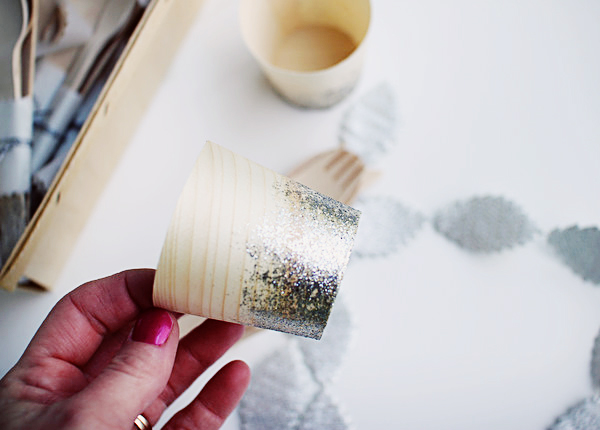
Use a sheet of wax paper or freezer paper to cover your table before you paint. Start with one layer of paint on the bottom of the handle. Let dry for 10-15 mins and add another layer. Repeat until you have 3 or 4 layers, depending on the amount of coverage you would like. I painted both sides of the flatware. I let each side dry overnight before I started wrapping them. I also used wood cups, so I could give a matching set for a party throwing pal.
I wanted something simple to wrap them in that could easily be reused by the recipient. These wood berry baskets were perfect and can double as storage for these glittered babies until they get used. For the filler, take one sheet of parchment paper and fold it into fourths lightly, don’t press your creases. Cut 1/2 inch strips with pinking shears. I used a full sheet to fill the basket. Sort the cutlery by placesetting. Cut four 1″ wide strips of the second sheet of parchment paper. Cut each strip in half and wrap each placesetting. Tie with ribbon or wire.


Place the wrapped sets in the filled berry box. Cut a four inch wide strip of parchment paper and wrap the berry basket. Tie with decorative ribbon, I got the silver leaf garland ribbon here. Make a bunch all at the same time (save on dry time) and give as gifts to your next dinner party or just give them to sparkle loving friends. It’s guaranteed to brighten that next batch of leftovers they have to bring to work.


Josie
November 17, 2011
Made these myself for an upcoming project I’m involved in. So much fun but the glitter gets everywhere!
Josie, this project is so great because Jenny used glitter paint. When dry, the glitter doesn’t come off! Totally genius!
Emily
November 17, 2011
LOVE this idea, Jenny! It’s so festive, pretty, and practical = perfect for the holidays!
Another, more mature, Kelley
November 17, 2011
Hey Kelley,
Didn’t your mother ever teach you that if you don’t have anything nice to say, not to say anything at all?
I happen to think this is an adorably sweet (like all of the other ideas featured on Oh Happy Day) idea.
-Another Kelley
Cecilia
November 17, 2011
I do liked it!
ashley
November 17, 2011
i have never seen a bad idea on oh happy day!! have been reading this blog for years and years! thank you.
Kirsteen
November 17, 2011
Wow I love this idea! I’m going to do this for my family this year. Fab x
Molly @thewaffler
November 17, 2011
So fun! The kids will love this.
@3samovar
November 17, 2011
so pretty!
veronica
November 17, 2011
what a great idea!
kiss
veronica
Rachael
November 17, 2011
this has definitely inspired me in the way of glitter-gluing ERRYTHANG. thanks dude!
rhiannon
November 17, 2011
love this! what a great idea.
http://www.modernsuburbanites.blogspot.com
Laure
November 17, 2011
Oh Happy Day is one of my favorite sites to visit for creative, lovely projects and ideas . Perhaps the glitter doesn’t photograph well, because these look more like a grade school project instead of a hostess gift. Dipping the ends in silver paint and then adding the glitter on top would maybe give it a more finished look. Glitter paint is a great tip and gives me hope of using glitter again with out the lingering mess.
Emily @ Little Bits of Delight
November 17, 2011
This is fantastic! I could see these tucked into a fancy picnic basket with bubbly and the like… The little basket and the cups charm the pants off of me! (not literally, of course.) ♥
Garnish
November 17, 2011
Brilliant!! You did Garnish proud girl. Glitter paint…that doesn’t rub off?! Double brilliant!!
Garnish + Enjoy,
– Suzanne
Elexia
November 17, 2011
I absolutely LOVE this idea. I purchased a set of 100 of these utensils and wasn’t sure what to do with them. Now I know! Thanks for sharing!!!
rachel!
November 17, 2011
you are brilliant!
Jessica Meyer
November 17, 2011
Are we sure these are food-safe?
Brittany
November 17, 2011
so cute! and i love the idea of glitter paint instead of pouring glitter all over. will definitely make these!
Anabelle
November 18, 2011
Hello Jordan,
Just found your blog via French Cannes Cannes. Ah! This lovely blog of your just brightened my day! Happiness the way I like it 🙂 I’ll have to come back later to see what other great ideas and pics you have there…
I am a French girl, Parisian on top of that, and sharing my life with my American darling, and our baby boy, my 10-year-old daughter and his three children. Wow, yes, I know.
Come visit if you have a minute 🙂
Have a lovely day!
Anabelle
pregnancyjoyandotherthings.blogspot.com
Courtney
November 18, 2011
gosh, you always post the most fun DIY’s!! this one i would love to try for the “fancy dinner party” i have with my friends every holiday season. i didn’t even know wooden flatware existed and now i am going to be on the hunt!
lyndsey @ the stationery place
November 18, 2011
i LOVE this project! what a fun idea — i’m always in need of good hostess gifts, and this one is perfectly unique & classy. great job jenny!!
Sue
November 18, 2011
Where did you get those adorable wood cups??
Hannah @ Sparrow + Spark!
November 19, 2011
This is a great idea. Sparkle is always fabulous!
Betty
November 20, 2011
Love your blog- love this idea- am very inspired to have a glittery party of my own :).
Fox and Beau
November 21, 2011
Such as great idea! Thanx for the share!
jordan
November 22, 2011
Hey All,
I almost never get unkind comments on my blog and in the rare case I do I always delete it. Jenny worked hard on this project and I personally think its clever. No need to be negative. If you don’t like it consider it your personal opinion and move on.
On the other hand if you want to be constructive with a suggestion, those comments are always welcome. Pure criticism is not helpful or welcome here.
Mikki Sage
November 22, 2011
Hi there! Love you blog and this post… so I reposted on my blog just know.
http://www.thesagepress.wordpress.com