


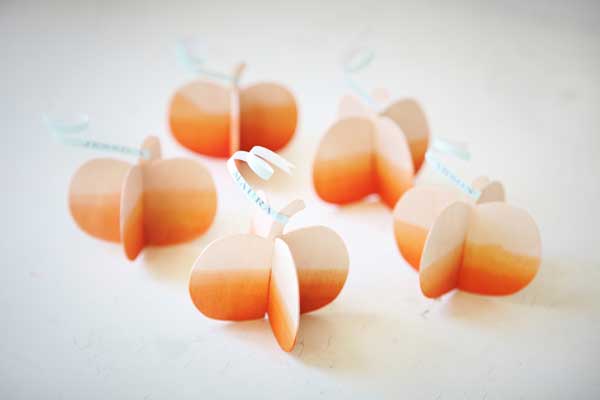
Fall is here! So many people skip the fall fun and jump into the Christmas season. But Fall is one of my favorite times of year and I love to savor it. To make guests feel right at home at your fall party how about making custom place card holders that double as a take home gifts? These little pumpkins are quick and easy to make and your can really experiment with the DIY process to make these all yours. You can even upsize the design to make a great centerpiece!


Supplies: thin craft wood, RIT dye, scissors, colored paper, pen, paper glue, sand paper
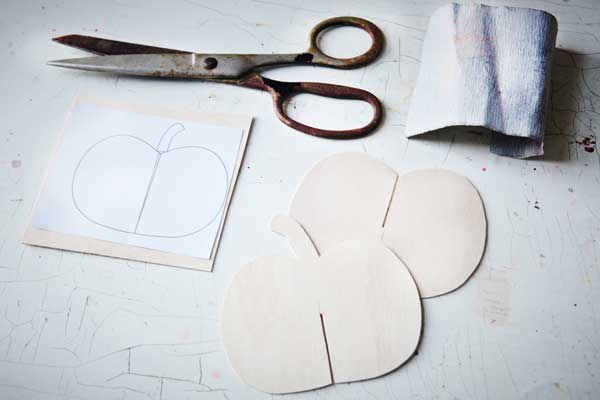
Step 1. Draw pumpkin shapes onto paper. Cut out using scissors and use sandpaper to clean edges.
Step 2. Draw lines onto the center of each pumpkin piece. Draw from the bottom on the stemmed piece and from the top on the unstemmed piece. Then cut a thin slit the same thickness as your wood.
Step 3. Slip your pumpkins parts into one another and dip dye each pumpkin using a RIT dye bath. To achieve a gradual fad hold your pumpkins at several levels in the bath starting with a short dunk half way up your pumpkin then longer towards the bottom.
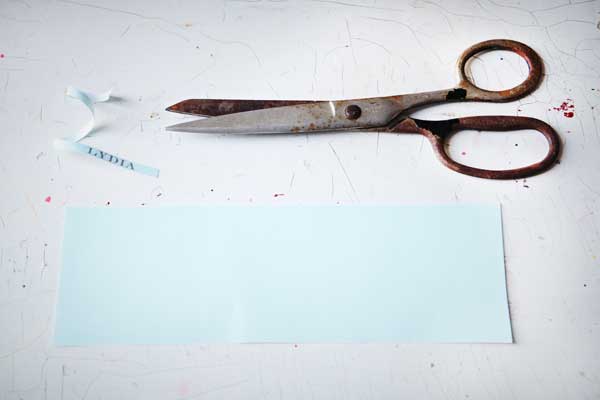
4. Type or scribe the names of your guests on paper and cut 1/8″ strips. To curl paper lightly pinch between two fingers and quickly pull. Cut a “v” shape at the end of your curl and then glue onto your pumpkin stem. –Happy Fall!


Katie
November 14, 2011
god this is so cute. what an adorable idea
RebeccA
November 14, 2011
oooo, how pretty! I may just try this out! thank you!
Christine
November 14, 2011
Love these…cute & chic.
Lexy @ The Proper Pinwheel
November 14, 2011
Oh boy! These are super adorable. I can’t wait to try my hand at some of these.
Marie
November 14, 2011
Really cute idea, but omg if you cut yourself on those scissors you are going to get tetanus!
Anya
November 14, 2011
What a cute idea! Saved it for the next year’s Fall holidays.
katie [the bright life]
November 14, 2011
These are adorable! So bright and festive…I love! Xo, Katie
Andrea @ Strawberry-Chic
November 14, 2011
SO cute! thanks for the tutorial!
Melanie
November 14, 2011
Cute!
Quick question: where do you buy those thin sheets of craft wood?
Sarah @ Designsgood
November 14, 2011
very cool!
joanie boyce
November 14, 2011
I think they are cute and I am doing them in a orange foil.
brynn
November 14, 2011
These are perfect for Thanksgiving! If only Canadian Thanksgiving wasn’t already over. Thanks for all of the great tips.
modernhaus
November 14, 2011
More uses for all those packs of balsa wood I have! Sweet!
Hannah @ Sparrow + Spark!
November 15, 2011
This is really sweet! If only we had Thanksgiving in the UK!
fàtima -flowers by BORNAY-
November 15, 2011
what a lovely old scissors!!!!!
leen
November 15, 2011
Hi, you have the most amazing blog i’ve seen in ages!! I’ll be back 🙂
Kate
November 16, 2011
Such a lovely project, with such lovely images, done by such a lovely lady! 🙂
Kayleigh
November 17, 2011
How CUTE! I think I need to make these for our Thanksgiving place settings!
Rachelle | TinkerLab
November 22, 2011
I love this project! Now if only I can just find time to make these between diaper changes, grocery shopping, and kid wrangling. I may not be able to pull it off with the wood this year, but I bet stiff paper would be a decent alternative.